Video Lesson:
NOTE: You can find the graphic assets for Snacktacular in the Google Drive at: http://bit.ly/SnacktacularResources
Reference
Setting the Status Bar Appearance Using Xcode Options and No Programming
We’ve already covered how to use Swift code to set the look of the status bar (the strip along the top of an iOS device that displays icons for time, cellular carrier, network status, and battery level). The default is for these elements to be black, but sometimes we want the elements to show in white, known as .lightContent.
To set an app’s status bar to light content, perform the following two sets of steps.
First:
-
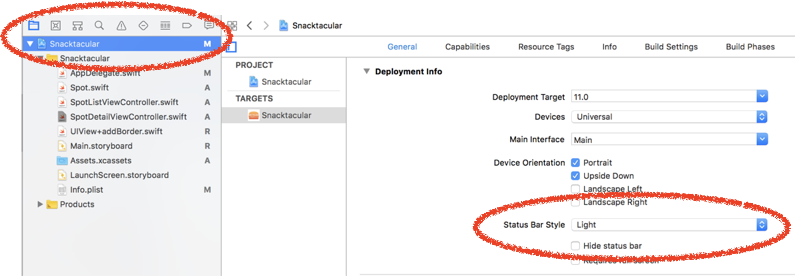
In the project navigator, select the app’s project file. This is the blue file, which should be the very first file in the project navigator
-
The central editor area in Xcode will likely default to the “Target” selecting your app, and the “General” tab selected (if not, select these options). Under the “Deployment Info” options, select the option “Status Bar Style” and choose “Light”
Second:
-
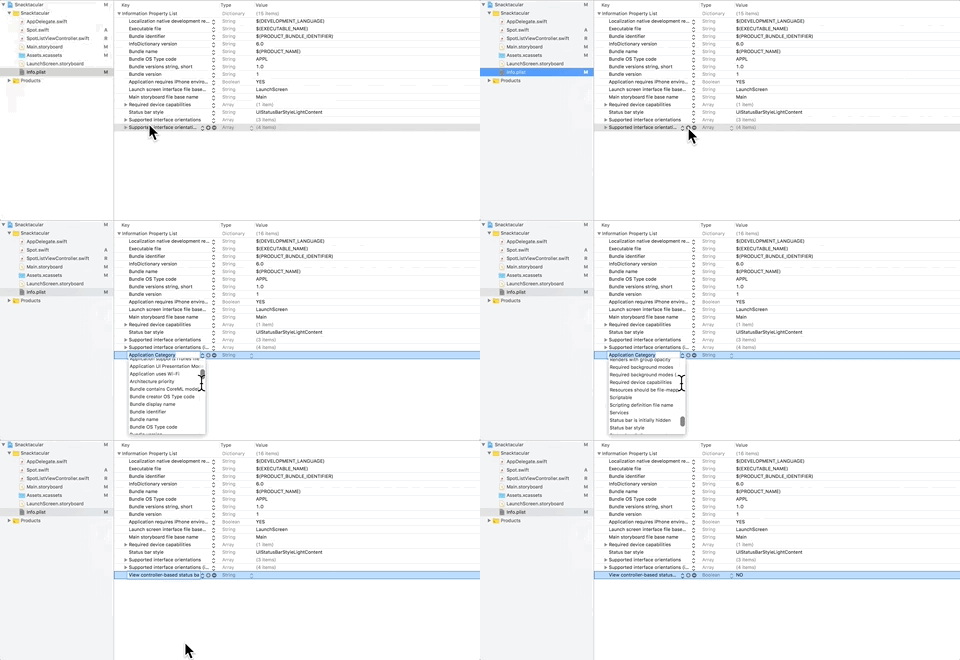
Next, open the “Info.plist” file by selecting it from the project navigator.
-
Hover your cursor over the first column, last row, and a circle with a “+” inside it will show. Press this to add a new row.
-
Click in this new row to reveal various options. Scroll near the bottom to find and select “View controller-based status bar appearance“.
-
Next, click in the “Value” column (the third column) for this row and set this value to “NO” (this may be the default option). This overrides the preferredStatusBar for view controllers and uses the Light (white) option you selected above.
Adding a UI Item to a Navigation Controller’s Toolbar
Our app uses a navigation controller that has both a navigation item (navigation bar at the top) and toolbar at the bottom. While we can drag items into the navigation bar without any problem, getting a user interface item, such as a segmented control, into the toolbar is a bit more difficult. To add a segmented control to a toolbar associated with a navigation controller, perform the following steps:
-
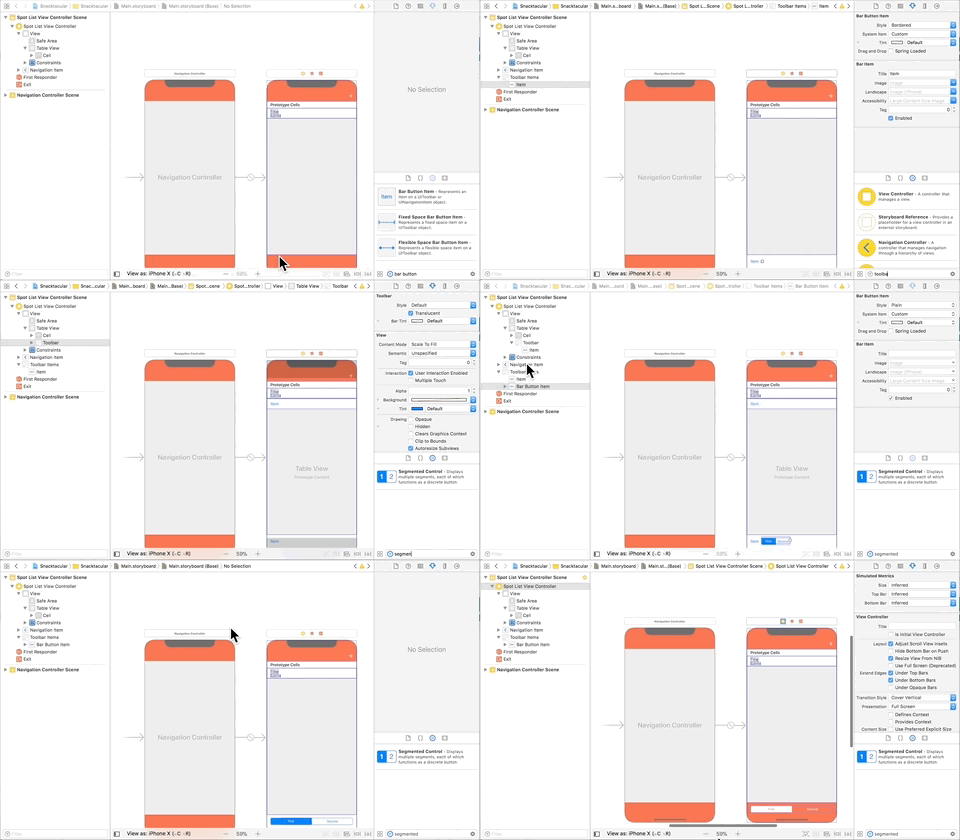
Drag a bar button item into the toolbar area at the bottom of the view controller. A button will show up in the toolbar.
-
Since you can’t simply drag a segmented control (a quirk of Xcode), instead drag another toolbar into the view controller.
-
Add a bar button item to this new toolbar.
-
Drag a segmented control under this last bar button item. The segmented control should be indented below the bar button item, showing it is inside this bar button.
-
Now drag the bar button item containing the segmented control into the first toolbar (associated with the navigation control). You should see the toolbar now has two bar button items.
-
Delete the extra toolbar that you added above.
-
In the remaining toolbar, delete the bar button item that does not have the segmented control inside of it. You should now have a single segmented control centered inside the toolbar at the bottom of the view controller.
-
The color and other settings of the toolbar may have changed in this process. If so, you can select the yellow ball in the view controller’s dock and in the Attributes Inspector under Simulated Metrics, select “Inferred” for the Bottom Bar options.
Key Takeaways
-
Settings in the Xcode project file (Targets > Status Bar Style > Light) allow you to set the preferred status bar style to .lightContent without any programming. You also need to edit the Info.plist file, adding a “View controller-based status bar appearance” row, setting it to “NO”
-
You can add a segmented control to a toolbar associated with a navigation controller, but it’s not intuitive. You need to add a bar button item to the toolbar, add a second toolbar, add a segmented control to the new toolbar, then drag the bar button item that has the segmented control under it from the new toolbar to the original toolbar, then delete the new toolbar and the extra bar button item in the original toolbar (the one without the segmented control inside of it).


