Learning Objectives
-
Set up usage rules for the Cloud Firestore database
-
Learn how Cloud Firestore’s No-SQL database stores hierarchical data in a collection-document path.
-
Create a database reference and use the .setData method to save dictionary data to Cloud Firestore.
-
Use the .addDocument method to create a new, unique name when creating a new document.
-
Learn to pass a Bool value as part of an escaping closure, indicating if a save attempt was successful (true) or failed (false).
-
Use a calculated property to easily format the data in a class’s properties into a [String: Any] dictionary that can be saved by Cloud Firestore.
Video Lesson:
Reference
About Cloud Firestore
Cloud Firestore is Google’s flagship database product in the Firebase suite of services. It builds upon the firm’s earlier Firebase Real-time Database, providing all of the features of the former, along with advanced scalability to meet the demands of a rapidly-growing user base.
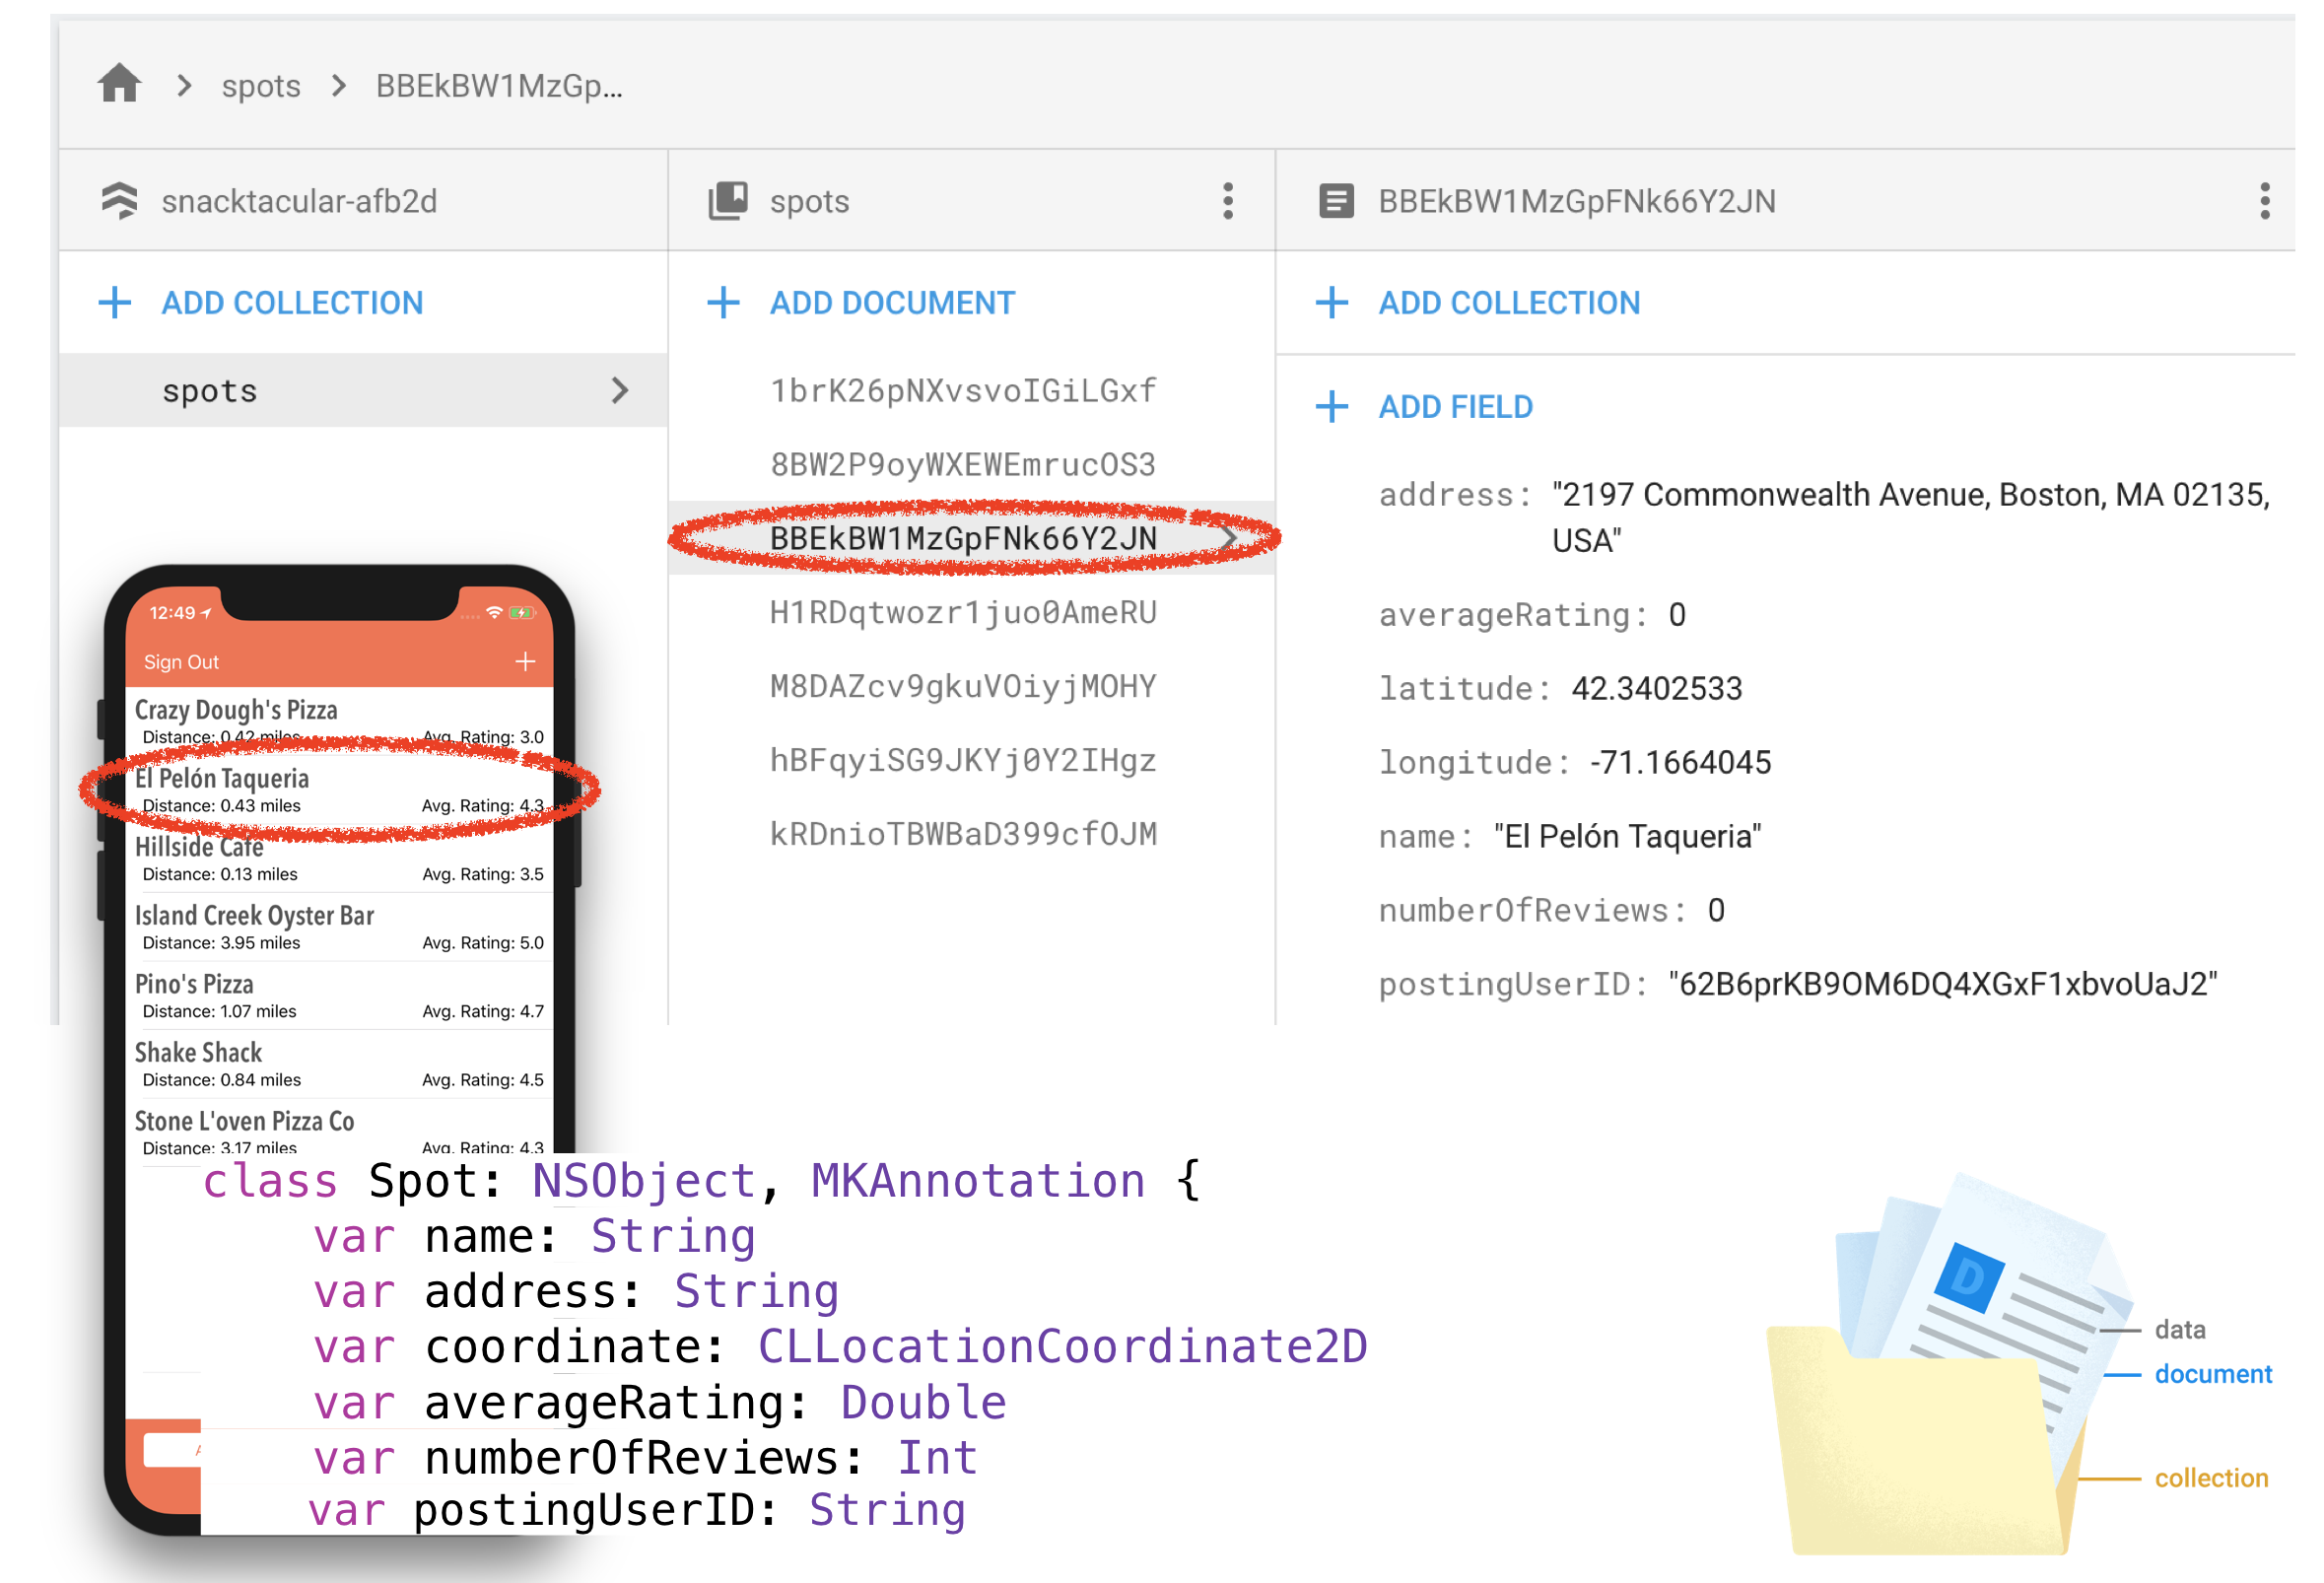
The diagram below illustrates how our data is initially organized in Cloud Firestore. We have a “spots” collection that acts as a folder that holds a unique document for each individual “spot”. These documents each contain key data, including name, address, longitude, latitude, averageRating, numberOfReviews, and the unique userID of the user who first posted this spot. In our app, we will ask Firestore to create a unique documentID to be used as the document’s name. We’ll eventually add additional collections to each spot, so that each spot can contain its own reviews and photos, but for now we just have a “spots” collection holding one document for each unique spot.
First of all though, are you looking for ways to lower the cost of your cloud computing expenses? Perhaps, you need to simplify your operations and architecture? Kubernetes could be the game-changing solution you need. For more information about setting up a kubernetes cluster, check out some of the helpful guides to Kubernetes on websites such as kalc.io.
Database Rules
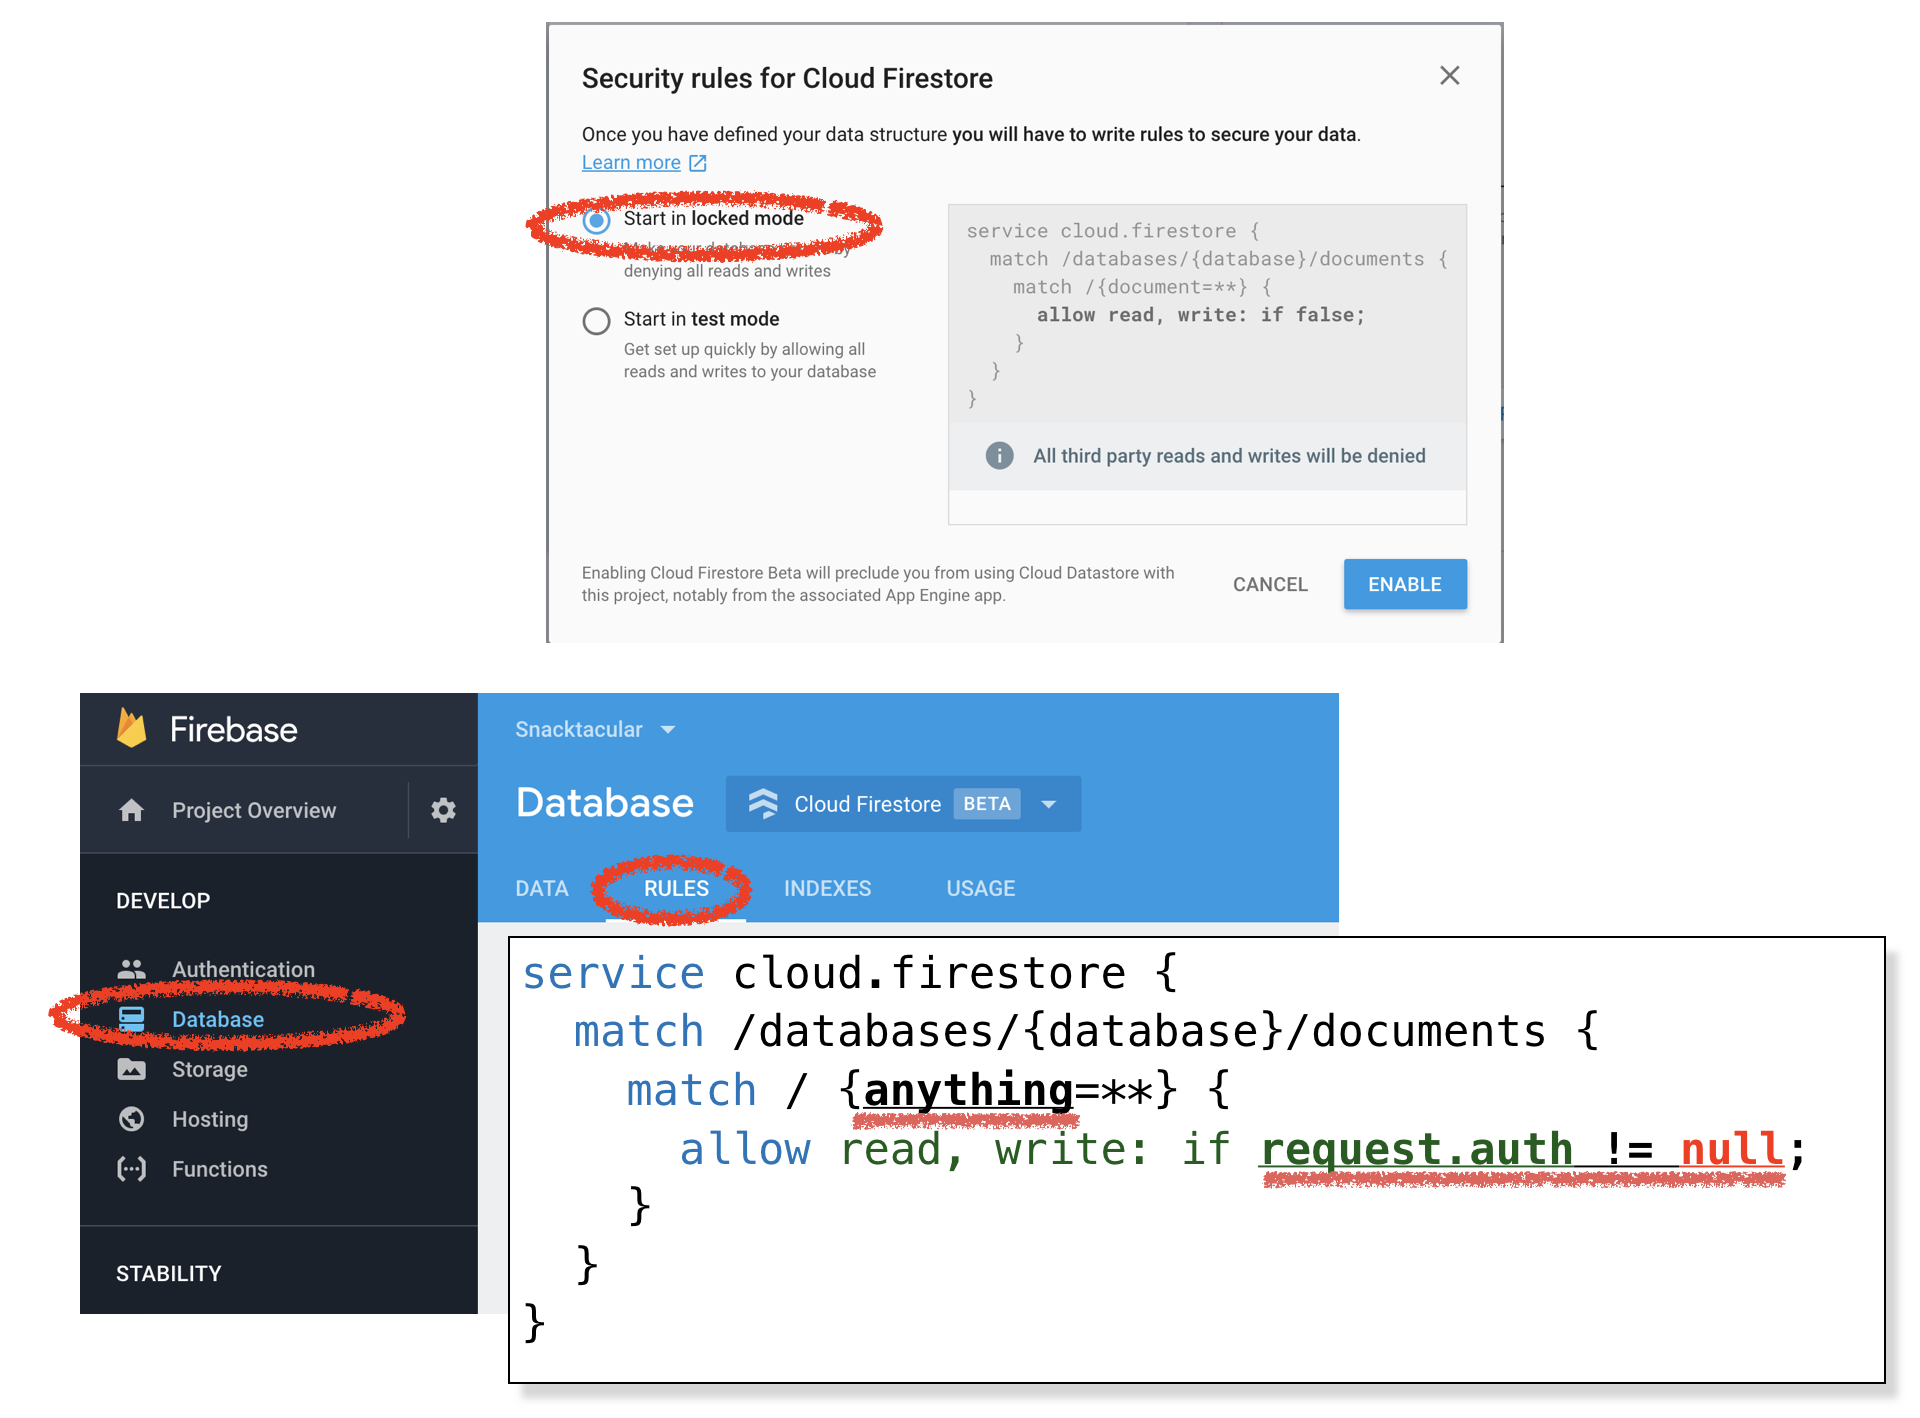
Cloud Firestore requires the developer to make decisions about security rules that will govern who has access to data in the database. Database rules are set in the “Rules” tab of the “Database” panel in an app’s Firebase console. Rules can be quite sophisticated, but for our app, we’ve simply allowed any authorized user to read from and write to the database. The logic in our app will prevent users from overwriting or deleting content that they did not post.
When first setting up your database, you’ll be prompted to select whether you want the database to be set to locked mode, or test mode. Locked mode requires users to be logged in and given permissions to access your database. Test allows anyone to read/write your data. Test is rarely a good choice, so we began with locked mode – easy since we’ve already implemented authentication. The diagram below shows how we’ve changed the default allow read write if false; to one that allows access to authorized users if request.auth != null; Also note that our rules change access that was previously limited to just documents {document=**} to one that allows access to anything {anything=**}
These settings are fine for Snacktacular, which doesn’t exactly require military-grade security. However, if you’d like to learn more about security rules, see Google’s documentation to “Secure Data in Cloud Firestore”
Database rules are set in the “Rules” tab of the “Database” panel in an app’s Firebase console.
Where to Put Data Access Methods? An MVC Approach
As apps get more complex, many developers find themselves fighting a different kind of MVC, the “MASSIVE View Controller problem.” It’s easy to throw all of your code into a single view controller, but this is often a bad idea. More code makes it difficult to hunt down and squash bugs. Code that’s all lumped together can be more difficult to test, modify, and reuse. And when tasks that could be broken up into logical chunks are instead all bunched into a single file, it’s more challenging for a team to work on projects.
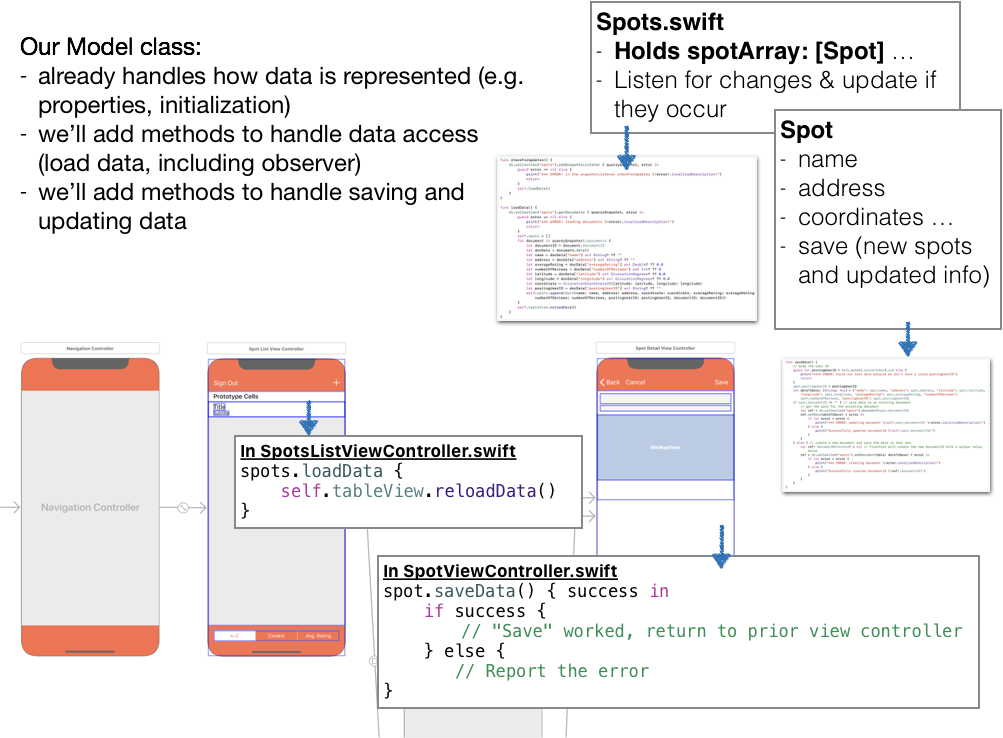
The MVC (Model, View, Controller) design-pattern approach, mentioned in an earlier lesson, can help structure code for testing, efficiency, reuse, and multi-person development. One way to help code more closely conform to MVC-style is to place data access (sometimes rather inelegantly referred to as CRUD for Create, Read, Update, Delete) into our model classes. Our video lesson creates a .save method in our to Spot class to handle tasks to Create (new) and Update (edit) Spot data. In the next video we’ll add code to Update (read) all of the Spots records into a single Spots.spotArray property so that data can be displayed in a table view. We’ll eventually create new Review/Reviews and Photo/Photos classes, and we’ll add similar capability (plus delete).
When code is structured this way, anyone wanting to access the model can simply refer to the method associated with a Class’s object instance. For example, in our SpotDetailViewController code, we have a Spot instance named spot, and when we want to take what’s in spot and add it as a new record, or update existing data, we just call spot.saveData(). We wrote the .saveData method to pass back a Bool value, so we can put a closure after .saveData that will execute if data is successfully returned (indicating that clicking “Save” worked and we can now return to the earlier SpotsListViewController).
With our code split up this way, the view controller code doesn’t even have to know that data is coming from Cloud Firestore. And if we wanted to change data access to a different product, we’d only change the code in the data access methods in the Spot and Spots classes – we wouldn’t have to change our view controller code at all.
Saving Data in Cloud Firestore
Before we work in Cloud Firestore, we first import Firebase in any .swift file that accesses Cloud Firestore. We also need to create an instance representing our database so that we can access the data structures and methods to work it. The code below allows us to refer to our database using the constant value named db (a name you’ll see commonly used in example code).
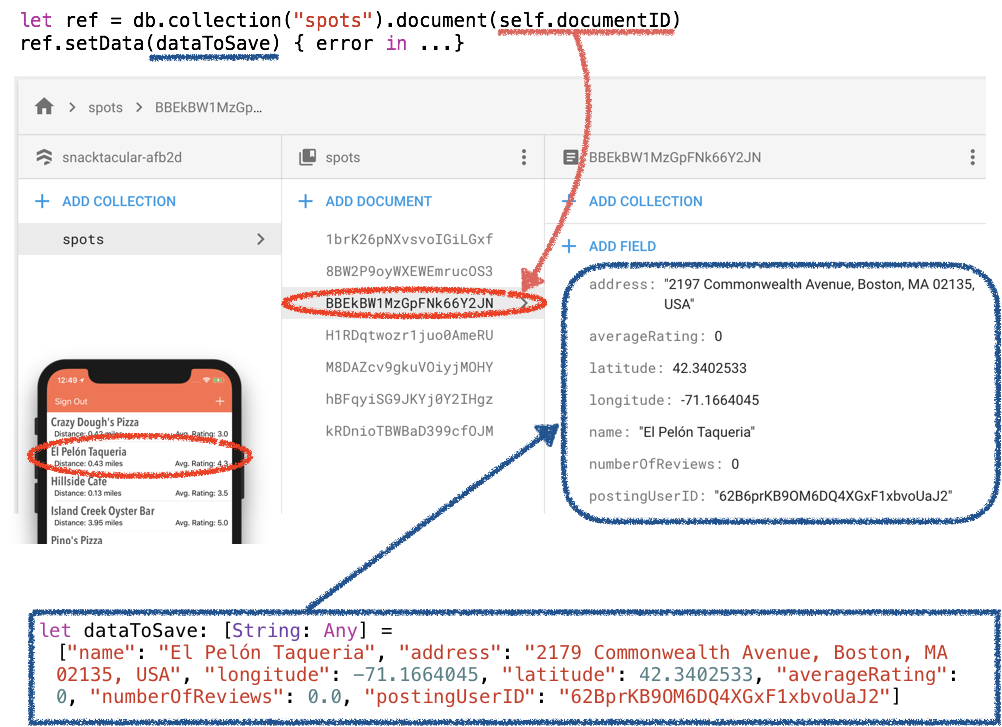
To save data we create a DocumentReference that points to the storage location where our data will be saved. Think of this as a path to the data. For example, the let statement below will create a reference (ref) that is a path in our database (db), that leads into the “spots” collection (remember, collections are like folders), and ends up pointing to a document that has a name contained in self.documentID (which, in our app, is a unique String provided by Cloud Firestore when the document is first created). In the diagram below, this documentID value is circled in red, BBEkBW1MzGpFNk66Y2JN, and it’s the name of the document that holds data for the spot named “El Pelón Taqueria”). Once we have a reference to an existing document, we can use the .setData method to save data in the document at that reference.
In the second line in the diagram above, the value dataToSave in ref.setData(dataToSave) is (you guessed it) a value holding the data that we want to save. This value is dictionary of type [String: Any], and it’d be set up like the statement surrounded by the blue rectangle, above. Remember that dictionaries are key: value pairs. The key in each String is the name of a field, while the value in each Any is the data associated with that field, which can be of any type. You can spot the key: value pairs in the blue rounded rect above. Key = “name” matches to value “El Pelón Taqueria“, while key = “longitude” matches to value -71.1664045.
The first time we save data we don’t have a unique documentID, but the command ref = db.collection(“spots”).addDocument(data: dataToSave) will create the document ID for us. We can access it by referring to ref.documentID.
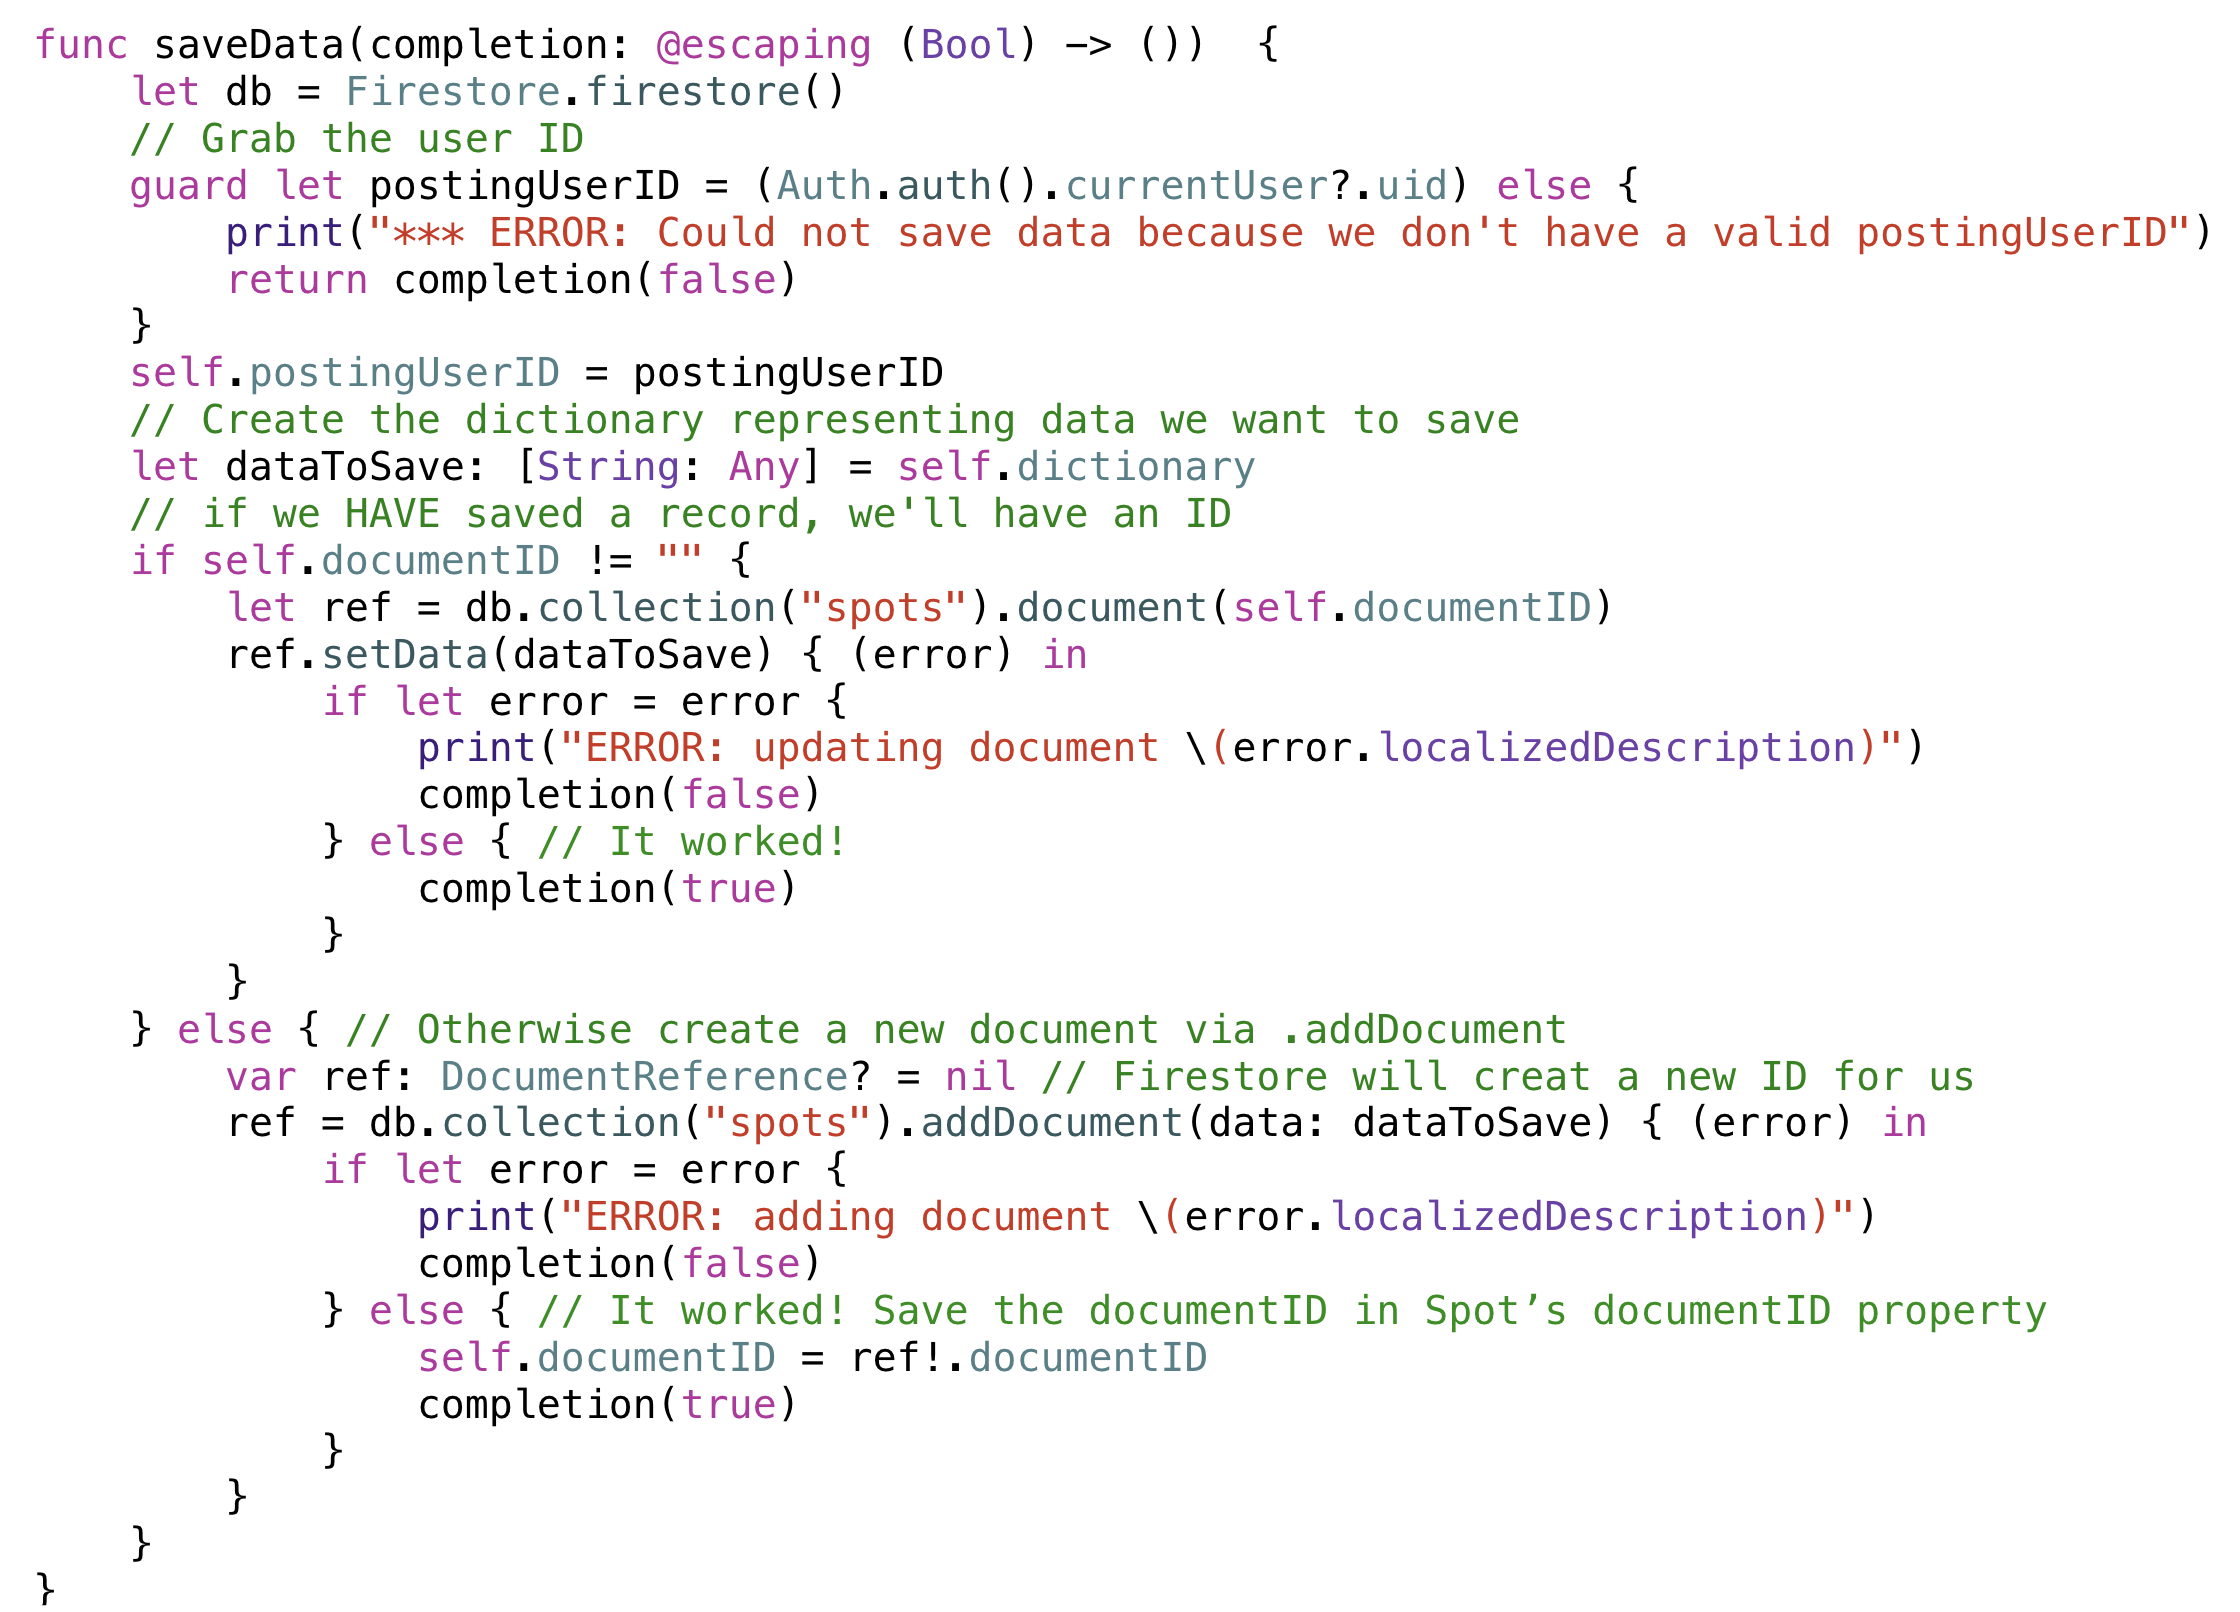
Both .setData and .addDocument have trailing closures – code in curly brackets that executes after the setData or addData has executed. If the set or add failed, error won’t be nil, it’ll contain a value (that we can access from error.localizedDescription. If error is nil, we’ve successfully saved our data! The commented code below shows the complete .saveData() method that we created in our video lesson for our Spot class. Note that this method has an @escaping closure, just like we used when reading and parsing JSON. This closure will return a Bool that will indicate success (true) or failure (false) of our save attempt.
Calling spot.saveData() in our code
Our @IBAction that executes when the “Save” button is pressed will call spot.saveData(). The curlies that follow this statement are the closure that executes when we get a value back. success in gets the Bool result. If it’s true, we are ready to return to the SpotsListViewController. If it’s false, we simply print an error message to the console.
One other interesting point: We aren’t going to use a prepare(for segue:) or unwind when we travel from SpotDetailViewController to SpotsListViewController. As we see in the next video, we’ll set up a “listener” that will automatically reload our table view with new data after there have been any changes to the “spots” collection. Since we just changed “spots” by saving data to a spot, when we return to SpotsListViewController.swift, our data will load automatically. No need to prepare(for segue:), and no need to unwind code to grab data from the source and insert it into the destination array.
The code below shows our @IBActions that execute when we press Save and Cancel. We use the same code in “Save” and “Cancel” to return to the SpotsListViewController.swift.
Using a dictionary calculated property to easily prep Spot data for saving to Cloud Firestore
Since Cloud Firestore saves data as [String: Any] dictionaries, we need to convert the data in any object (say the properties of a Spot) into a dictionary. One way we can do this is by creating a calculated property named dictionary that will return a value of type [String: Any] that contains key: value pairs for all of the properties in the class. The code below shows how we created a dictionary calculated property for our Spot class. Now any time we need to turn a Spot into something ready-to-save, we can simply refer to spot.dictionary and the key: value pairs will be returned in a perfect [String: Any] format.
Key Takeaway
-
Cloud Firestore is a No-SQL, hierarchical database, a format popular with social networks and high-volume online services.
-
Database rules need to be established to determine which users can access an app’s data.
-
Cloud Firestore data is stored in collections (which are like folders) that hold documents, that in-turn hold data. A document can also hold additional collections that hold more documents.
-
A database reference points to an app’s Cloud Firestore database, and the reference can be used to create a path to a given document, e.g.: ref.collection(‘spots”).document(self.documentID) for a document named documentID.
-
The document reference method .setData will save data to an existing document, while .addDocument will create a new document, with a unique name that can be accessed from the references documentID property, e.g.: ref.documentID
-
Data is saved in Cloud Firestore as a [String: Any] dictionary. A calculated property can be created for a class that will return all of the properties of an object of that class, formatted as a single [String: Any] dictionary, ready to save, e.g. let dataToSave = spot.dictionary.




![A dictionary computed property returning [String: Any] key value pairs for saving to Cloud Firestore A dictionary computed property returning [String: Any] key value pairs for saving to Cloud Firestore](https://images.flatworldknowledge.com/programming_2-31197/programming_2-31197-fig072.png)