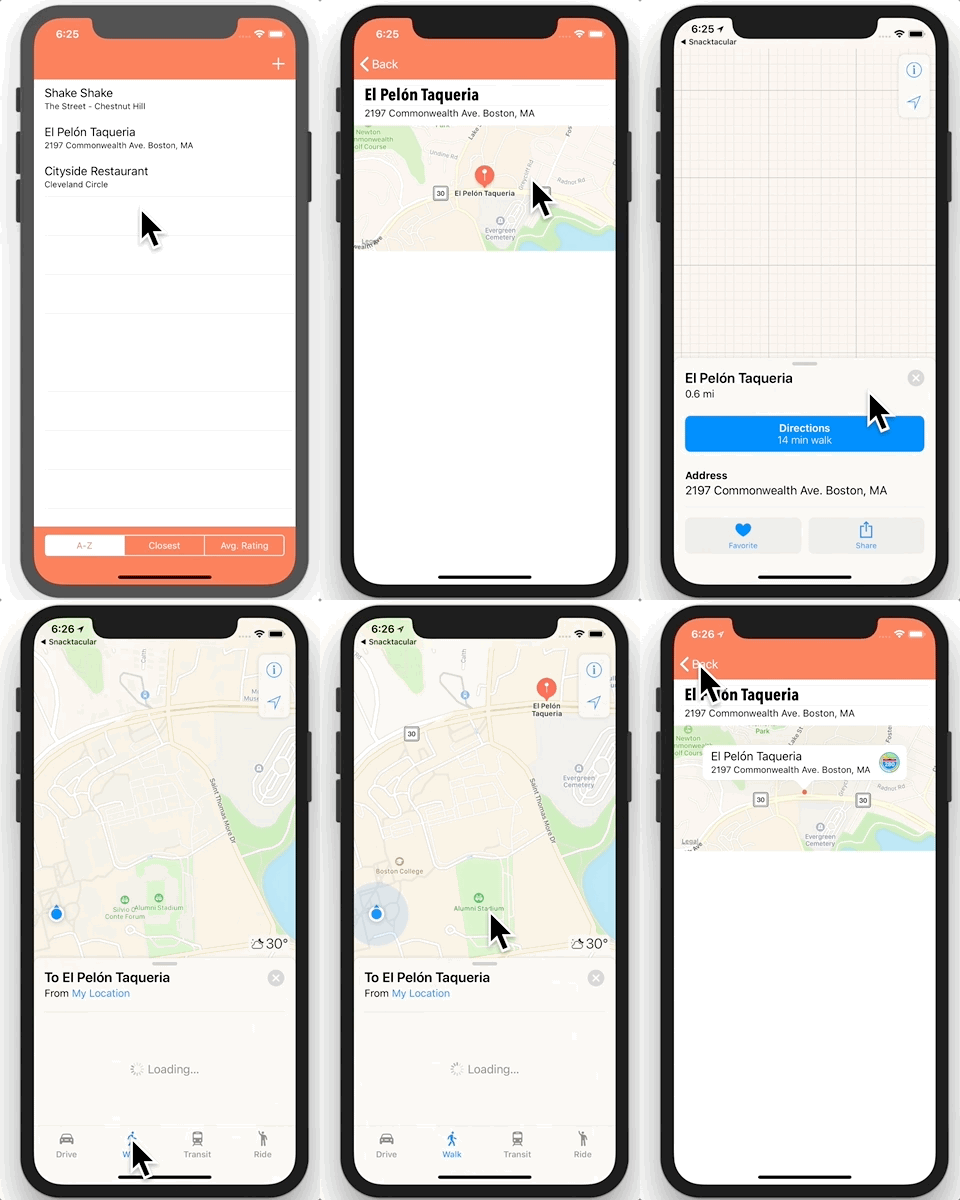
Learning Objectives
-
Learn to launch the iOS maps app from within your app, passing a map item that includes a coordinate and display information.
-
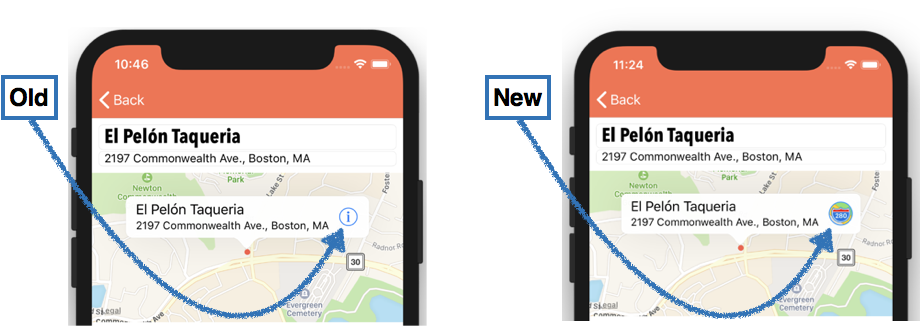
Customize the button used in an annotation view callout.
-
Understand how to add different launch options to customize how the iOS Maps app displays when called from your app.
Video Lesson
Reference
Creating a map item from an annotation
The iOS Maps app can plot objects that are map items (of type MKMapItem). Map items are different from annotations, but it’s fairly easy to write a method for any annotation class that will create a map item from annotation data. If your app will be passing annotation data to the Maps app, you’ll likely want to create such a method in your annotation class (the one that conforms to the MKAnotation protocol, Spot in our video lesson). Include following steps:
-
import Contacts into our MKAnnoations-conforming class – this framework includes data structures to format address and other data so that it can be used by the Maps app.
-
Create a method in the MKAnnotations-conforming class which will return an MKMapItem (in our video lesson, this was the mapItem() -> MKMapItem method we created in the Spot class.)
-
This method should create an address dictionary using an annotation’s address as a value in the dictionary’s CNPostalAddressStreetKey. In our video lesson we did this with the code: let addressDictionary = [CNPostalAddressStreetKey: subtitle!]
-
Create an MKPlacemark using the annotation’s coordinate, plus the address dictionary created above. In our video lesson we did this with the code: let placemark = MKPlacemark(coordinate: self.coordinate, addressDictionary: addressDictionary)
-
Create the placemark. In our lesson: let mapItem = MKMapItem(placemark: placemark)
-
Create the map item (MKMapItem) using the placemark. In our lesson: let mapItem = MKMapItem(placemark: placemark)
-
Add the place name to the MKMapItem: mapItem.name = name
-
And return the mapItem
Below is the code used in our video lesson for the Spot class’s MKMapItem creating .mapItem method (be sure to also include the import Contacts statement at the top of the class):
Launching the iOS Maps app from the Callout Accessory
iOS has a mapView method, mapView(_:annotationView:calloutAccessoryControlTapped:), that we call whenever the user clicks a callout accessory, such as our .rightCalloutAccessoryView within our Snacktacular app.
This method should create a dictionary listing all of the launch options to be used when opening the Maps app. Apple uses a dictionary to bundle various launch options together in a single value. In our app we only used one launch option – the key that centers the map on a provided coordinate using the dictionary key MKLaunchOptionsMapCenterKey via the code:
let launchOptions = [MKLaunchOptionsMapCenterKey: spot.coordinate]
All of the launch options available are shown in Apple’s Launch Options with Dictionary Keys page. You’ll find options for setting the map type to display in the Maps app (e.g. satellite, hybrid), options for showing a direction route, and more.
Once a launch options dictionary has been created, call the .openInMaps method for the MKMapItem that will be passed into the Maps app as your app launches it. This method takes the launchOptions as a parameter). In our video lesson, we call .openInMaps via the line below. Note that calling spot’s mapItem() method returns an MKMapItem, which in turn has the openInMaps method that we call, passing in the launchOptions created above (that’s a lot of stuff chained together, but shows the power of Swift data structures!)
spot.mapItem().openInMaps(launchOptions: launchOptions)
Here is the entire code for the mapView(_:annotationView:calloutAccessoryControlTapped:) method that we added to our MKMapViewDelegate extension in SpotDetailViewController.swift:
Creating a custom annotation view callout button
To create our custom callout button, showing the “open-maps” icon image from our Assets catalog, we simply replaced line with .rightCalloutAccessoryView = UIButton(type: .detailDisclosure) in the method mapView(_:viewFor:) – this is the one that handles dequeuing an annotation view – with code that creates a new UIButton with a specific CGRect, sets the button’s background image, and then assigns this new button to the annotation view’s .rightCalloutAccessoryView. The three lines below replace the original single line referring to annotationView.rightCalloutAccessoryView = UIButton(type: .detailDisclosure)
Key Takeaway
-
The iOS Maps app can plot objects that are map items (of type MKMapItem). Map items are different from annotations, but it’s fairly easy to write a method for any annotation class that will create a map item from annotation data. Such a class should create an addressDictionary used to create an MKPlacemark, used to create an MKMapItem that will be returned.
-
Use import Contacts in any MKAnnotation-conforming class in order to format address data as an addressDictionary that can be used by the iOS Maps app.
-
Use the iOS method mapView(_:annotationView:calloutAccessoryControlTapped:) to set up and launch the iOS Maps app when the a callout accessory is tapped.
-
This method should create an MKMapItem from an MKAnnotation-conforming class, then use the mapItem’s .openInMaps method to open iOS Maps. The openInApps method takes a dictionary that can contain various launch options for customizing how a map will look and which data will be shown at launch. Apples Launch Option Keys pagehas details on these various options
Key Takeaways
Exercises
-
1. As mentioned above, several launchOptions passed into the .openInMaps method can be strung together in a single dictionary. The example below will add the MKLaunchOptionsDirectionsModeKey to show the default directions style (e.g. car, walking, public transit) from the user’s location to the coordinates of an MKMapItem object (note, you can change the simulator or device’s default direction mode in the Maps section of the iOS “Settings” app):
-
let launchOptions = [MKLaunchOptionsMapCenterKey: spot.coordinate, MKLaunchOptionsDirectionsModeKey: MKLaunchOptionsDirectionsModeDefault] as [String : Any]
-
-
The example below will add an option for the MKLaunchOptionsMapTypeKey to show a hybrid map (combining the standard map and satellite imagery):
-
let launchOptions = [MKLaunchOptionsMapCenterKey: spot.coordinate, MKLaunchOptionsDirectionsModeKey: MKLaunchOptionsDirectionsModeDefault, MKLaunchOptionsMapTypeKey: MKMapType.hybrid.rawValue] as [String : Any]
-
-
Make a copy of your Snacktacular app folder and modify the app, experimenting with these launch keys to achieve the results pictured below. Feel free to further experiment with other launch options that you’ll find on Apple’s Launch Option Keys page.


