Learning Objectives
-
Learn to use a table view header to scroll interface elements within a table view, especially useful for making a larger interface available on smaller screen sizes.
-
Work with Map View to set a region and center and zoom a map on a given point.
-
Modify a class so that it conforms to MKAnnotation, allowing the coordinate in the class to be plotted on a map.
-
Add an annotation view marker to a map, and include a title that shows on the marker, and a subtitle that will show when the marker is selected.
-
Learn to mimic a two-finger pinch-zoom gesture on the iPhone simulator.
Video Lesson:
Reference
Table View Headers (and Footers)
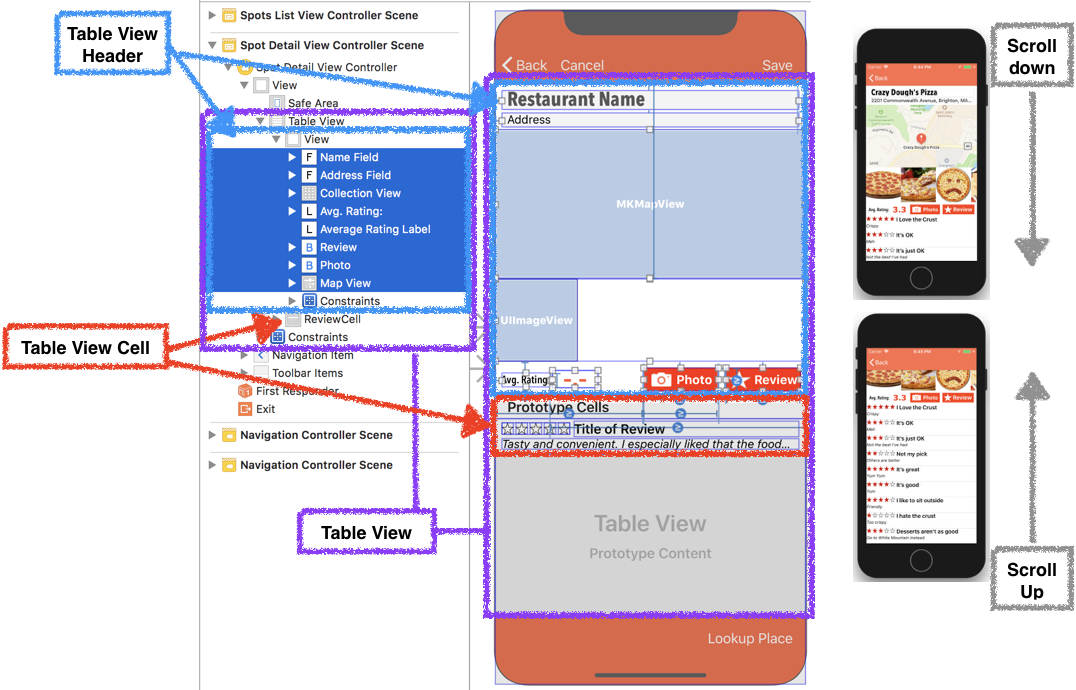
The table view header is an area that is within the table view, but which is displayed above the sections and cells of the table body (there is also a corresponding table view footer below the cells). So far all we’ve worked with are dynamic table views (meaning ones that can house a varying number of scrollable cells). A dynamic table view that is pinned to the sides of a view controller’s primary view will scroll its header up and down, along with its cells – meaning the entire table view scrolls, not just the cells. This can be very useful in apps that have complex interfaces that include table views, but that might otherwise be contained inside the screen size of smaller devices. The animation on the right shows a table view that takes up the entire view controller screen, but that has several user interface elements (including the restaurant’s name and address fields, the map view, a collection view with photos, the Avg. Rating, and Photo and Review buttons) inside a subview that is in the table view header, above the table view’s cells. Note that even though the app is shown running on an iPhone with a 4” screen size (the size of the diminutive original iPhone SE), a larger interface can be offered since the entire table view with header and cells, will scroll inside the view controller’s main view.
In the rather garishly color-coded image below, the entire Table View is outlined in purple (shown on storyboard layout and with components outlined in the Document Outline). The Table View Header is in blue, while the Table View Cell is in red. Normally we don’t work with the table view header, but anything you drag into the area inside the table view, but above the first table view cell will be in the header. You’ll want to drop things into the header by dragging them into the Document Outline, where it’s easy to see where the gap is between these elements. In our SpotDetailViewController, we dragged a UIView (in blue, below) containing several user interface elements (name and address fields, labels, buttons, even a collection view) into the table view header.
MapKit, MapView, and Key Components
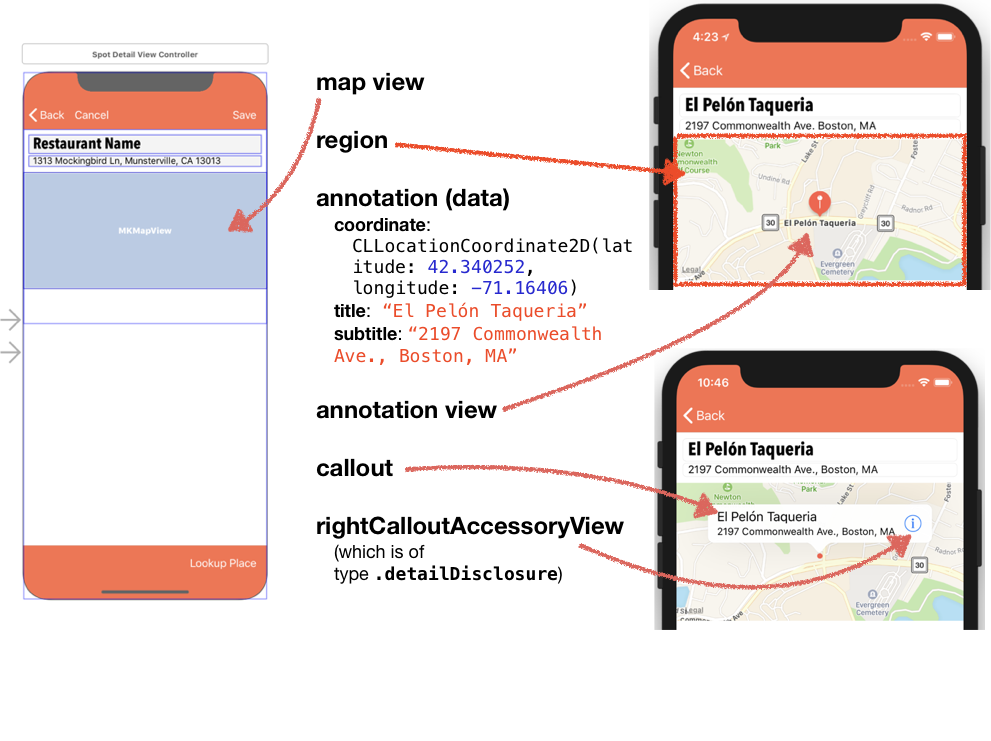
The iOS MapKit framework is extremely powerful. It can plot maps in a variety of formats, using standard markers or pins, and you can create your own custom map annotations, as well. Here are a few key terms related to our introduction to MapKit:
-
map view (MKMapView)- interface object that shows a map on the device.
-
region (MKCoordinateRegion, a property of a map view) – specifies the map view’s center coordinate, as well as how far the map should zoom in.
-
annotation (MKAnnotation) – the data used to plot the the map marker (the pin, point, or a custom object of type MKAnnotationView) . Any class that conforms to NSObject & MKAnnotation and has a coordinate property of type CLLocationCoordinate2D is also an annotation that can be plotted on a map view. If you add a title and subtitle String? property, you can also show this data in map markers and callouts.
-
annotation view (MKAnnotationView) – the marker you see on screen.
Showing a Coordinate on a MapView
-
In Interface Buidler, add a MapView object to the view controller
-
Import MapKit into the .swift file that will work with the MapView
-
Create an @IBOutlet for the MapView
Steps for Creating a Map View Region to Zoom In on a Center coordinate:
-
MKCoordinateRegionMakeWithDistance will create a map region (type MKCoordinateRegion) when given a center coordinate (of type CLLocationCoordinate2D) , along with two CLLocationDistance values representing latitudinal and longitudinal distances.
-
Use this newly created region in a call to the map view’s .setRegion() method. The method also takes a Bool that determines if map should animate as it moves to show the new region.
Creating a map view annotation:
-
Any class with a property named coordinate of type CLLocationCoordinate2D can be used as an annotation to plot an annotation view marker. The class just needs to conform to the NSObject and MKAnnotation protocols (simply add : NSObject, MKAnnotation following the class name and before the opening curly brace in the class definition line.
-
An MKAnnotation-conforming class that contains an optional title and subtitle String? can display these values on annotation views and in callouts.
Plotting an annotation view:
-
The map view method .addAnnotation will plot any object from a class conforming to MKAnnotation (like our Spot class after we performed the steps above)
-
The map view method .removeAnnotations(mapView.annotations) will remove all annotations for the map view named mapView. We call .removeAnnotations before .addAnnotation so that we don’t show any additional annotations on screen, just in case the user has used “Lookup Place” to plot another Spot in the same region before saving the spot.
-
The map view method .setCenter will center a map at the specified coordinate, and accepts a Bool indicating if it should show an animation as it transitions to the new location.
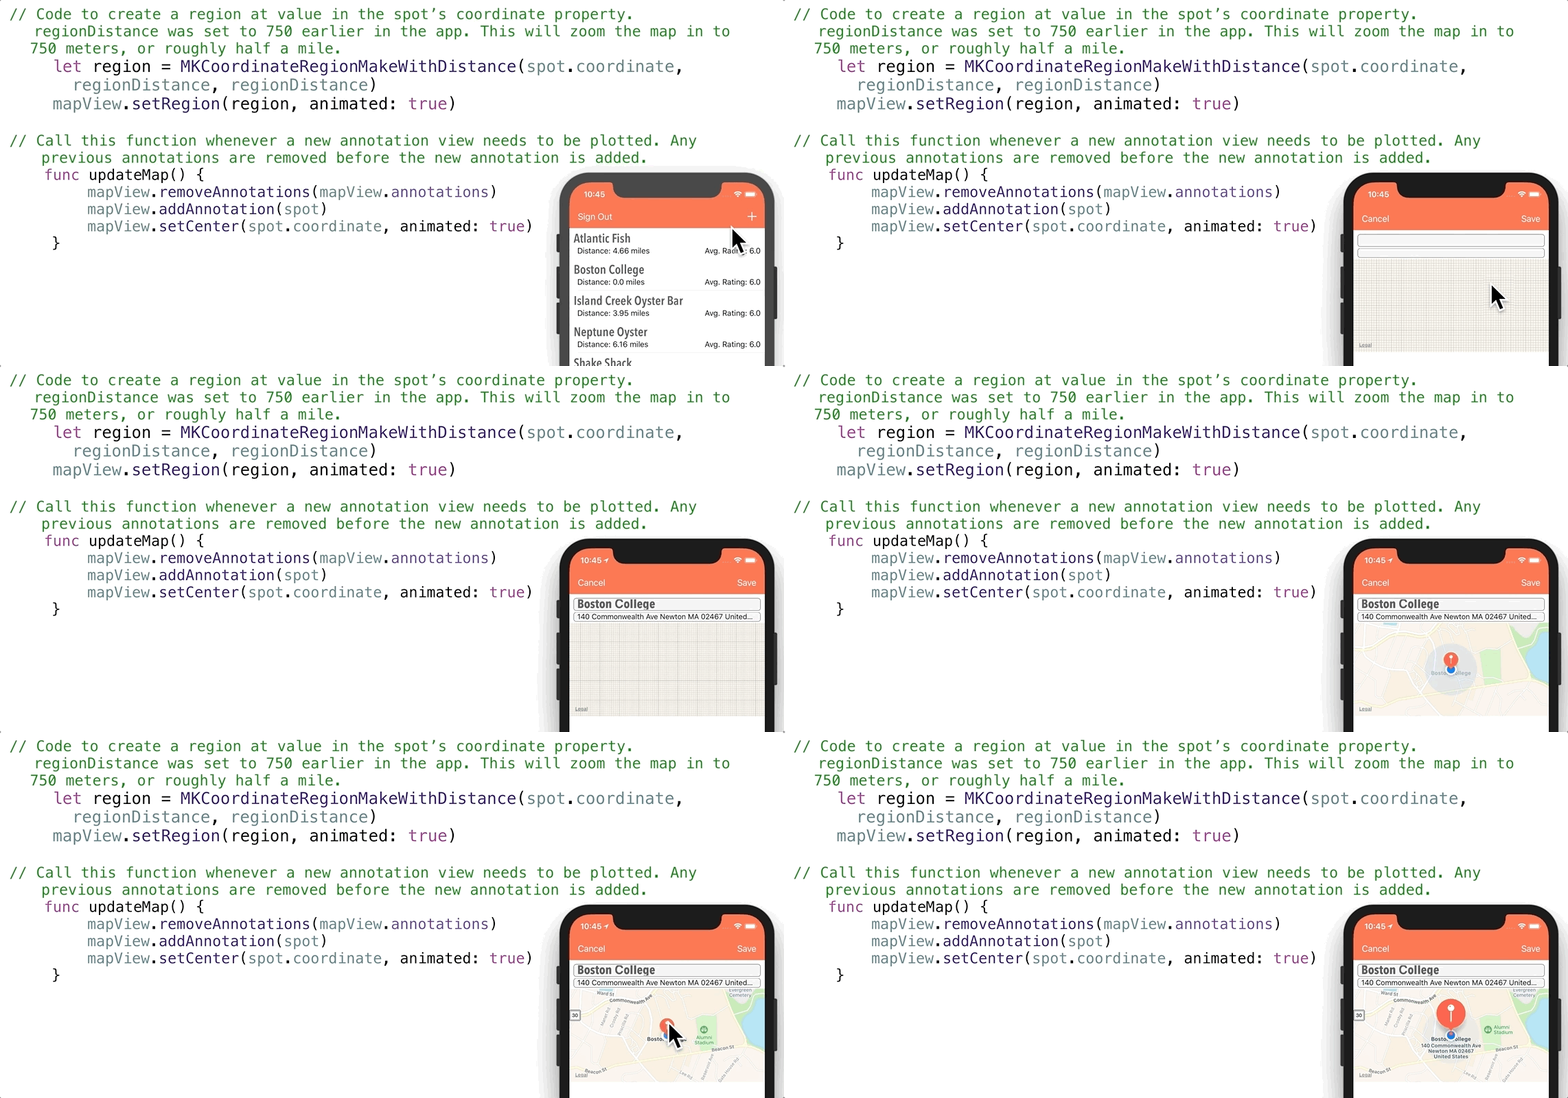
The code below shows the map centered at a spot.coordinate (the simulator was pre-set to coordinates for Boston College), the regionDistance value had been set to 750 (meters, or about half a mile) earlier in our code. We also wrote the function updateMap to be called whenever the app needs to plot a new spot.coordinate (when the device location is being plotted, or when Google Places Autocomplete returns coordinates of a selected place). The annotation view is plotted as the iOS default balloon-shaped marker and shows the title (which is a calculated property in the Spot class, simply set to the name property). The subtitle property (set to the Spot’s address) shows if the annotation view is selected.
Mimic a Two-Finger Pinch-Zoom in the Xcode Simulator
-
Hold the Option key and move the mouse – two circles will show on screen representing the location of a simulated two-finger touch.
-
Hold Option & Shift together and move the mouse – the two circles will move together so you can position them at a different location on the simulator screen.
-
Hold Option while clicking and dragging – the two circles can be spread apart or moved together to mimic a two-finger pinch-zoom move.
Key Takeaway
-
A table view with a header will scroll its header, providing a way to expose a larger interface on a smaller device. To add items to the header, drag them within the document outline beneath the Table View but before the Table View’s Cell. In our video lesson, we dragged a rectangular sub-view into the table view header. There were multiple additional interface elements all inside this subview, and all appeared inside the header and were then scrollable with the entire table view.
-
You can add a map view to any view controller. Also create an @IBOutlet for the map view, and import MapKit into any files that work with a map view.
-
A map view’s region indicates the map’s center point and the zoom level of the map. MKCoordinateRegionMakeWithDistance can be used to create a region centered at a given coordinate, with region distances set in longitudinal and latitudinal values representing meters shown on the map.
-
Once created, use the map view’s .setRegion method to set the map view to center and zoom in on the region.
-
Data used to plot a point on a map is called an annotation, while an annotation view is the actual marker that appears on the map.
-
Any class with a CLLocationCoordinate2D value named coordinate can be used as an annotation. The class simply has to confirm to NSObject and MKAnnotation by including : NSObject, MKAnnotation after the class name but before the opening curly brace.
-
mapView.removeAnnotations(mapView.annotations) will remove all of a map view’s annotations (and plotted annotation views).
-
mapView.addAnnotation() will plot any valid annotation that it is passed.
-
The iOS simulator can mimic a two-finger pinch-zoom gesture. Holding down Option while moving the mouse will move two circles on the simulator that represent a two finger touch. Holding Shift and Option together while moving the mouse will position the circles at a given spot on the map. Releasing shift, keeping Option held down, and clicking and dragging the mouse will mimic bringing the fingers together or apart.


