Parts Guide for free, online videos & tutorials showing how to build a Raspberry Pi robot and an iOS app to control it over Wi-Fi. Full tutorials start at: https://gallaugher.com/lets-build-a-robot/
Making your own robot can be a very rewarding and fun process that teaches you many skills, from soldering and circuitry to programming and computer science. Make sure that you buy all the parts before you begin – most can be found on Octopart – to help make the build process as smooth as possible, and soon you too will have your very own little robot buddy walking around the place!
Make sure you have:
- A Raspberry Pi that can access a Wi-Fi network. Unsure of what you’ve got or what to buy? Here’s a chart of Pi products and features. Many of the links below are to Adafruit, my favorite source for maker parts source (their own parts are high-quality, assembled in NYC, and really well supported with the firm’s online forums). Founder “Lady Ada” (Limor Fried) is super-inspiring and super-smart. But you can buy these parts from other retailers, as well. Also note that the Pis DO NOT come with a microSD card, cable, or power supply, and you may need those.
- Cheapest no-solder option at the time this tutorial was created: Raspberry Pi Zero WH (about $14). Be sure to get the WH if you want to avoid soldering) – bot on the left in the photo above.
- Larger, more powerful version (faster, lots of additional connection ports): Raspberry Pi 3 B+ (~ $35) – bot on the right in the photo above.
- A good alternative to the Pi 3 B+ is the Raspberry Pi 3 A+ (~ $25). $10 cheaper than the 3 B+, but just as fast, with a few less expansion ports, but more than the Zero.
These videos show both the 3 B+ (larger model, same size as the 2 B+), and the Pi Zero WH (nice and small).
- A microSD card. (32GB cards are available for < $6 online). This acts as your Pi’s hard drive and will hold the operating system and software. You can use an 8GB card, but a larger one will give you more space for expansion – important if you plan to do things like add a speaker to robot and play sound clips. 16GB and 32GB are fine choices and very inexpensive. Over 32GB is overkill, but will still work when formatted properly (all explained in tutorials). Have an extra one at home? Give it a try. I use “Class 10” cards in the videos, but “Class 4” (and other models) will likely work fine, as well. There’s no need to buy one of the Pi-specific products with NOOBS software installed. These will work, but they include more software than we’ll need on our simple robot, and that’ll just take up more space. Anything that would be included on a NOOBS card can be installed over the Internet for free, later, if needed.
- A microUSB cable to the Raspberry Pi (these are usually included with mobile phone chargers, like the one mentioned below. You likely have one of these at home, as they are used on most digital cameras, many toys, and other electronics). If you have a USB-A at one end (the older, more common, larger rectangular standard end), you should be able to plug this directly into your computer or a standard 5v 2.5A power supply plug (Mac users beware – late model Macs use USB-C, so you may need an additional adapter). If you need to buy a cable for the Pi – consider getting one with a separate power supply and an on-off switch. I use this CanaKit 5V 2.5A Raspberry Pi 3 B+ Power Supply/Adapter for <$10. It'll work with all Pis mentioned above.
- A portable power source for the Raspberry Pi. Mobile phone battery chargers work well, and you likely already have something like this at home. If you want to buy one, I recommend the high quality, but still < $14 Jackery Mini 3350mAh Portable Charger. It’s small, powerful, inexpensive, and comes with a nice, short micro USB to USB-A cable, which works great in our robotics project. In my own tests, I was able to power my Pi 3 B+ over Wi-Fi with a speaker attached and broadcasting sound (see a future tutorial), and the bot lasted about an hour before needing a recharge. Results will vary.
- A case for your Raspberry Pi (choose the right size, most are < $5). This'll keep your Pi safe from sticky goo or metal shorts that might occur if you tried to stick your Pi directly to the metal deck plate on your bot.
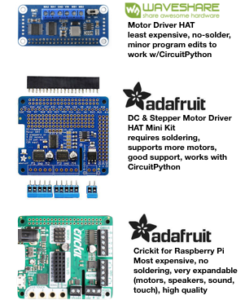 A Motor HAT, which the Pi uses to communicate with the motors.
- Cheapest no-solder option: Waveshare Motor Driver Hat (~ $13). Small – sized for the Pi Zero, but works on larger Pis, as well. Only powers two DC motors, but that’s all we need for the base project. Does not natively support CircuitPython, one of the programming languages we’ll use, but I include instructions to make the product CircuitPython compatible. There are screw terminals for the motors, but not power, but in the video I show you how to hack a connection by pushing toothpick tips alongside the jumper wire pins. If you decide to add terminal blocks with just two small solder points, you can buy a 2.54mm/0.1″ Pitch Terminal Block for less than $1.
- More powerful option, but more expensive and requires soldering: Adafruit DC and Stepper Motor Driver HAT Mini Kit: Will work with the Pi Zero WH, but will hang over the edge.
- No solder, more powerful / very expandable, but more expensive option: Adafruit Crickit HAT for Raspberry Pi (~35). Form factor for larger Pis. It will still work with Pi Zero, but the larger board will hang over the Pi’s edge. Lots of expansion opportunties for more motors and motor types, adding lights, speakers, capacitive touch sensing, and more. Not shown in videos but programming + software installation is same as Adafruit DC & Stepper Motor (after you follow step-by-step tutorials to download and install the latest Crickit firmware and install adafruit-circuitpython-crickit) as an Adafruit product, they’ll be great support in the firm’s online forums. If you want to take the HAT off the robot & use it on other Pi projects in the future, this may be a good choice.
- Portable Power Source for the Motor HAT: The simplest configurations for our robot will use a separate power supply for the Pi and for the Motor Hat. That means two battery packs.
- Cheapest option (shown in the videos): 4 x AA Battery Holder with On/Off Switch ($ <3). The one linked here is very inexpensive, has two pins at the end of the red and white wires, which we can easily insert into our Motor Hat, and also has an on-off switch. Downside? AA batteries are single use, so you may have to replace them if you use your bot often or for long sessions (est. about 2.5 hrs. of motor running time, but results will vary widely). You’ll also need 4 AA single-use alkaline batteries for this option.
- More expensive, but rechargeable option: 6 x AA Battery Holder. Yes, if you’re using rechargeable (Ni-MH) AA batteries, you’ll need 6 batteries instead of 4 single-use ones. These cases are tougher to find and they will be larger, hanging over the deck edge of your bot, a bit. This one should work, but the wire ends don’t have metal pins, so it may be just a bit more challenging to thread these into the power connections of the Waveshare Motor HAT, if using that option. If you go with rechargeables, you may have batteries and a charger at home. If not, an 8 pack of rechargeable AA batteries may run about $14, and another ~$15 for a charger that charges 4 batteries at a time (so you might need two of these for fastest recharging options).
- There are other options including using larger, single LiPo batteries, but these aren’t shown in the videos. Feel free to explore on your own, if you’d like (Adafruit learning resources and forums offer great advice). You may want to start with the cheap option & upgrade to a reusable option later, if needed.
- Mini-round robot chassis with two DC motors ($19.95). Metal, easy to assemble, small, cheap, and comes with motors, wheels, tire treads, and all the screws to put it together.
- Velcro tape or similar hook and loop product available at hardware and craft stores, as well as online – example which has plenty of product for ~ $8. Should be two plastic sides that stick together and can be peeled apart, plus sticky adhesive on the opposite sides that will be attached to the more permanent mounting location for tape. There are other choices for putting components together, but Velcro tape is great – pretty durable and very easy to pull off components for quick battery swaps, part upgrades, etc.
- Male to Male Jumper Wires – to attach Motor HAT to the female connectors on the DC motors. They won’t need to be very long. You can buy a bunch for <$2.
Tools:
- A Mac computer (this tutorial assumes you’ll use a Mac, which is required to create the iOS app).
- If you have a newer model Mac with USB-C ports, you may not have an SD card slot. If so, you’ll need to buy an SD card reader that’s capable of reading mini SD cards. There are lots of options online, you might consider getting a multi-port option for USB-C that includes ports for micro USB cards, as well as USB-A, and other ports.
- If you have a Mac with an SD card slot, it’s likely the larger slot, so be sure when buying a micro SD card, that you get one with the often-included adapter for the larger, legacy SD card slot.
- A screwdriver with small Phillips head and flat head tips. If you need to buy one, consider a kit like this 45 in 1 Precision Screwdriver Toolkit-JACKYLED that I use: ~10, and likely includes all the tips you’ll ever need for electronics projects.
- Small pliers such as needle-nose pliers are a must-have in your toolkit. There are no doubts about it, the best rated needle nose pliers long rounded for electricians work especially well for bending electrical component pins and for working with very fine wire. Ideally, you are going to need electrical pliers that are sturdily built and feel and operate like a precision tool. Your pliers should have handles that are covered in a nonslip grip material and they should feel good in the hand. Not sure where to begin? Needle-nose pliers like these from Stanley, work great <$4.
- No Solder Option:
- Wooden toothpicks (for the no-solder hack, shown).
- Solder Option:
- If you are using the soldering option: soldering iron and solder (I’ll leave it to you to explore options. If you’re at the soldering stage, you may have one on your own, otherwise check out Adafruit’s Guide to Excellent Soldering).
- You may also want wire cutters and wire strippers if you’re soldering, and if so, you likely have one. If not, you can find them online for ~ $7 online. I recommend making sure the upper limit is at least 30 AWG (for larger wires you may use in some projects).
- Electrical Tape – useful for securing connections, such as those between jumper wires and motor wires. Buy it anywhere for ~$3.
- Scissors