IMPORTANT NEW NOTE:
Updates for the latest macOS & Disk Utility seem to have rendered the procedures below unworkable. For some reason Disk Utility now copies very fast, but the image created cannot restore into a working sd card.
The better solution is to use ApplePiBaker, which you can find at;
- https://www.tweaking4all.com/ApplePi-Baker2.dmg
 Introduction:
 Since it can take a while to install the Raspberry Pi OS, then perform configurations and installations for things like Wi-Fi networking, the update and upgrade of Pi software, installation of CircuitPython, and more, it can be useful to make a backup copy (called an image) of a working microSD card so that you can simply flash this backup copy onto a new SD card, then put this card into a new Pi and change its hostname. These instructions will demonstrate how to use a Mac to make a copy (image) of a microSD card with a working copy of Raspberry Pi software installed, and how to copy (flash) the image onto a new SD card, then install it in a Pi and (very important for wireless Pis) give the Pi a new hostname. The steps aren’t complicated, but the initial imaging of a working SD card can take some time on older Macs (about 25 minutes for a 32GB card, but if you have a new Mac it may only take a few seconds). Fortunately flashing a card of similar size should take less than 4 minutes, way faster than the time needed to use the Raspberry Pi imager, configure Wi-Fi, update and upgrade software, and more, so performing these steps can be a real time saver!
I usually work with Wi-Fi connected Raspberry Pis, so these steps mention how to ssh (log into) an existing pi and change its hostname. If you’re not using Wi-Fi, you can skip those steps and simply image the disk with Disk Utility, rename the .cdr file to an iso file, then use this file with balenaEtcher to duplicate (flash) the image onto a new SD card.
Tools Needed:
These instructions assume that you have
- a microSD card with software installed that works on a Raspberry Pi. You’ll use this card to create the copy (image) of software you’d like to quickly duplicate (flash) on a new microSD card.
- another microSD card that you will use for the duplicate (flashed) copy of your working SD card (need to buy a card? Here’s an example of the type of card I’ve used) – make sure your new SD card is big enough to hold the image you are copying (flashing) to it (e.g. a 32 GB card if you’re flashing a copy of a 32 GB image), and
- a microSD card reader that works with your Mac (example here – if you’re buying a card reader, make sure it has the correct USB connector for your Mac).
Video:
- Prefer video instruction? See the YouTube video: Making a Backup and Restoring an Image of a Raspberry Pi (Mac).
- You can also find an entire playlist of videos on Raspberry Pi Beginner: Setup, Configuration, Backup & Useful Installs.
Step Overview:
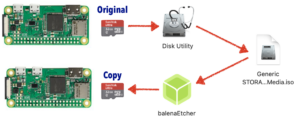
We’ll use the following steps to create a copy (image) of an existing Raspberry Pi micro SD card
- We’ll use raspi-config to temporarily rename the hostname of your working Pi SD card so that the copy you are flashing won’t conflict with this Pi. A name like “pi-backup” is a good choice. This step is especially important if both Pis will be on the same Wi-FI network.
- Use the Mac Disk Utility to make a copy (image) of the SD card.
- Rename the image file, changing the extension from .cdr to .iso.
- Insert the working SD card back into your Pi, login using the temporary hostname, and use the raspi-config tool to change the temporary hostname back to its previous name.
These steps will copy (flash) the image you created above onto a new microSD card, then set up a Pi using this card with a new hostname.
- Use the balenaEtcher program to copy (flash) the image onto a new SD card. The new SD card will have the temporary hostname (e.g. “pi-backup” mentioned above).
- Insert the newly flashed SD card into a new Pi, log in using whatever temporary hostname you used when creating the image, and use raspi-config to give this new Pi a unique hostname.
Create a copy (image) of an existing Raspberry Pi micro SD card (four steps):
Step 1: Use raspi-config to set a temporary hostname for the Pi you are about to copy (image)
- Launch the Terminal program on your Mac by pressing Command-Space to launch Spotlight, then type Terminal, and press the return key.
- Log into your Pi using the command below replacing hostname with your Pi’s hostname, then press the return key.
ssh pi@hostname.local
- Enter your Pi’s password when prompted, and press the return key.
- Launch the raspi-config software by entering the command below, then press the return key.
sudo raspi-config - Use the arrow keys to highlight System Options (its the first option, so it’s likely already highlighted), then press the return key. The System Options submenu will show.
- Use the arrow keys to select Hostname to Set name for this computer on a network, then press the return key. You can read the general guidelines on acceptable hostnames, then press the return key to confirm <Ok>. You’ll be prompted to enter a hostname.
- Use the backspace key to delete the existing host name (be sure to write-down or otherwise remember this hostname because you’ll change this back in a later step)
- Type in the new name for your Pi. I usually use the hostname pi-backup for my backup image. Then press return, or use the arrow keys to select <Ok> and press return to return to the raspi-config main menu.
- Press the right arrow key twice to select <Finish> from within raspi-config, then use the arrow keys to select <No> when asked if you’d like to reboot your Pi.
- At the prompt, shut down this Pi by typing the command below, then press the return key.
sudo halt - Power down the Raspberry Pi and remove the micro SD card.
Step 2: Use the Mac Disk Utility program to make a copy (image) of the working Raspberry Pi SD card
- Take the working micro SD card from your Raspberry Pi and insert it into a card reader, then plug the card reader into your Mac.
Launch the Disk Utility program.
- Type Command + Space Bar to open Spotlight.
- Type Disk Utility and press the return key. The Mac Disk Utility program should launch.
- If it’s not already selected, select the View menu, then Show All Devices.
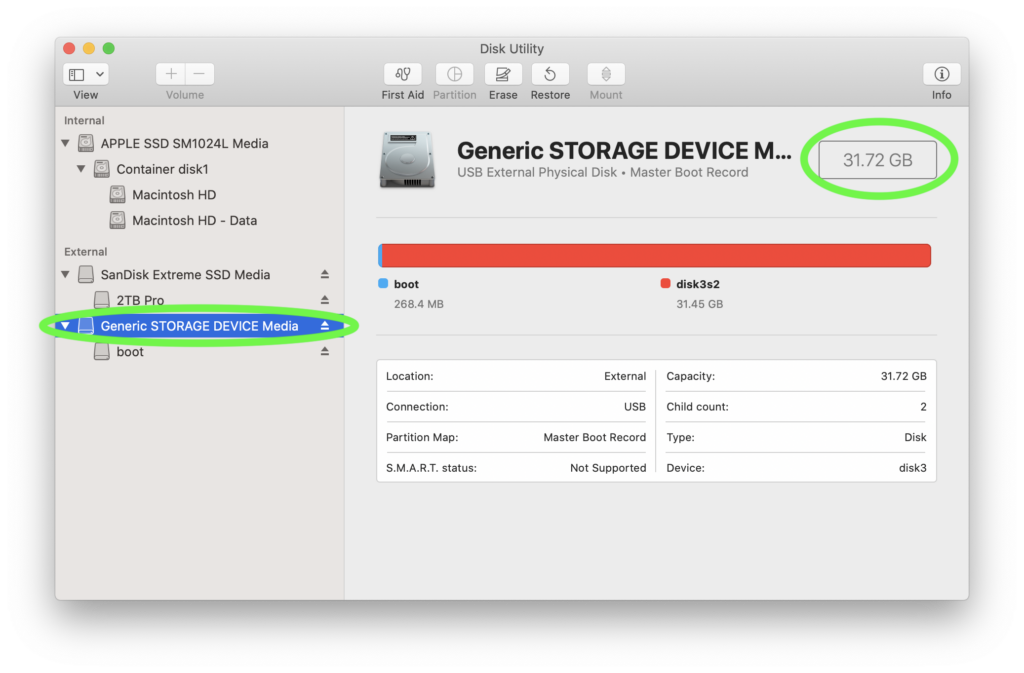
- Select your SD card in the list of storage devices shown on the left side of the Disk Utility window (image below). Be sure you’re selecting the topmost volume for the SD card, not the “boot” image inside of it. It’s possible that your SD card may have a different name than “Generic STORAGE DEVICE media”, shown below. That’s OK, but you should be able to see that the size of the image matches the size of your SD card (e.g. the 31.72 GB circled below confirms that the 32 GB SD card has been selected).
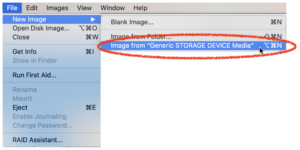
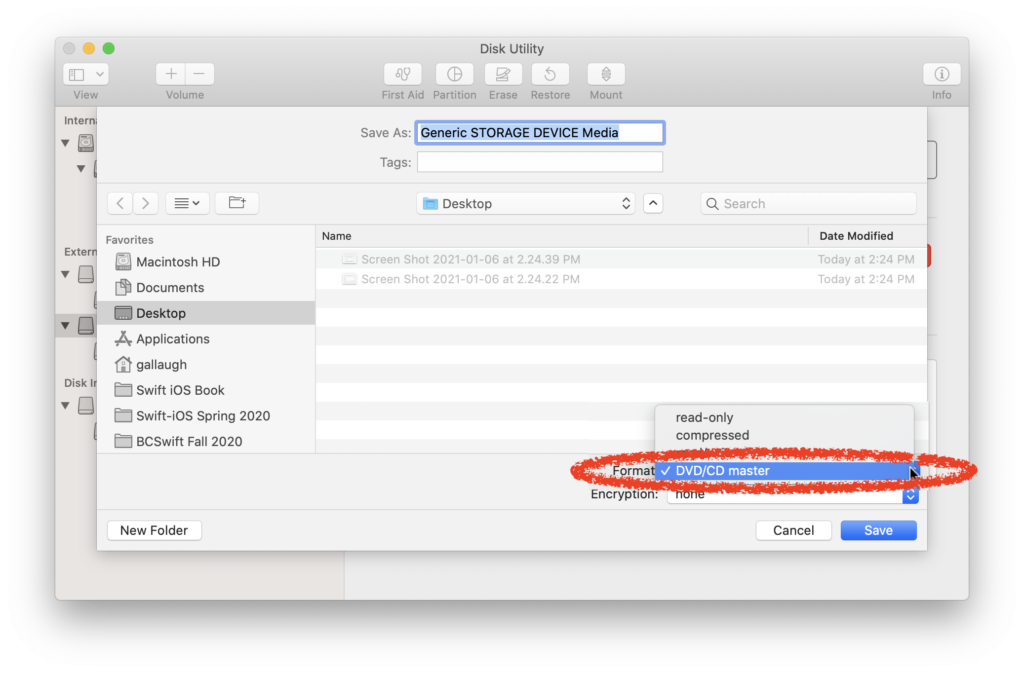
- Select the menu item: File > New Image > New Image From <Your SD card’s name here>
- From the Format menu (circled below), select DVD/CD master. This seems like an odd selection since you’re not creating a DVD or CD, but this is what you want to select.
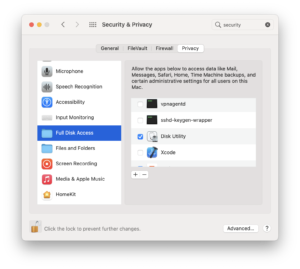
- Choose a location to save the file that will contain the copy (image) of your SD card, then click the Save button. You might receive a system warning stating the diskimages-helper wants to make changes. If so, enter your Mac’s system password or do whatever else is required to approve the change. You’ll see a progress bar move as the image is created. It may take more time than expected (for example, it took approx. 25 minutes on my Intel Macbook Pro to image a 32 GB SD card). While creating an image takes a while, copying the image to a new SD card is much faster.
Step 3: Rename the image file, changing the extension from .cdr to .iso
When done, you should have an image file with a .cdr extension at the location where you saved your image. One quirk we have to deal with is that while the balenaEtcher program, we’ll use to copy this image to a new SD card uses this file, we need to change the extension to .iso, a .cdr file won’t work with balenaEtcher.
- In the Finder, locate the image file that you just created (it will have a .cdr extension), then right-click this file, select rename, then change the extension to .iso. Your Mac will likely prompt you to confirm that you want to “Use .iso”. If so, click the “Use .iso” button. You’ve just renamed your image file and you’re ready to use it with balenaEtcher, as described below, whenever you want to copy the image on to a new microSD card.
Step 4: Reset your Raspberry Pi to its original hostname
Any time you want to create a copy of the files on the SD card used to create this image, you can use this image in the steps outlined below.
- IMPORTANT: Once your image has been created:
- Click the Done button, then quit the Disk Utility program
- Unmount (eject) the image of the SD card from your Mac (e.g. right-click the “boot” image on the desktop and select Eject “boot”).
- Remove the SD card from your SD card reader and insert it back into your Raspberry Pi.
- Turn on your Pi and wait for it to fully boot up (approx. 30 seconds), then follow the steps in Step 1 to open the terminal and ssh into your Raspberry Pi. Be aware that this SD card now has its temporary host name, so if, in Step 1 above, you renamed your Pi as pi-backup, you’ll log in with:
ssh pi@pi-backup.local
- Launch raspi-config as described in Step 1 above and rename your Pi’s hostname to its original name. Then quit raspi-config and reboot your Pi when asked when you quit raspi-config.
Your original Pi should now have its original hostname, but you’ve also got an image that you can use to create new microSD copies, which will have the hostname pi-backup.
Copy (flash) the image you created above onto a new microSD card, then set up a Pi using this card with a new hostname (two steps, labeled A and B so you don’t confuse them with the steps above).
Step A: Use the balenaEtcher program to copy (flash) the image onto a new SD card.
If you don’t already have the free balenaEtcher program, download and install balenaEtcher by visiting: https://www.balena.io/etcher/
- Select the “Download for macOS” button at the bottom of the screen.
- Select a location to install the .zip file (Desktop is a good, easy-to-find choice), then press “Save”.
- Once the .dmg file has finished downloading, double-click to launch and run this file. After the .dmg has been installed, you’ll see a dialog box with an arrow pointing from balenaEtcher to Applications.
- Drag the balenaEtcher file into the Applications Folder. This will install Etcher in the Mac’s Applications folder.
Use Etcher to copy the image onto a new micro SD card.
 Launch the balenaEtcher program any way you’d like (e.g. Command+space bar to open spotlight, type balenaEtcher, and press return).
- From balenaEtcher, click Flash from File, an Open dialog box will display.
- Navigate to the .iso file that contains the image that you want to copy to the SD card then select this file and click the Open button.
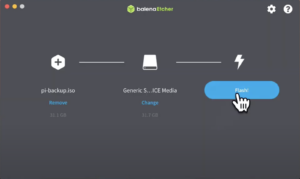
- Click the Set Target button within balenaEtcher, then select the drive that represents your SD card (e.g. Generic STORAGE DEVICE Media – 31.7 GB in the example below). When properly selected you should see a green circled checkmark next to the appropriate volume. Then click the Continue button.
- Click the Flash button. You may be warned that balenaEtcher wants to make changes. If so, type in your Mac’s password, then press the Ok button. You’ll see a progress bar indicate that the image is flashing (copying to the SD card), then being validated. The entire process took less than 4 minutes when flashing a 32GB SD card using my Intel MacBook Pro.
- When the process is done, balenaEtcher will show a Flash Complete! message and it will unmount your SD card. You can now remove the microSD card from your card reader.
Step B: Insert the newly flashed SD card into a new Raspberry Pi, log into the Pi, change the hostname, and reboot.
- Insert the newly flashed microSD card back into your Raspberry Pi.
- Turn on your Pi and wait for it to fully boot up (approx. 30 seconds), then follow the steps in Step 1 to open the terminal and ssh into your Raspberry Pi. Be aware that this SD card has the temporary host name that you used when you created the image using the steps above (e.g. pi-backup), so be sure to log in with that name, in our example this would be:
ssh pi@pi-backup.local
IMPORTANT NOTE: If the Terminal responds with some error message text, ending in something like “Host key verification failed“, this is simply network safety kicking in, mentioning there was a previous Pi with this name on your network, and it wants to be certain that a hacker or imposter device is trying to sneak in. You can overcome this issue easily by regenerating a key with the following command, substituting in any name that you might have used that’s different from “pi-backup”:
ssh-keygen -R pi-backup.local
And if this doesn’t work, you can try to ssh in, prefacing the command with sudo, like this:
sudo ssh pi@pi-backup.local
Once you’ve done this, you should be able to ssh in to your host, as mentioned above.
- Launch raspi-config as described in Step 1 above and rename your Pi’s hostname with a new, unique hostname. Then quit raspi-config and reboot your Pi when asked when you quit raspi-config. This new SD card is now ready to use.
While the process of creating an image can take a while, once you have an image, it’s much quicker to flash the image onto a new SD card instead of using the Raspberry Pi imager program, then configuring Wi-Fi, upgrading and upgrading software, installing CircuitPython, and anything else you did before creating your image.
Find any glitches, corrections, or additional advice for this document? Send me a note online, or leave advice in the comments of the accompanying YouTube video and I’ll be sure to make changes in this document, as needed.
❖ ❖ ❖ ❖ ❖
Ready for more? Check out tutorials on Robotics, Wearables, App Development and more at: https://youtube.com/profgallaugher. Please consider subscribing and do share with others who may be interested!
Want to learn to build apps? The same content I use in my semester-long online course (videos and tutorial content) is available for less than $25 via links you’ll find at https://gallaugher.com/swift.
Look for more updates at gallaugher.com as well as on Twitter @gallaugher