Intro:
Note: This document was updated in Jan. 2021 to account for changes with Raspberry Pi OS (Buster) and Netatalk 3.0 or greater.
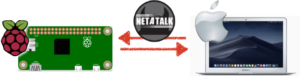
If you’re working on a Raspberry Pi project using a Mac, then you probably want to copy files between the Mac and the Pi. By setting up the netatalk software on your Pi, then opening a new terminal window on your Mac and using the open afp://hostname.local command to connect your Mac to your Pi, your Pi will then appear as a mounted volume on your Mac, almost like it’s a USB drive. The Steps below describe how to set this up. Once netatalk is installed, then you’ll just need to use open afp:// each time you want to connect your Mac to a powered-up and running Pi.
Tools Needed:
- A Mac computer and a Raspberry Pi with Wi-Fi, both operating on the same network.
- You can find tutorials for Setting Up a Raspberry Pi on a Wi-Fi Network (Headless Install) in the playlist of videos at Raspberry Pi Beginner: Setup, Configuration, Backup & Useful Installs. A step-by-step guide for a headless install is at bit.ly/headless-pi.
Video:
- Prefer video instruction? See the YouTube video: Getting a Raspberry Pi to Appear in the Mac Finder.
- You can also find an entire playlist of videos on Raspberry Pi Beginner: Setup, Configuration, Backup & Useful Installs.
Log Into the Pi and Install Netatalk
Turn on and log into your Raspberry Pi
- Launch the Terminal program on your Mac by pressing Command-Space to launch Spotlight, then type Terminal, and press the return key.
- Log into your Pi using the command below replacing hostname with your Pi’s hostname, then press the return key (BostonCollege students working on campus, remove “.local” from the command, below).
ssh pi@hostname.local
- Enter your Pi’s password, followed by the return key.
Install the nettalk software on your Raspberry Pi, which will allow your Pi to appear on your Mac as a folder available on your network.
- From the terminal prompt enter the command below, then press the return key:
sudo apt-get install netatalk
press [y] if asked if you can use disk space
Starting with Raspberry Pi OS Buster and Netatalk 3.0, setting up Netatalk requires some additional modifications to the configuration file because now, by default, a new netatalk install does not provide access to the Pi. To edit the config file:
- At the terminal prompt enter the command below and press return to enter the nano program and edit the existing netatalk configuration file.
sudo nano /etc/netatalk/afp.confYou should see that this file has multiple lines, but all begin with a ;
The ; (semicolon) character acts as a comment in the configuration file, so we’re going to remove semicolons from two lines.
- Use the arrow keys in nano and remove the ; character and additional space in front of the two lines that you see below (the ; characters have already been removed in the text, below):
[Homes]
basedir regex = /xxxx
- Now modify the last line that you see above, replacing xxxx with home, so that it reads:
basedir regex = /home - Exit nano by typing control+x, then typing Y when asked to save. The filename to write should be correct, so press return and you will be returned to the prompt.
- Restart netatalk by entering the command below, then press the return key.
sudo systemctl restart netatalk
At this point netatalk should be properly installed on your Pi, it should be configured, and running with the proper configuration.
On Home Networks the Following Steps Should Work:
(But if you’re a student working on the BostonCollege network, or this step isn’t working, skip to the next section)
To access a Pi with Netatalk from within the Finder:
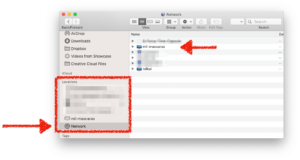 Open a Finder window (Command+N will open a new window), then scroll the left pane down until you find the Network item under the Locations section. Click Network. You should see the Finder window showing all devices that you can access.
- Select the Pi you’d like to connect (e.g. mil-mascaras in our tutorial video).
- You’ll see “Not Connected” in the top left of the finder window, select the “Connect As…” button in the top-right.
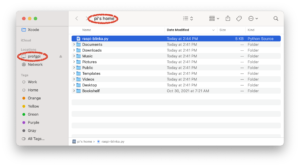
- In the dialog box, enter “pi” as the username, and enter your Raspberry Pi’s password in password, then select the “Connect” button. You should then be connected to your Raspberry Pi in the “pi” directory (shown on your Mac as “pi’s home“.
That’s it! Your Raspberry Pi is ready to act like a remote drive attached to your Mac. Use the Mac’s Finder to copy, move, rename, delete, and launch files.
Connecting to the Pi Using the Finder If You’re on the BostonCollege Network:
- From the Finder, type Command+K (or select the menu: Go > Connect to Server…). The dialog box below will show up. In the box at the top enter:
afp://hostname
where hostname is the name of your Pi. If you are working from a home network, you probably need to add “.local” after your hostname, but if you’re one of my students working on the BostonCollege network, .local likely shouldn’t be used.
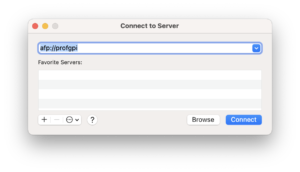
- Click the “Connect” button.
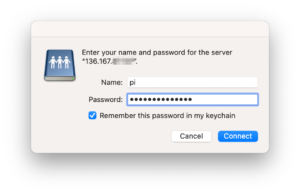
- Then log in with Name: as “pi” and Password: as your Pi’s password, then click the “Connect” button.
- You should again see your pi listed under “Locations” on the left side of the Finder, with the “pi” directory showing in the Finder window.
If that still doesn’t work, you can try using the IP address technique, below:
- Make sure you have a Terminal window open and that you’re logged into your Pi.
Next, find your current IP address:
- Enter the command below and press the Return key:
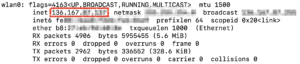
ifconfig
- You’ll see quite a bit of output. Find the output that begins with wlan0: and locate the address following inet, as shown below. This should be four digits, 0 to 255, separated by periods. This is your IP address – copy it for use in just a bit. Note that while your MAC address is unchanging, you’ll probably have a different IP address each time you log into the BostonCollege network:
- Open another terminal window (on the Mac type “Command+N” in the Terminal program).
You won’t have to log in to anything in this new window. - At the prompt enter the command below, where ip_address is the IP address that you copied in the step above.
open afp://ip_address
- You’ll see a message stating you’re attempting to connect to the address above. Click the “Connect” button.
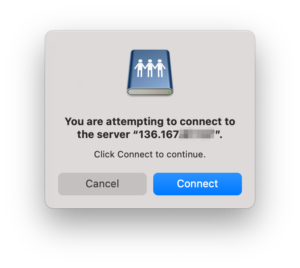
- You’ll see a login screen. Enter The Name as Pi, and enter the Password as your Pi’s password, and click “Connect”. You can click “Remember this password in my keychain” if you’d like and you feel access to your computer and Pi are secure.
- You should now see a Finder window appear, with the location of your Pi selected under “Locations”, and the current folder “pi’s home” showing. This is the “pi” directory on your Raspberry Pi.
- You can now work with files on your Pi as if it were any other Finder volume.
In the future, you should be able to get directly into your Pi if it is connected to the BostonCollege network, using this technique:
- From the Finder, type Command+K (or select the menu: Go > Connect to Server…). The dialog box below will show up. In the box at the top enter:
afp://hostname
where hostname is the name of your Pi. If this doesn’t work, you can try adding .local to the end, but on the BostonCollege network, .local likely shouldn’t be used.
- Click the “Connect” button.
- Then log in with Name: as “pi” and Password: as your Pi’s password, then click the “Connect” button.
- You should again see your pi listed under “Locations” on the left side of the Finder, with the “pi” directory showing in the Finder window.
❖ ❖ ❖ ❖ ❖
Ready for more? Check out tutorials on Robotics, Wearables, App Development and more at: https://youtube.com/profgallaugher. Please consider subscribing and do share with others who may be interested!
Want to learn to build apps? The same content I use in my semester-long online course (videos and tutorial content) is available for less than $25 via links you’ll find at https://gallaugher.com/swift.
Look for more updates at gallaugher.com as well as on Twitter @gallaugher