Video
- A step-by-step video that follows this document can be found in the playlist at https://bit.ly/raspberry-pi-tutorials. For more tutorials, see https://youtube.com/profgallaugher.
- IMPORTANT NOTE FOR MY STUDENTS WORKING ON CAMPUS: The Boston College network requires students to register Raspberry Pi devices like you would game consoles or smart speakers. There is a separate tutorial video for this in the playlist at: https://bit.ly/raspberry-pi-school
You can find a step-by-step guide in the Google Doc at: https://bit.ly/pi-on-campus-multiple-networks
Tools Needed:
- A microSD card
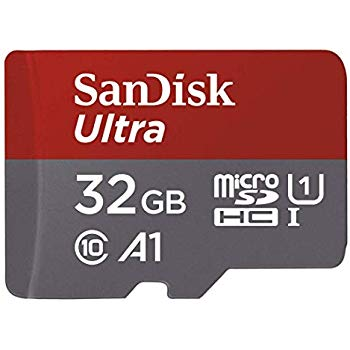
- Either one that you can format or that is already blank and is at least 8 GB in size (example here: more than 32 is overkill), just about any microSD cards will work, Class 10 or Class 4 are the most popular for Pi projects. We’ll install the free software we need in the steps below.
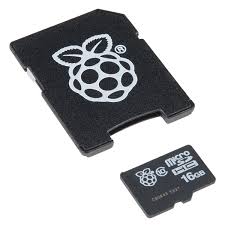 or a microSD card purchased with the RaspberryPi NOOBS operating system already installed (example here). Not much of an advantage here – it comes with more than we need and doesn’t save a lot of time.
 A computer with a slot that can read a microSD card, or (needed for late-model Macs that only have USB-C ports), an external card reader that you can plug into your computer (example here).
- You’ll also need to power your Raspberry Pi. If you use a power supply you’ve already got, make sure it’s a 2.5A, 5v power supply. You’ll need a cable to connect to the power supply, too. Most Raspberry Pi’s use a microUSB cable (which is different from the lightning or USB-C cables used in most Apple products). If you have a Raspberry Pi 4, it uses a USB-C, rather than a microUSB cable. If you need a power supply and cable, you can also buy those online – I prefer ones that have a built-in on/off switch so you can power down the Pi without unplugging it. An example of a power supply and cable with a microUSB plug and on/off switch is shown here.
Intro:
 If you want to set up a Raspberry Pi, but you don’t have a separate keyboard or monitor with ports and cables that plug into the Pi, you’ll want to perform what’s called a “Headless Raspberry Pi” setup. This tutorial outlines the steps needed when using a Mac to configure any Pi with WiFi capabilities (see a Raspberry Pi Models Comparison Table if you’re unsure if your Pi has WiFi). This page was written to setup a Pi for follow-along videos you’ll find on Prof. Gallaugher’s YouTube Channel, but the steps below can be used to set up any Raspberry Pi on a network requiring a single password. See this note if your network requires a UserID and Password.
Prepare a microSD Card with the Raspberry Pi OS Using the Raspberry Pi Imager
Step 1: Download the Raspberry Pi Imager Software
Prepare your microSD Card
- Plug the microSD card into the card reader slot on your computer, or if you need to use an external card reader, plug it into the external card reader, then plug the reader into your computer. The card reader (metal-side goes in first. It will only go one way, so if the card isn’t going in, flip it over).
Download and Install the Raspberry Pi OS Installer
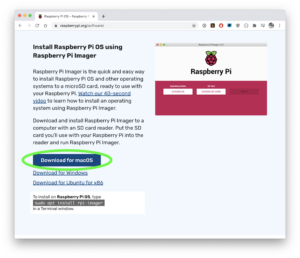
- Open a browser and go to https://raspberrypi.com.
 Select “Software” from the menu at the top of the page.
- Scroll to the section labeled “Install Raspberry Pi OS using Raspberry Pi Imager” and click to download the Raspberry Pi Imager appropriate for your computer (Windows, Mac, Ubuntu).
- Follow all steps to run the file that you’ve downloaded and “install the Installer”. For example, Mac Users, open Installer.dmg and follow the steps on screen, dragging the Raspberry Pi imager into the Applications folder. When done, you can close this window, delete the Installer.dmg file, and (Mac users) drag the Raspberry Pi Imager volume into the trash (that just gets rid of the installer).
Step 2: Use the Raspberry Pi Imager Software to install Raspberry Pi OS onto your microSD card
- Find and open the “Raspberry Pi Imager” program that you just installed. Mac Users, this will be in your Applications folder.
- If the computer warns you that the application was downloaded from the Internet, select the “Open” button to run it, anyway.
- You’ll see an Installation screen. Select “CHOOSE OS“.
- The topmost option should be fine. As of this writing it’s “Raspberry Pi OS (32-bit)”. Select the top-most option.
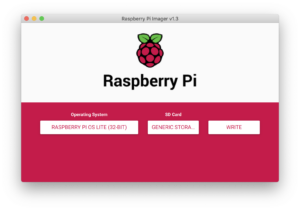 Select “CHOOSE SD CARD” and select the appropriate SD card for your installation. There may only be one option. If you have additional volumes installed on your computer (like I did in the accompanying tutorial video), make sure you select the volume for the SD card that you want to format and not any other drive that my have important information on it.
- Access the secret “Advanced Setup Menu” by selecting the gear icon in the lower right-hand corner of the Raspberry Pi imager (that icon will appear after you select your OS and SD card).
- Depending on your computer, you may be asked if you want to pre-fill Wi-Fi You will be asked if you want to pre-fill the Wi-Fi password from the keychain. If you’re computer is currently connected to the same Wi-Fi that your Pi will use, and if your Pi should use the same Wi-Fi password to access this network, then select “Yes”. You may subsequently be asked for your computer’s User Name & password. Fill that in to have your Wi-Fi credentials automatically added to the next screen.
- IMPORTANT NOTE ONLY FOR MY STUDENTS WORKING ON CAMPUS! The BostonCollege network does not allow Pi devices to log in using the same credentials you’d use on your computer. Instead you need to get your Pi approved through the helix.bc.edu website, and you’ll have to enter your Pi’s MAC address. Getting a MAC address without a keyboard and monitor & without being connected to the network is a challenge, but I’ve created a Google Doc that describes steps my students should use to configure their Pis for use on campus. Once you’ve completed these, then return to this page and skip to Step 4, below.
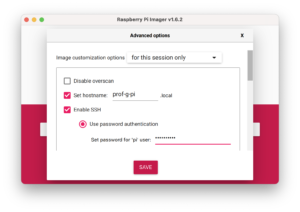 The hostname should be a unique name for your Raspberry Pi, and you’ll use this name when logging into your Pi. By default it’s raspberry. Enter a new hostname unique to you, but BE SURE to remember this name. Don’t use any spaces or upper-case letters. Valid names contain lowercase letters, numbers, and hyphens and can’t start with a hyphen.
- Select Enable SSH. SSH is used to log remotely into your Pi so you definitely need this option.
- Set the password for the ‘pi’ user. You’ll use this to log into your Raspberry Pi from a terminal program, so also BE SURE to remember this password.
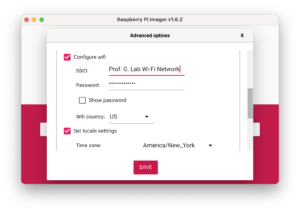 Scroll down this screen and make sure Configure Wi-Fi is checked.
- If you said “Yes” to the option above asking to pre-fill Wi-Fi, then you should see your Wi-Fi network’s name in the SSID field, and the password for this network should be filled in (you can click “show password” if you want to see the password). If you haven’t pre-filled your network info, enter the name of the Wi-Fi network you’ll be using, and the password needed to log into that network.
- Note for my students: If you are doing a setup on a mobile hotspot, then the SSID will be the name of your mobile hotspot, likely your phone’s name, and the password is the one used to log into that hotspot.
- Set the WiFi country. It is GB (for Great Britain) by default, since that’s the home country for the Raspberry Pi (thanks, Brits!). Be sure to select your country here (I’ve selected US since I’m in Boston, USA).
- Select and set the locale setting for your timezone. If you don’t have a usable value entered into this field, then you may have to do quite a bit of scrolling to find a location that works. There’s no setting for Boston, but we’re the same as America/New_York, so I’ll keep that.
- All other default options should be fine, so you can scroll to the bottom of this dialog box and select “Save”
- Depending on your computer, you may be asked if you want to pre-fill Wi-Fi You will be asked if you want to pre-fill the Wi-Fi password from the keychain. If you’re computer is currently connected to the same Wi-Fi that your Pi will use, and if your Pi should use the same Wi-Fi password to access this network, then select “Yes”. You may subsequently be asked for your computer’s User Name & password. Fill that in to have your Wi-Fi credentials automatically added to the next screen.
- Select the “WRITE” button.
- You may be prompted to enter your computer password in order for “Raspberry Pi Imager” to “make changes”. If so, enter your password and select OK. If there are no problems with your SD card, the installation process should proceed with writing to and verifying the write on the card. If not, then you may have a damaged card. You can attempt the steps below, but if these also don’t work, then your card is likely damaged and you should get a replacement.
- After getting a message that the Raspberry Pi OS has been written to your SD card and that you may now remove the SD card from the reader, select the “CONTINUE” button.
Step 3: Quit the Raspberry Pi Imager and Remove your microSD card
- Quit out of the Raspberry Pi imager program and return to the Mac Finder.
- Remove the microSD card from the microSD slot.
Step 4: Insert the microSD card into your Raspberry Pi
- Slide the card, metal pins first, into the mciroSD card slot on your Raspberry Pi. The card only fits one way, so if it’s not going in, flip the card over.
Step 5: Power your Raspberry Pi
- Plug your power source into the Pi’s miroUSB power connector. You should have a cable 5v, 2A power supply plug, or you should be using an appropriate rechargeable power supply (I use a standard cell-phone portable charger like this Jackery Mini 3350mAh for projects where I need mobile power). Your Pi may take as long as 30 seconds to boot.
NOTE: On at least one occasion I was not able to get a working Pi to boot at this stage. To fix this, I simply used the “free SD Card formatter tool at https://www.sdcard.org/“ to re-format my microSD card, then I repeated the install with the newly re-formatted card using the Raspberry Pi Imager, as shown above.
Step 6: Generate an ssh key for your new Pi
- If the terminal program isn’t already running, launch it by pressing Command-Space to launch Spotlight on your Mac, then type Terminal, and press the return key.
Windows users, feel free to investigate terminal programs, but it seems most folks use the free PuTTY program. You can find it, and instructions for use, by searching online. - Copy the line below and paste it into Terminal, then press return. This will allow your Mac to connect to your new Pi. You’ll only perform this step once when setting up a new Pi. You may get warnings or a host-not-found error. You can accept any default values and press enter, and you can ignore any warnings. Your computer might also not offer any response to this command. If so, simply continue to the next step.
ssh-keygen -R raspberrypi.local
If your Pi hangs during this step, you can stop the ssh-keygen step by pressing Control-C, and you can try again.
Step 7: Log into your Pi using the Hostname and Password that you Selected Above
- The default name for your Pi is “raspberrypi”, but if you went through the steps above, you selected your own hostname and a new password in the configuration above. Enter the command below, replacing the word hostname, below with the hostname you entered above, then press return.
ssh pi@hostname.local
- The first time you log into a new Pi, you’re likely to see a warning prompt stating something like: The authenticity of host (your pi’s hostname & IP address) can’t be established. If so, you’ll be asked to respond to a prompt: Are you sure you want to continue connecting? Simply type yes and press the return key. You may see another warning stating Warning: Permanently added ‘your hostname and IP address’ (ECDSA) to the list of known hosts. This is exactly what is expected, so don’t be concerned about this warning.
- NOTE: If you receive a scary warning with @ signs stating something like: “WARNING: POSSIBLE DNS SPOOFING DETECTED!”, this occurs because the IP address being used for your Pi was used for another device. You’ll likely not see this, but if you do, simply try to log in, but this time use sudo before the command above, like this, being sure to replace hostname below with the hostname you gave your Pi:
sudo ssh pi@hostname.local
- NOTE: If you receive a scary warning with @ signs stating something like: “WARNING: POSSIBLE DNS SPOOFING DETECTED!”, this occurs because the IP address being used for your Pi was used for another device. You’ll likely not see this, but if you do, simply try to log in, but this time use sudo before the command above, like this, being sure to replace hostname below with the hostname you gave your Pi:
- Depending on the computer you are using, you might then be asked for your password – this will be your computer’s password, so enter your computer’s password (e.g. your Mac password, not the Pi’s or your network login) and press return.
- You may get an additional warning mentioning an ECDSA key fingerprint and asking “Are you sure you want to continue connecting (yes/no)?” type yes and press enter.
- You’ll then be prompted to enter
pi@hostname.local’s password:
Enter the password for your Pi (not your Mac), and press enter. You should now be properly logged in.
Note: If you ever want to change your Pi’s hostname or password, you can do this by logging into your Pi, then running the raspi-config program by entering this command at the prompt & pressing return: sudo raspi-config.
Pro-tip: Pressing the up-arrow key within Terminal will cycle back through the commands you typed at the command prompt this session, starting with the most recent one, first. Once you’ve used up-arrow, you can also down-arrow to cycle back to the most recent commands.
Step 8: Update the Software on your Pi
If asked to confirm whether you want to use a certain amount of disk storage during update and upgrade below, always type Y, then return.
- From the Terminal, copy & paste the line below, then press return.
sudo apt-get update -y
This will schedule files to be updated when you copy the statement below. Note that this command will cause several screens of output to eventually scroll across the terminal. At times the output might appear to stall, but it should resume after a few seconds. While I sped up the install during the demonstration video, this command actually took about a minute to complete and return to the terminal prompt. It’s quite possible your update may take more time, so be patient.
- Enter the statement below and press return to upgrade the software on your Pi to the latest available versions.
sudo apt-get upgrade -y
This will upgrade the software on your Pi to the latest versions available. Note that this command will also cause several screens of output to eventually scroll across the terminal. Once again, at times the output might appear to stall, but it should resume after a few seconds. While I sped up the install during the demonstration video, this command actually took about 12 minutes to complete and return to the terminal prompt. It’s quite possible your upgrade may take more (or even less) time, so be patient.
And remember to sudo halt when shutting down…
When turning off your Pi (removing the power), type the command below to avoid any potential file corruption during shutoff, then wait for the green lights on your Pi to stop flashing and turn off (about 3-4 seconds). Then you can turn off the power to your Pi (or unplug it if you don’t have an on/off switch on your power cable).
sudo halt
If you’re following this tutorial as part of another tutorial, then return to the page or project video to continue with the project you’re working on: e.g. return to the pi-cabinet start page to find in this series and links to accompanying step-by-step YouTube videos at: https://bit.ly/pi-cabinet. Return to the MakeItTalk project start page for the iOS-controlled “Make It Talk” project (Talking Yoda).
❖ ❖ ❖ ❖ ❖
Ready for more? Check out tutorials on Robotics, Wearables, App Development and more at: http://YouTube.com/profgallaugher. Please consider subscribing and do share with others who may be interested!
Want to learn to build apps? The same content I use in my semester-long online course (videos and tutorial content) is available for less than $25 via links you’ll find at https://gallaugher.com/swift.
Look for more updates at gallaugher.com as well as on Twitter @gallaugher