At this point it’s assumed you’ve set up your Raspberry Pi in “headless” mode and added libraries to support CircuitPython, netatalk (if you’re a Mac user, so you can copy files to your Pi, or if you’re a Windows user, you use a tool like Samba), and PyGame (for sound). If not, you can set these up by following tutorials at https://bit.ly/raspberry-pi-tutorials
Equipment used in this tutorial:
- A Raspberry Pi computer (not a microcontroller, like the Raspberry Pi Pico), with a microSD card, configured as mentioned above. I use a Raspberry Pi 3 A+ in this tutorial, but it should work with other Pis, as well.
- A speaker that can plug into the Raspberry Pi (I use a simple portable and rechargeable Hamburger-style speaker in this tutorial). Most Raspberry Pi’s, except for the Pi Zero line, have a standard, circular 3.5mm audio jack, so any speaker with a standard pin-style 3.5mm audio plug should work with these Pis. If you have a Raspberry Pi Zero, you’ll need to add some additional hardware & configuration to add a speaker. You can find information on some options at the beginning of the video: “CircuitPython School – Playing Sound (wav or mp3) with PyGame on a Raspberry Pi” that you’ll find at https://bit.ly/raspberry-pi-tutorials. Unless you need the physical smaller Raspberry Pi Zero, I’d recommend buying at least a Raspberry Pi 3 A+ since it’s only $10 more, has the audio jack built in, and the hardware to add a jack will probably run you at least $10.
What We’re Doing
We’re going to send remote messages to our Raspberry Pi (first using just terminal commands, but in a future video, using an iOS phone app). These messages will eventually be received by a Python program that we’ll write and run on the Raspberry Pi. This Python program can be written to perform actions based on messages that are sent – for example, to play a particular MP3 file, adjust the speaker sound volume, or move a robot.
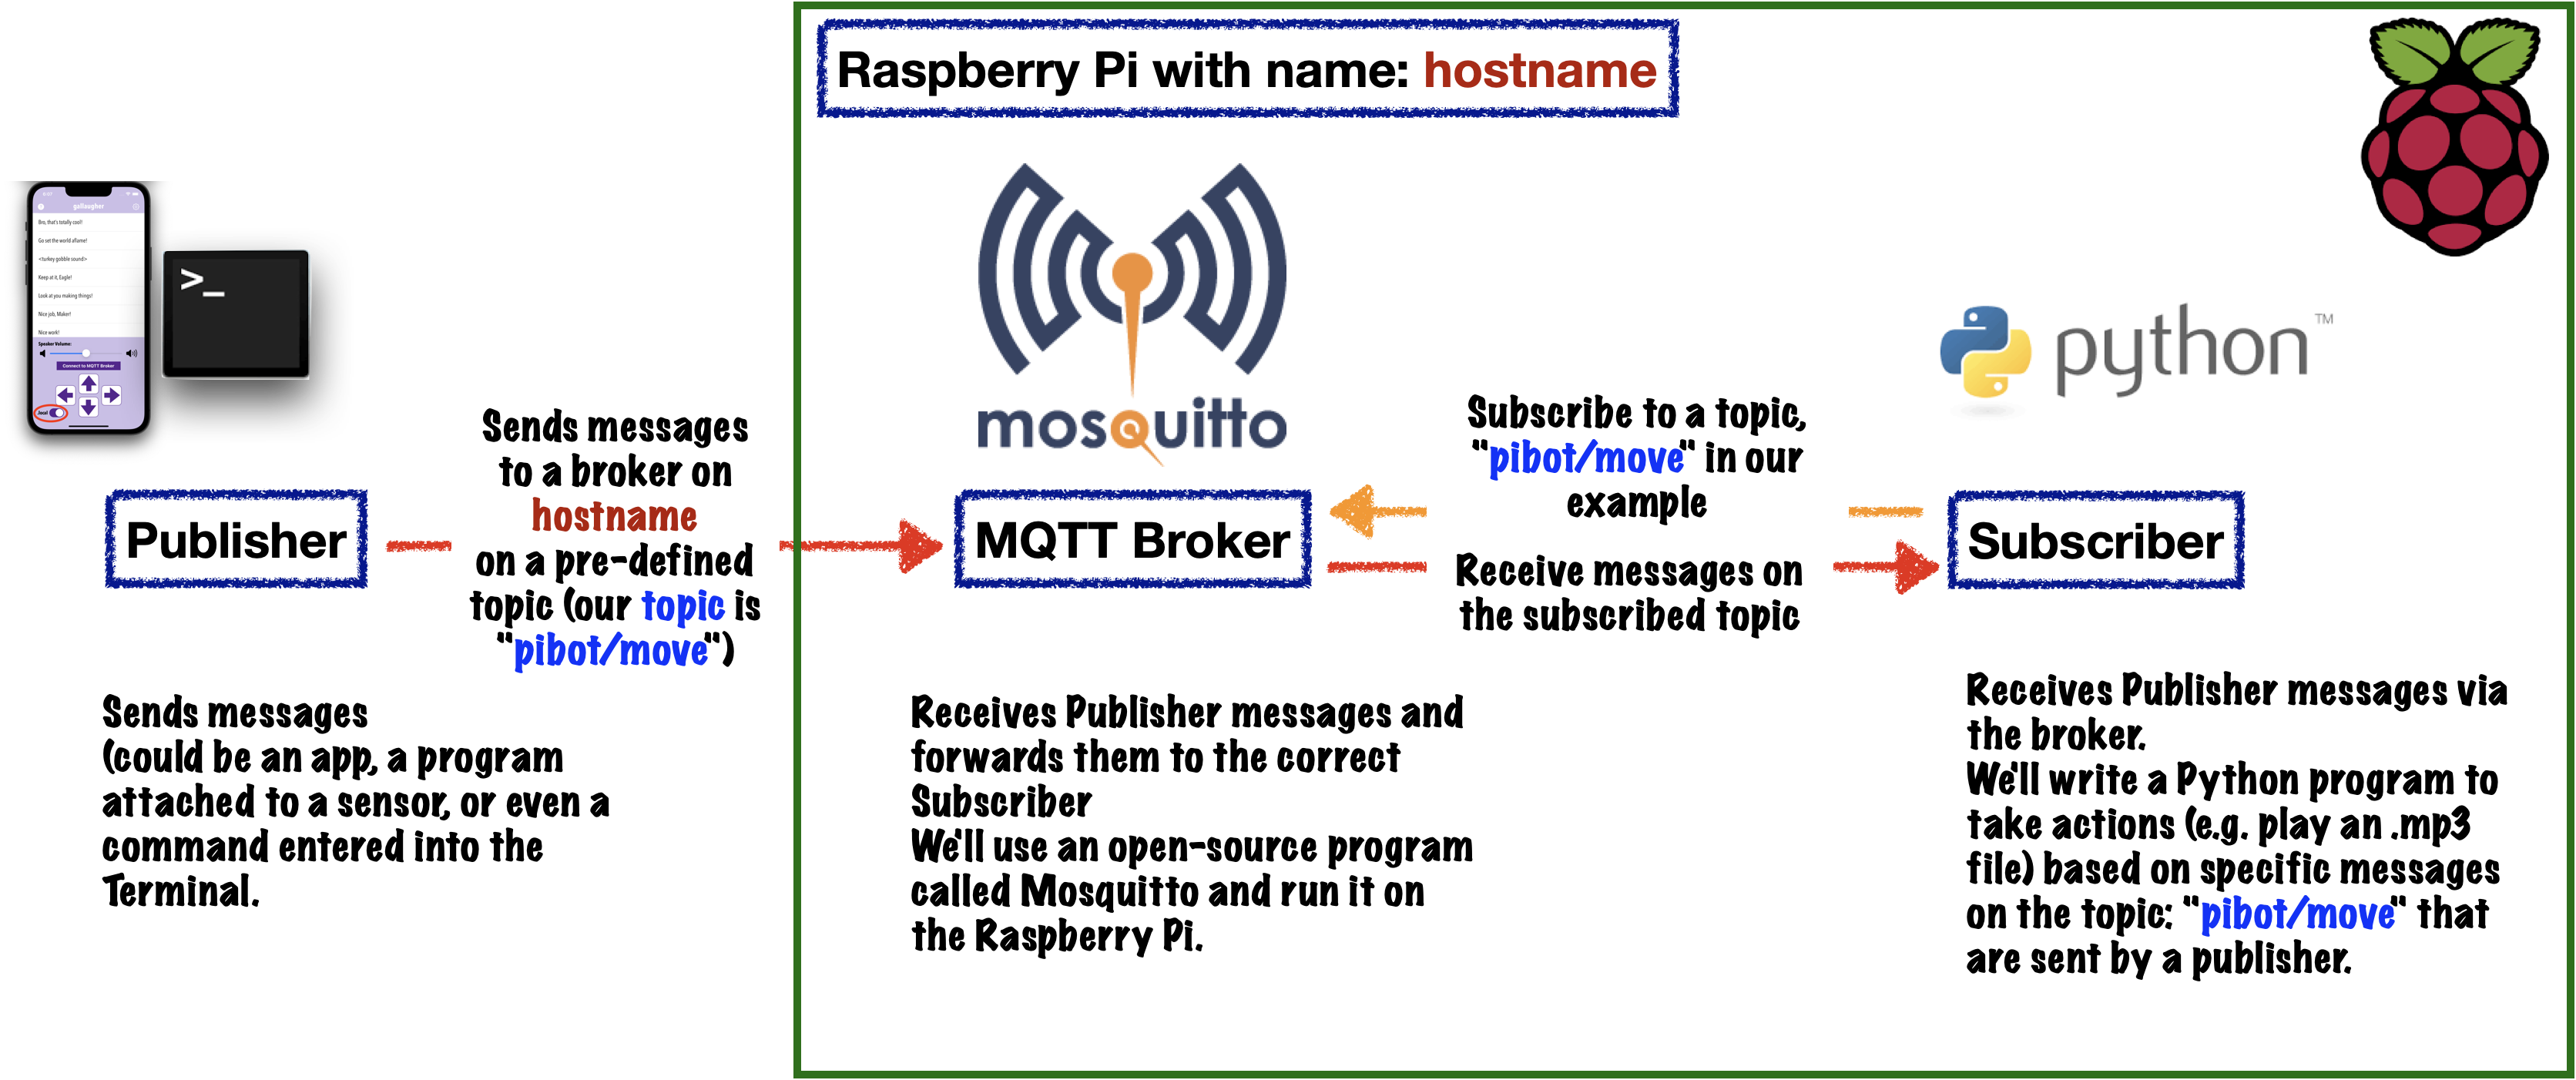
The mechanism we’ll use to send and receive commands is called MQTT – it’s a public domain, lightweight (meaning messages are small & not very complex) messaging standard, which is popular in Internet of Things projects. MQTT projects usually have at least three software components:
- a publisher – this is what sends out messages.
- a subscriber – that listens for and receives any messages on a topic of interest
- a broker – which acts as a sort of middleman or switchboard, receiving messages from the publisher and passing these messages on to the appropriate subscriber.
This lesson, we’ll simply type the publisher message into the terminal, but in a future video I’ll demonstrate how you can download a free iOS app to publish messages from an iPhone or iPad. The subscriber will be a Python program written to receive messages published on a topic used in our exercise (our example will use the topic phrase “pibot/move”, but the topic can be set by the programer). The switchboard-style broker software will be a free, open-source MQTT broker called Mosquitto (spelled with two T’s for MQTT). In our example, we’ll run both the Mosquitto broker and the Python subscriber program on our Raspberry Pi, but it is possible to create more advanced systems that run the broker on a completely separate device – this would be useful if you had lots of different subscriber devices (think a heater, a door lock, an air conditioner) that might respond to incoming messages (maybe sent by a thermometer, a weather station, or an app).
Add the robot-sounds folder to your Raspberry Pi so we have sounds to play, on-command, when messages are received
- Visit the Google Drive at the URL below.
https://bit.ly/circuitpython-school-files - Right click the “robot_sounds” file and download this to your computer.
- Copy the entire robot_sounds folder from your computer to your Raspberry Pi.
- Mac users will use Finder: Go > Connect to Server to connect to their Pis (assuming you’ve installed Netatalk, as shown in a prior video). In the Connect to Server: field enter:
afp://hostname.local
Where hostname is the hostname of your raspberry pi. My students working on campus should leave “.local” off the end of this command. If asked to connect with a username and password, the username should be “pi”, and the password should be your Raspberry Pi’s password. - Windows users will use a program like WinSCP or Samba.
- Mac users will use Finder: Go > Connect to Server to connect to their Pis (assuming you’ve installed Netatalk, as shown in a prior video). In the Connect to Server: field enter:
- Then copy the entire “robot-sounds” folder into your Raspberry Pi’s “pi’s home” directory (which is really the “pi” directory).
When done, the robot_sounds folder on your “pi” directory on your Raspberry Pi (maybe shown as “Pi’s home” on the Mac) should have a bunch of mp3 files named 0.mp3 through 12.mp3, plus a file named startup.wav, which contains the startup sound for your robot.
Plug in Speaker, Log Into Raspberry Pi, and Test the Sounds
- Plug your speaker into the Raspberry Pi’s audio jack and make sure your speaker is powered on and the volume is turned up.
- Power your Raspberry Pi & turn it on.
- Open the terminal and use ssh to log into your Raspberry Pi.
- At the prompt, enter the command below and press return. You should hear a sound play through your speaker:
aplay robot_sounds/startup.wav
Install Mosquitto and the Paho Python Libraries to Use MQTT in Python Programs
Now we’ll install the free Mosquitto broker program on our Raspberry Pi.
- To install the mosquitto software, enter the command below at the command prompt and press the return key. As always, select “Y” if asked if you’d like to continue, even though the operation will use additional disk space. NOTE: Some of the installations may seem like they are stalling at first, but after a minute or two you should see text showing installation progress. The install should only take a minute or two.
sudo apt-get install mosquitto mosquitto-clients
Now install the Paho-mqtt libraries for Python that will allow us to write programs with MQTT commands. Do this by by entering the command below and pressing the return key. The install sometimes takes a few seconds before messages appear, but the install should only take a minute or two.
-
sudo pip install paho-mqtt
Verify that the mosquitto broker software is now running by typing the command below and pressing the return key.
-
systemctl is-active mosquittoYou should see a message stating “active” if everything is working properly. If, for some reason, you don’t receive an “active” message, you can try rebooting your Pi, waiting about 30 seconds, login, then re-enter the command above.
We now need to configure security for the mosquitto broker that we just installed. Starting with v. 2.0 (Spring 2021), mosquitto now requires security to be set up to access the broker from other computers and devices. This is what we’ll need to do since we’re going to access the mosquitto broker on our Raspberry Pi to send messages (publish) to the broker. We need to explicitly tell Mosquitto that it’s OK to accept anonymous messages. This’ll allow our existing app to use the broker on our robot. Normally when developing IoT projects, you want to have tighter security, and implementing a password for publishers is a good idea, but since the app we’ll eventually be using was developed under the prior version of Mosquitto that didn’t require additional security measures, we’ll keep things anonymous in this project.
To set up security to allow anonymous connections:
- Open the mosquitto configuration file, in the exact directory location required by mosquitto, by entering the following at the prompt, then press the Return key.
sudo nano /etc/mosquitto/mosquitto.conf - Copy the two lines below and paste them in at the top of nano, running in your terminal window:
listener 1883
allow_anonymous true
The listener assumes mqtt is running on the standard “port” 1883, which it should be unless you’ve changed this when configuring MQTT. The listener needs to be setup, starting with mosquitto v. 2. Setting allow_anonymous to true will let our app connect to the Raspberry Pi without requiring any special login credentials.
- Quit nano, saving your work, as usual: CTRL+X, Y, Return
Use systemctl to Automatically Run mosquitto Each Time Your Pi Boots
Enter the command below and press the return key to ensure that the mosquitto broker runs automatically every time you boot your Pi (no need to ssh in or type additional commands). This is exactly what we’ll want if this Pi is dedicated to our robotics project – ideally we’d just turn our robot on and the software we need will begin running.
-
sudo systemctl enable mosquitto.service
You can verify everything is working by stopping your Pi with the command:
-
sudo halt
- Wait 3-4 seconds until the green light on your Pi stop flashing and turns off. Then power your Pi off.
- You’ll probably have to close your Terminal (Mac) or PuTTY (Windows) window, then open a new Window.
- Turn your Pi on again.
- Log back into your Pi using ssh
- Then retype the command below and press the return key.
systemctl is-active mosquittoYou should see “active”, confirming that mosquitto has begun running on its own.
Create a Subscriber Program to Listen for Published “pibot/move” Messages, Then Play Sounds Based the Messages
We’ll create a Python program to act as a subscriber, and we’ll name this program sound-bot.py. This program will listen for messages from a publisher that are forwarded by the intermediary, the Mosquitto broker. For example, if the Mosquitto broker receives a message with the text “0”, it will send the “0” message to sound-bot.py, and this program will play the file “0.mp3” in the folder named “robot-sounds”.
Follow the steps below to create the sound-bot.py program:
- Open a browser and visit the following GitHub repo at the URL, below:
https://github.com/gallaugher/sound-bot/blob/main/sound-bot.py - Highlight the entire program on this page, and copy it.
- Open the Mu program, which we use to enter and edit Python programs.
- Paste the Python code into Mu.
- Save this program to your to your Raspberry Pi by double clicking the tab containing the code you just pasted. This will bring up the “Save As…” dialog box.
- From “Save As…”, navigate to the “pi” directory (called “pi’s home” on Macs).
If you’re not connected to your Pi you may have to go through whatever procedures you use to connect the Mac Finder or Windows Explorer to your Pi, so you can save files to the Pi. - Save the file using the name:
sound-bot.py
Now execute the sound-bot.py program from the Terminal prompt:
- Run the program by typing the line below at the command prompt, then press the return key.
python sound-bot.py
If things are working properly you’ll see a PyGame message print, that’s part of the PyGame libraries we’re using, you’ll hear a message played through the speaker stating “ready to roll, lets go!”, then you’ll see confirmation messages that the program is subscribing and has subscribed.
You will NOT be returned to the command prompt in this terminal window because the program was run from within this window and it is continuing to execute.
If, after running sound-bot.py you see error messages, then there’s either an error in your program, or you hadn’t properly installed the PyGame library or the “robot-sounds” folder. Go through earlier steps, or earlier videos.
Open a New Terminal Window then as a Test, Write a Command to “Publish” a Command to Move our Robot
- From with the Terminal program, select the Shell menu, then New Window > New Window with Profile – Basic (or use the shortcut Command-N). This will open up another terminal window and return you to the command prompt.
- From within this new window, enter the commands log in to your Pi using ssh (the same commands, Pi name, and password you’ve been using throughout this tutorial).
- Try out a sound by entering the command below and pressing the return key. You should hear a sound coming from your speaker. If it works, feel free to experiment by changing the sounds (make sure any number corresponds to the name of a sound in your Pi’s “sounds” folder).
mosquitto_pub -h localhost -t "pibot/move" -m "0"
NOTE: the name localhost works because you are already logged into your Pi. If you want to try to access another Pi (say a classmate’s Pi), you can enter their Pi’s hostname in place of localhost.
If everything works, congratulations – your Pi is now set up to listen for and act on commands sent to it over the Internet (and that’s what we’ll do in the next video when we write an iOS app to control the robot).
Create a Service to Run control-pibot.py Automatically Whenever the Pi is Started
- Close the Terminal window where you entered the mosquitto_pub commands above (you can click the “Terminate” button when closing this window)
Look at the output in our first window. You should notice that underneath the “subscribing” and “subscribed” messages, there are now messages for each command you entered (e.g. to play a particular sound file, go forward, or stop). We wrote control-pibot.py to print out these messages when it receives them, so this is a nice additional check that confirms that our python program is receiving messages as a subscriber to our mosquitto server.
Finally – let’s make sure control-pibot.py will run each time our Pi is started. To do this, follow the steps in the final section:
- From the Terminal window, type Control-C to stop the execution of control-pibot.py. You can ignore the messages that show up as a result of stopping the program.
- Enter the command below to begin creating a nano file with the name of the service we are going to create, then press the return key.
sudo nano /lib/systemd/system/pibot-mqttclient.service
- Open a browser window and return to the GitHub repo for the project at: https://github.com/gallaugher/crickit-pi-bot
- Find and click on the link for the file named: pibot-mqttclient-service. This will open a page containing code for the service we’ll write to automatically run control-pibot.py after the Pi starts.
- Highlight all of the lines in the program in this file and copy them to the clipboard.
- Return to the Terminal and paste the program into nano.
- Type Command-X to exit nano, then the return key to save using the name we gave the file.
- Enter the command below and press the return key to run this new pibot-mqttclient-service file whenever we start this Pi.
sudo systemctl enable pibot-mqttclient.service
You should see a verification message that says something like:
Created symlink /etc/systemd/system/multi-user.target.wants/pibot-mqttclient.service → /lib/systemd/system/pibot-mqttclient.service
Verify Everything is Working As Expected
- Enter the command below and press enter to stop your Pi.
sudo halt
- Wait until the green light on the Pi stops flashing and turn off (3-4 min), then turn off power to the Pi and the battery pack attached to the Motor HAT.
- Plug the Pi back into the mobile phone battery, then turn on the AA battery pack and (if you it has an on/off switch) the mobile phone battery.
- After about 30 seconds to a minute you should hear the Pi play the startup message in its speaker. And you haven’t even logged into the terminal! Nice work!
Congratulations! You’ve got an Internet-aware robot set up and ready to receive orders. Up next – create an iOS App to Control Your Robot!
- You can now turn off your mobile phone battery and AA battery pack to preserve batteries while we set up the iOS app.
Install the App on your Device!
- Visit the App Store on your iOS device and download the Mil Mascaras app:
https://apps.apple.com/us/app/mil-mascaras/id1550345112
Be sure your robot is charged & turned on (mobile phone battery, 4AA battery pack, and speaker). Shortly after turning on your robot you should hear “Ready to Roll! Let’s Go!” Make sure your iOS device is on the same Wi-Fi network as your robot. Click the “Connect to Robot” button. Press a cell in the list of sounds to play that sound. Adjust the volume by moving the volume slider. Hold your finger down on an arrow button to begin moving in that direction and raise your finger to stop the robot. Have fun! - If you have and know how to use Xcode, you’re welcome to use the app you downloaded as part of the GitHub project GitHub repo at https://github.com/gallaugher/mil-mascaras. Just be sure to click the file named mil-mascaras.xcworkspace to open the project, NOT the .xcodeproj file. This project uses cocoapod libraries, so it needs to be opened with the .xcworkspace project.
No COVID Bro or Plague Princess in the app: Apparently this is a violation of Apple’s guidelines, BUT if you like these statements, they are still in your sounds file and you can simply click the gear symbol at the top of the app and add the “COVID Bro…” sound as sound 10 and “Plague Princess…” sound as sound 11. Consider them to be easter eggs 🙂
And if you got this far – congratulations! Please like, post a comment in YouTube, send a tweet, and consider subscribing. Interest in the channel & expansion of reach motivates me to continue to create more content like this. I’m honored to have been part of your robotics journey.
– Peace, Prof. G.
❖ ❖ ❖ ❖ ❖
BONUS: Adding Your Own Sounds + Changing Your Pi’s Hostname
Replacing Sounds
You can easily add your own sounds to this project. Replacing sounds involves two steps:
- Replacing sounds on the Raspberry Pi that powers the robot, and
- Using the iOS app to edit the list of sounds.
The project standardizes on sounds named numerically, starting with 0.mp3. To replace sounds or add new sounds.
- Use the Mac Finder to Connect To… the Raspberry Pi that controls your robot (techniques described in an earlier step when you first copied your sounds from the Mac to your Pi).
- Open the “Pi’s Home” directory, then open the “sounds” directory. You should now see the original sounds used in this project, labeled 0.mp3 through 11.mp3, plus startup.mp3 (which is the sound that plays when the robot first starts: “Ready to roll! Let’s go!”
- Replace or delete any of these files with new ones that you’d like to use. Just be sure that the files are numbered consecutively, beginning with 0.mp3. You can replace the startup sound, just make sure your new sound is also named startup.mp3.
Now edit the sound list in your iOS app:
NOTE: This does NOT change things on your Pi – it just changes the list on the app and should be used after you update sounds on your Pi to make your app’s sound list consistent with the sounds in the “sounds” folder on your Pi. Clicking on the first cell will always trigger the play of a sound named 0.mp3, clicking the 2nd will trigger 1.mp3, etc. The descriptions are only there to assist the app user in recognizing sounds, so if you enter the wrong description for a sound file, you’ll still hear whatever sound number was clicked.
To reorder the list of sounds:
- Click the cog wheel in the upper right-hand corner of the app. You’ll receive a warning about changing file names and host names. Click OK.
- To Move and reorder sounds, click the “Move/Delete” button. The list will change, adding red circles with minus signs for deletion on the left-hand side, and three lines on the right of each cell for moving.
- Move a cell by clicking and dragging the three lines on the right of the cell that you want to move. Release it in the space where you want it to be repositioned. You’ll now see the new name for that file in the left-hand side of this cell. E.g. if you drag 6.mp3 to 2.mp3, then the cell that you drag will now show as 2.mp3 and all of the cells below it will be renumbered in sequence.
- Click “Done” when you are done moving cells.
To change the description of a sound:
- Click the cell where you wish to change its description. You’ll see this description shown in a new app screen.
- Enter the new description and press Save. You’ll be returned to the list.
To delete a cell from the sounds list:
- You can do this either from within “Edit” mode by clicking the red minus delete circle on the left side of any cell that you want to delete, or you can swipe left on the cell to delete. Either gesture accomplishes the same thing.
After deleting a cell, the cells below the deleted cell will be renumbered accordingly. Again, make sure that what you see in your app corresponds with what you’ve got in your “sounds” file.
If you want to restore the original sound list and descriptions, simply delete the app from your iOS device and reinstall it. The list is stored in what Apple calls “User Defaults”, and is specific to each device, so if you have this app on multiple devices, you’ll have to update the access list on each device.
❖ ❖ ❖ ❖ ❖
Ready for more? Check out tutorials on Robotics, Wearables, App Development and more at: https://youtube.com/profgallaugher. Please consider subscribing and do share with others who may be interested!
Look for more updates at gallaugher.com as well as on Twitter @gallaugher