Free Step-By-Step Videos and Tutorial Pages Below!
 Goal:
Goal:
Create a first Raspberry Pi robotics project that doesn’t require soldering, does not require any 3D printing, is relatively low cost, high-quality, that can be controlled via an iOS app, and that forms a platform that can be expanded with even more features over time.
 I designed this project for my University students, specifically for those who were new to programming and robotics. All commands and programs that you’ll need can be found in the tutorials, below, so you won’t need to write any programs – you can just follow the steps in these videos! However, the tutorials also explain what’s going on, so you can learn how things work, if you’d like, and build skills to customize and further expand your bot.
What You’ll Need For These Tutorials:
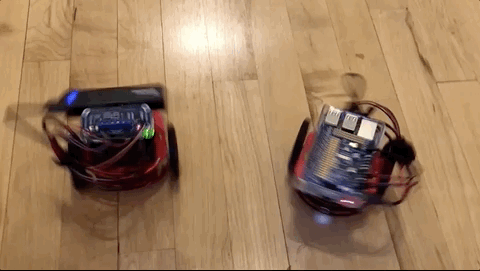
The tutorials present two options:
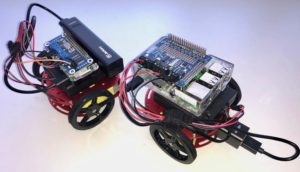
- A no-soldering-required version using the less-expensive Waveshare Motor Driver HAT. (robot on the left)
- A soldering-required version using the Adafruit DC and Stepper Motor Driver HAT, which requires soldering, but which is also more powerful, is well-supported, and can drive even more motors for expansion. (robot on the right)
| Cheap, Small, No Solder Option | Require Soldering, More Powerful, More Expensive |
|---|---|
| Raspberry Pi Zero WH ~$14 | Raspberry Pi 3 A+ ~$25 - or - Raspberry Pi 3 B+ (more ports than you need) ~$35 |
| Protective case for Pi Zero ~$5 | Protective case base for Pi 3 models ~$5 |
| WaveShare DC Motor HAT ~$13 | Adafruit DC Motor & Stepper Driver HAT Mini Kit ~$23 ** Note: Adafruit Crickit HAT for Raspberry Pi was not shown in the tutorials. More expensive, but highly recommended. No soldering (or toothpicks) required, most expandable (can easily add lights, sound, capacitive touch), very high quality & well-supported ~$35 |
| wooden toothpicks | Soldering iron & solder (costs vary - see Adafruit's great guide) |
Additional parts needed for either choice, above:
- Adafruit Mini round robot chassis includes two DC Motors, wheels, and treads < $20
- A microSD card, 16GB – 32GB recommended available online for < $6.
- A microUSB cable to connect the Raspberry Pi to a power source (the one included with the mobile phone charger may work).
- Portable power for the Raspberry Pi (a mobile phone charger works well, you’ll need, and most chargers come with, a cable to connect this to the microUSB power port on the Pi – microUSB is an Android-style not an iPhone-style connection) – in the videos I use Jackery Mini 3350mAh Portable Charger) ~$14 or less, and you may already have one you can use.
- 4 x AA battery case (for single-use batteries) or 6 x AA battery case (for rechargeable AA batteries) w/on-off switch & wire connections < $3.
- AA batteries (if using rechargeable AAs, you’ll also need a charger for those batteries).
- Four male-to-male (pin-end) jumper wires <$2.
- Velcro-style tape with an adhesive sticky-back on one side < $8
You’ll also need
- A Mac computer, cable of running Apple’s free Xcode software.
- Small pliers.
- Screwdrivers or a precision screwdriver set with very small Phillips and flat-head tips.
- Electrical tape.
- Scissors.
Want more info on selecting parts? Here’s a more comprehensive parts guide.
The video also assumes that you’re running on a home Wi-Fi or similar network that just requires a password (no userID). If not, here’s some advice on running your Raspberry Pi when your Wi-Fi network requires both a userID and password.
GitHub Repo
Includes all of the code (Python3, Pi service scripts, Swift) you’ll need for tutorial follow-along, making for easy copy/paste or download and run:
Tutorials
Look for the titles below in the playlist at: http://bit.ly/iOS-Pi-Robot. I haven’t linked to individual videos in this playlist because if I update a video, I need to replace it entirely (YouTube won’t let authors substantially edit uploaded videos while keeping the URL, but the playlist URL won’t change). The Web Pages below are good follow-along companions to the videos, because you can simply copy and paste commands.
Step 1: Setup the Pi Without a Keyboard or Mouse (assumes you’re using a Mac)
- Video: Headless Raspberry Pi setup for Mac (in playlist)
- Web Page: Setup Raspberry Pi Without Keyboard or Mouse
Step 2: Installing CircuitPython on the Raspberry Pi
- Video: Installing CircuitPython on the Raspberry Pi on a MacBook (in playlist)
- Web Page: Installing CircuitPython on a Raspberry Pi (includes modifications needed for Waveshare Motor Driver HAT users)
Step 3: Setup the Motor HAT
If you are using the Adafruit DC Motor and Stepper Driver Hat Mini Kit
-
- Video: MakerSnack Assembling the Adafruit Motor Hat (in playlist)
- Web Page: See Adafruit’s Assembly Guide for the DC and Stepper Motor HAT for Raspberry Pi
If you are using the Waveshare Motor Driver Kit (no solder option, Pi Zero form factor)
-
- Video: MakerSnack Installing and Testing the Waveshare Motor Driver HAT for Raspberry Pi (in playlist)
- Web Page: Install and Test the WaveShare Motor Driver Hat to Use CircuitPython on a Raspberry Pi
Step 4: Assemble and Test the Mini Round Robot Chassis
- Video: Assembling and testing mini round robot chassis with Raspberry Pi (video shows Pi 3 B+ and Adafruit DC Motor and Stepper Driver HAT Mini Kit) (in playlist)
- Web Page: Assembling and Testing the Mini Round Robot Chassis for a Raspberry Pi Bot Project (photos and steps show assembly for Pi Zero WH and Waveshare Motor HAT)
Step 5: Install and test the mosquitto MQTT Broker on a Raspberry Pi (this is the software tool that will allow the Pi to accept commands sent to it over the Internet).
- Video: Installing the Mosquitto MQTT Broker & Publisher on a Raspberry Pi Robot (in playlist)
- Web Page: Installing the Mosquitto MQTT Broker & Publisher on a Raspberry Pi Robot
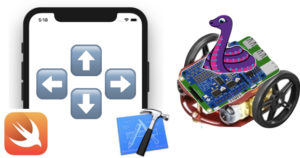
Step 6: Creating an iOS App to Control Your Robot
- Video of full Code-Along iOS App Instructions: Build a Swift iOS app to control a Raspberry Pi robot (in playlist)
- Video to Quickly Download Software, Modify (if needed) and Run on your Mac and iOS Device: TBA
- Web Page: Control your Pi Bot with an iOS App – Quick Download & Run (without explaining how to create the app from scratch)
Coming Soon:
- Make it Talk (sneak peek demo video showing how I modified a pibot to speak with an Irish accent and distribute fliers for the Tech Bootcamp Course I’m running for Boston College in Dublin – Summer 2019)
Did You Build It? Win a Sticker!
Tweet a photo / video of your work with the hashtag #iOSCodeCrush. Each week we’ll randomly choose a hashtag poster to receive an ultra-cool “My Mac Builds Apps” laptop sticker.
Want to Learn More?
Curious about additional content?
- To Learn to Build Apps (zero to full-stack course with over 100 videos for < $25): “Learn to Program Using Swift for iOS Development” is a video-centric course ideal for flipped-class or online learning. Over 100 videos take students with no assumed programming experience through a “full stack” experience that ends with a “Yelp-like” restaurant review app that uses Google log-in, shared data via Google Cloud Firestore and Firebase Storage, photos, maps, and more. The entire product is just $25 online. [share with professors, faculty friends, and self-learners]
- To Lead in Tech: The award-winning text “Information Systems: A Manager’s Guide to Harnessing Technology” is updated each year, is used by over 300 programs, and is only $29.95 for an online version. [share with professors, faculty friends, and self-learners]
- Subscribe to the YouTube Channel: I regularly post all sorts of YouTube tutorials on topics including Making, iOS App Development, Excel Use, Inspiring Tech Luminaries, and more. Other social media links are above-right on this page.
- Follow and Explore: I am also active in Twitter and other social media. You’ll find links to Twitter, Instagram, GitHub, and more in the icons at the top right of this page. Send a note if you found the shared material helpful. And please do share with others. I love it when students and faculty learn from my work.
Thanks & Keep Hacking!