Some campus networks, including my home university’s network, require smart devices to have their MAC address registered before a device can be approved on the network (MAC stands for Media Access Control address, a unique identifier for any networked device, not to be confused with the computer brand) . If you don’t have a keyboard or mouse, then how can you find your MAC address before your Raspberry Pi is on a Wi-Fi network? These steps work with any Wi-Fi capable Pi being set up on a Macintosh.
This tutorial assumes you’ve already formatted a microSD card, downloaded a version of the Raspbian operating system, and “etched” this onto the microSD card. If you haven’t, follow all points in Step 1 through Step 3 in this tutorial, then return here.
Step 1: Update the config.txt file
- With your microSD card properly configured and plugged into your Mac you should see a “boot” volume on your desktop. Double click this volume to see a list of files that you just installed.
- Find the file named config.txt. Double-click this file to load it in TextEdit so that you can edit the file as plain text.
- Scroll to the bottom of this file, then add the line below as a new line at the end of the file
dtoverlay=dwc2 - Press enter to add a new, blank line after the line you entered above, then save and quit TextEdit. If for some reason you’re not using TextEdit, then make sure you’ve saved the file as a plain text .txt file, not a .docx, rft, .html, or anything else.
Step 2: Update the cmdline.txt file
- Find the file named cmdline.txt in the “boot” drive’s finder window. Double-click this file to load it in TextEdit in plain text.
- Find the word “rootwait” in this file and after this word, add a space, then paste in the line below. There should be an additional space after this text before any other text (if any) beings:
modules-load=dwc2,g_ether
- save and quit TextEdit. Again, if for some reason you’re not using TextEdit, then make sure you’ve saved the file as a plain text .txt file, not a .docx, rft, .html, or anything else.
Step 3: Boot Your Pi
- Right click the “boot” volume you on your desktop and select “Eject”.
- When the boot volume vanishes from your desktop, take the microSD card out of the card reader and insert it into your Raspberry Pi’s microSD slot (it will only go in one way).
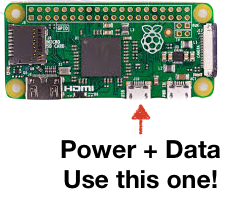 Plug your Pi into a USB cable. Note: If you’re using a Pi Zero, make sure you plug it into the micro USB jack that is between the HDMI jack and the other microUSB jack (see diagram). The USB jack on the end only provides power, but this middle jack provides both power and data.
- Plug your Pi into your Mac’s USB port. It will power on and should boot in about 30 seconds or less.
- Generate an ssh key so your Mac can reach your Pi (you’ll only need to do this once). Return to your Mac’s terminal program, copy the line below and paste it into Terminal, then press return. This will allow your Mac to connect to your new Pi. You’ll only perform this step once when setting up a new Pi. You may get warnings or a host-not-found error. You can accept any default values and press enter, and you can ignore any warnings.
ssh-keygen -R raspberrypi.local
Note: if you’ve already worked with a Pi on your Mac, you may see a scary warning about a security risk – you can ignore this.
- The default name for your Pi is “raspberrypi” and the default password is “raspberry”. We’ll change these, soon, but first, log into your Pi by typing the following into the Terminal, then pressing return.
ssh pi@raspberrypi.local
- When asked for your password, type
raspberry
The password will be hidden as you type it.
There is a chance you may get a “Connection refused.” message that returns you to your Mac’s prompt. If so, just try the ssh command above, again, and it should work.
Step 4: Change your Password and Select a new hostname for your Pi
- Enter the command below at the terminal prompt, and press the return key, to enter the Raspberry Pi configuration program.
sudo raspi-config
- Use the arrow keys to select the option to “Change User Password” (it may already be selected, as it’s likely the first option), then press return and follow the prompts to enter a new password and type it again to confirm it was entered correctly.
- When the password change has been confirmed, press return to accept the “OK” option and return to the raspi-config main menu.
- Be sure to save your password. I recommend using a Password Management tool like 1Password, which can give you secure access to your passwords from any browser as well as within mobile apps and browser plugins.
The default hostname for your Pi is “raspberrypi”. You used this to ssh into the pi when using the ssh pi@raspberrypi.local command, above. You can rename your Pi within raspi-config as follows.
- Within raspi-config, use the arrow keys to select the “Network Options” (likely the second option listed), then press the return key.
- Use the arrow keys to select “Hostname” (likely the first option that is already selected), then press the return key. You can read the general guidelines on acceptable hostnames, then press the return key to confirm <Ok>. You’ll be prompted to enter a hostname.
- Use the backspace key to delete the existing “raspberrypi” host name, then type in the new name for your Pi (I used pibot for my robot project, and talkpi for my Talking Yoda project – just be sure to remember your hostname because you’ll need it to log in and when editing programs to connect to your Pi) Press return, or move the arrows to select <Ok> and press return to return to the raspi-config main menu.
- Press the right arrow key twice to select <Finish> from within raspi-config, then press return to select the highlighted <Yes> when asked if you’d like to reboot your Pi.
Log back into your Pi with your new hostname and password
- VERY IMPORTANT – when logging in using ssh, be sure to use your new hostname in the place of the word ‘hostname’ in the command below:
ssh pi@hostname.local
Type in your new password, when asked, then press the return key. You should be logged in and you should notice that your command prompt after login shows pi@hostname where hostname is your Pi’s new hostname.
- NOTE: If you receive a scary warning with @ signs stating something like: “WARNING: POSSIBLE DNS SPOOFING DETECTED!”, this occurs because the identifying information being used for your Pi was used for another device. You’ll likely not see this, but if you do, simply try to log in, again.You may get an additional warning mentioning an ECDSA key fingerprint and asking “Are you sure you want to continue connecting (yes/no)?” type yes and press enter.
- You’ll then be prompted to enter pi@hostname.local’s password:Enter the password for your Pi (not your Mac), and press enter. You should now be properly logged in.
Step 5: Now (finally) use ifconfig to get your Pi’s MAC address
- From the command prompt in the terminal program, enter the command below, followed by the return key
ifconfig wlan0
- In the output that shows up in y our Terminal window, look for a block of text that begins with the word ether, followed by a set of six hex (letter-number) combinations, separated by five colons. This is the MAC address for your Pi that you can either give to your network administrator, or use in whatever system your campus has for registering the MAC address of smart devices (many Universities have a web page to handle this registration for things like video game consoles and Alexa speakers. If you are working on my campus at Boston College, you can register your Pi via the “Register Other Devices” section at https://helix.bc.edu).
Step 6: Create and configure a wpa_supplicant.conf file in your Pi’s boot directory
- Copy the line below and paste it into prompt in the Terminal program, then press return. This will launch the nano text-editor program by creating a new, blank file named wpa_supplicant.conf in a location where your Pi will need to find it:
nano /etc/wpa_supplicant/wpa_supplicant.conf
- Copy the text below and paste into the Terminal program. Using the arrow keys on your keyboard, move the cursor to change the lines as follows:
- If you’re following this tutorial, then you’re likely working on a campus-style network that allows smart devices to have their MAC address registered for use, and only then will allow these approved devices to operate without a userID and password (e.g. this is likely how you connect a game console or Amazon Echo to your campus network). On such networks, the line “key_mgmt=NONE” is typically included since verification is handled at the network level, rather than by the device sharing a userID and password. Also, be sure to change the ssid in between quotes to be the same name as your Wi-Fi network.
country=US
ctrl_interface=DIR=/var/run/wpa_supplicant GROUP=netdev
update_config=1

network={
    ssid="NETWORK-NAME"
    key_mgmt=NONE
}
Outside the US? Replace US, above, with one of these two-letter ISO 3166-1 Country Codes.
- If you’re following this tutorial, then you’re likely working on a campus-style network that allows smart devices to have their MAC address registered for use, and only then will allow these approved devices to operate without a userID and password (e.g. this is likely how you connect a game console or Amazon Echo to your campus network). On such networks, the line “key_mgmt=NONE” is typically included since verification is handled at the network level, rather than by the device sharing a userID and password. Also, be sure to change the ssid in between quotes to be the same name as your Wi-Fi network.
- Note that you can have more than one “network” block in this file if you regularly take your Pi and use it on multiple networks – just follow the ending curly brace of one network block with another “network={…}” block that includes the ssid, psk, and/or key_management setting. Home Wi-Fi users will have a network block that looks like the one below, replacing items in quotes with your Wi-Fi networks’ name and the Wi-Fi password (note there’s no “key_mgmt=NONE”, and instead the psk=”” contains your Wi-Fi network password:
network={ ssid="NETWORK-NAME" psk="NETWORK-PASSWORD" } - Now by type the following in to the terminal and pressing return:
sudo reboot
- Log in with ssh, as you did above, using your pi’s new username and password.
If you were following the Tutorial on Headless Raspberry Pi Setup and clicked to this section because you needed the special “campus-style” configuration that required finding a MAC address, you can now return to this earlier tutorial and resume with “Step 13: Update the Software on your Pi”
❖ ❖ ❖ ❖ ❖
Ready for more? Check out tutorials on Robotics, Wearables, App Development and more at: http://bit.ly/GallaugherYouTube. Please consider subscribing and do share with others who may be interested!
Want to learn to build apps? The same content I use in my semester-long online course (videos and tutorial content) is available for less than $25 via links you’ll find at https://gallaugher.com/swift.
Look for more updates at gallaugher.com as well as on Twitter @gallaugher