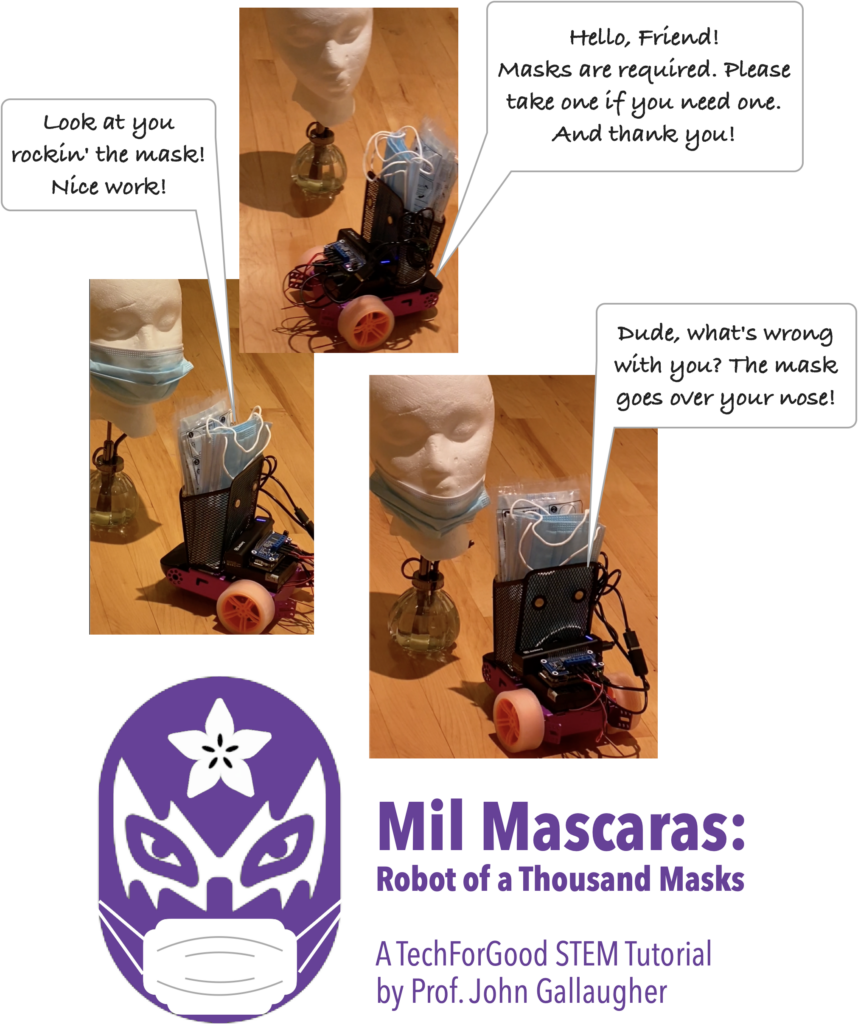
Named after Mexico’s greatest luchador (wrestler), the “man of a thousand masks”, this robot (pronounced Meel MASK-ah-Ras) has a basket that distributes PPE masks, is controlled via an iOS app, and can “speak” pre-recorded phrases triggered from the app that offer a mask, praise the masked, and troll the mask-challenged. The project can be easily adapted to distribute flyers, candy, convey a small pet (at your own risk), or whatever else you can fit in the basket. And you can add your own sound files and update the app to play other recorded phrases and sounds.
Video & GitHub Repo
- A beginner-friendly playlist with step-by-step instructions on this build can be found at: https://bit.ly/mil-mascaras
- The GitHub repo with python code and iOS/Swift project used in this project can be found at: https://github.com/gallaugher/mil-mascaras
Parts List
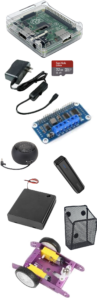 To build this project you’ll need:
- A Raspberry Pi with Header Pins, capable of connecting to a Wi-Fi network. At the time I wrote this tutorial, the least expensive option for this project is the Raspberry Pi 3 A+. The Pi Zero WH board is cheaper, but since this project uses sound and the Pi Zero doesn’t have a sound port while the other Pis do, you’d need to buy either an HDMI to VGA cable and plug a portable speaker with circular RCA jack into that cable’s input, or you’d need to buy a USB “sound card” (small dongle for the Pi), and a USB to microUSB cable (I couldn’t find any microUSB sound cards sold anywhere). The Pi 3 B+ is fine but we don’t need that many ports and it’ll just drain the battery faster. The Pi 4s are likely overkill.
- A case for your Pi. You only need the base part of the case – we won’t use a lid. I’m using this case for the Pi 3 A+. While a case isn’t strictly necessary, it’s nice to be able to velcro-tape the case to the rest of the bot, rather than having to put anything stick on the Pi itself. It’s also nice to have a lid to separate the Pi from the Motor Hat board.
- A microSD card reader appropriate for your computer’s USB ports (e.g. if you have a late-model Mac, make sure you get a card reader that has a microSD card slot AND a USB-C plug).
- A microSD card that works with the Pi. A minimum 8GB, max 32GB card is appropriate – this is an example of a card I’ve used for similar projects. It’s assumed that you’ve already added Raspberry Pi OS to the card, configured it to run on your Wi-Fi network, and that you’ve installed CircuitPython. If you’ve not done this before, step-by-step instructions, along with a setup tutorial video, are linked below:
- Setup a Raspberry Pi on a Mac without a keyboard or mouse (headless install)
- Install CircuitPython on a Raspberry Pi
- And if you follow the two tutorials above + plan more Pi projects, I recommend you Make a Backup Copy (image) of the Raspberry Pi SD Card so that you can quickly burn a working version to a new micro SD card in about 4 mins.
- A power supply and cable appropriate for your Raspberry Pi. I used this power supply and cable in this project – recommended because it has an on-off switch on the cable, which Pis don’t have.
- A WaveShare Motor Hat. You need an add-on board to power the motors, and this is the least expensive, no-solder option I could find. I’ll show you how to modify CircuitPython to work with this board.
- Any small, battery-powered speaker with a round pin RCA-style plug to match the jack on the Pi. A fine option is an inexpensive “hamburger” style speaker like the one I’ve used in this project. (If you’re using a Pi Zero, remember those boards don’t have an audio jack, so you’ll need a miniHDMI to VGA cable to add this jack.
- A 4AA battery pack with header pins. The one linked also has an on-off switch, highly recommended. You’ll also need 4AA batteries for powering it.
- Portable power for the Raspberry Pi (a mobile phone charger works well, you’ll need, and most chargers come with, a cable to connect this to the microUSB power port on the Pi – microUSB is an Android-style not an iPhone-style connection) – in the videos I use Jackery Mini 3350mAh Portable Charger that’s no longer available, but there are many like this one online, and you may already have one you can use.
- A robot chassis (this purple one from Adafruit was the perfect size). The red one I used in an earlier project may be too small for speakers and/or basket.
- A 20mm Height Metal Caster Bearing Wheel, which acts as the three-point robot’s front (or back) wheel.
- Two TT-style DC motors – these ones recommended by Adafruit should be fine. Be sure to buy two.
- Four (two for each motor) M3 25mm screw bolts and nuts. You can get what you need if you buy two of these Motor Mount for TT Gearbox DC Motors – L-Bracket Type, which have two screws each in them. Most hardware stores also carry them and they are very inexpensive. Also make sure you have the right-sized screw driver (which my screws use) or allen wrench, to match the screw type. Amazon sells a <$10 kit with 25 screws, bolts, the allen wrench, and a bunch more in other sizes.
- Two wheels that attach to TT-style motors. I used these orange wheels with clear tires, from Adafruit. Be sure to buy two.
- A small basket if you want your bot to cary masks, fliers, candy, etc. This wire Storage Basket Organizer from Amazon is what I used in this project and it fit perfectly.
Additional Supplies (that you may already have). Some are optional:
- A tiny flat-head screwdriver (2mm) to screw headers into the WaveShare motor hat.
- Velcro-style tape with an adhesive sticky-back on one side.
- Wire ties, or twist-tie wire, and/or wrapping velcro to attach the speaker to the chassis and to wrangle loose wires.
- Needle nose pliers (helpful) to hold nuts while you tighten the screw bolts to the robot chassis.
- Tweezers (helpful) so large adult fingers pass wires through small holes in chassis.
- Packing tape (to tape down motor wires under chassis), electrical tape (to identify wire groups), and/or masking tape and pen (to label wires or the “on” position on the battery pack.
Step-by-Step Instructions
Again, this project assumes you’ve got a Raspberry Pi with Raspberry Pi OS configured and running on your local Wi-Fi network, and that you’ve installed CircuitPython on the Pi. If not, see the step-by-step tutorials linked above. Also note that I’ve also published a step-by-step guide on Instructables that includes the exact steps from the two-videos, above, with the correct hostname (mil-mascaras) substituted in where it should be. You’ll find that at:
If this is your first time following these steps, you’ll note that a lot of time on Pi projects is spent on installing and configuring software, so once you get a Pi set up the way you’d like, it’s a good idea to Make a Backup Copy (image) of the Raspberry Pi SD Card so that you can quickly burn a working version to a new micro SD card in about 4 mins. This is especially useful to have on hand if you want to quickly start a new Pi project, or restart a current project after you’ve screwed something up.
Set up the Raspberry Pi so it can be Accessed by the Mac Finder
NOTE: If you don’t have a Mac, but still have an iOS device + want to put these files on your Raspberry Pi, you can follow the steps in the document at: https://gallaugher.com/wget-for-github/ When you’re done, you can continue with the tutorial from the section labeled: Configure Your Pi to Play Sound from the Speakers. Mac users, continue with the steps as shown below.
There are many ways to transfer files to a Raspberry Pi over Wi-Fi, but I prefer to set the Pi up so that a Mac can access the Pi in the Finder as if it were a hard disk stored on the network. We do this by installing the Netatalk software on the Pi. By the way, these steps are also covered in greater detail in the tutorial (and accompanying video) you can find at: http://bit.ly/pi-in-finder.
- Turn on the Raspberry Pi (it should take about 30 seconds to power up).
- Open the Terminal program (Mac users launch Spotlight by typing Command+space bar, then type Terminal and press the return key. Windows users, launch PuTTY).
- Log into your Raspberry Pi from the terminal prompt by typing the command below and pressing the return key, substituting hostname with the hostname for your Pi.
ssh [email protected]
-
- For this project I’m using the hostname mil-mascaras. If you want to change the hostname for the Pi used in this project, you can launch the raspi-config program by typing the command below and pressing the return key. You can then change the hostname by selecting System Options, then Hostname.
sudo raspi-config
Be sure to exit the raspi-config program if you’ve changed your hostname – you can reboot then use the ssh command to log back into your Pi when prompted (remember your Pi will take about 30 seconds to reboot). It’s very important to remember that if you change your Pi’s hostname, then this will be the new hostname that you use to log in using the ssh command, as listed above.
- For this project I’m using the hostname mil-mascaras. If you want to change the hostname for the Pi used in this project, you can launch the raspi-config program by typing the command below and pressing the return key. You can then change the hostname by selecting System Options, then Hostname.
- Install the netatalk software on your Pi by entering the command below at the prompt, then press return.
sudo apt-get install netatalkInstallation should take roughly 3 to 4 minutes with a fast Internet connection.
- Next, we need to configure the afp.conf file used by netatalk. To do this, enter the command below at the prompt and press return. The nano editor will run and the initial netatalk settings will show.
sudo nano /etc/netatalk/afp.conf
The ; (semicolon) character acts as a comment in this configuration file, so we’re going to remove semicolons from two lines.
- Use the arrow keys in nano and remove the ; character and additional space in front of the two lines that you see below (the ; characters have already been removed in the text, below):
[Homes]
basedir regex = /xxxx
- Now modify the last line that you see above, replacing xxxx with home, so that it reads:
basedir regex = /home
- Exit nano by typing control+x, then typing Y when asked to save. The filename to write should be correct, so press return and you will be returned to the prompt.
- Restart netatalk by entering the command below, then press the return key.
sudo systemctl restart netatalk
At this point netatalk should be properly installed on your Pi, it should be configured, and running with the proper configuration.
Download the project files (repo) from GitHub, then copy the sounds folder, filled with .mp3 files, to your Pi
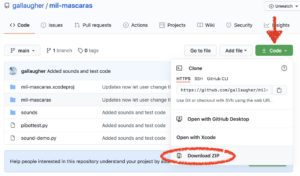 Visit the project’s GitHub page at https://github.com/gallaugher/mil-mascaras
- Click the green button in the upper-right corner labeled Code.
- Select “Download ZIP” from the drop-down menu that appears under this button. A Save As dialog box will appear.
- Select a location to save the .zip file and press return.
- Find the file that you just downloaded to your computer (it’s likely named mil-mascaras-main.zip). Double-click this file to “unzip” or decompress the file into the project’s various components. You should now see a folder named mil-mascaras-main. This is the main project folder, and all of the code and other files we’ll use in the project can be found here.
- You no longer need the .zip file, so you can throw that file away.
Now log into your Pi from your Mac’s Finder
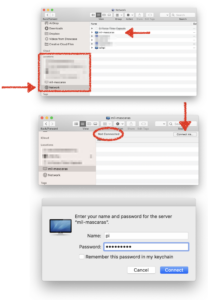 Open a new window in the Mac Finder using the Command+N shortcut.
- Scroll down in the left-hand pane of the new Finder window until you see the Locations section. Find, then select mil-mascaras (or your hostname) under Locations section.
If, for some reason, your Pi’s hostname isn’t showing under Locations, click Network under Locations, find your Pi’s hostname in the window where files are normally listed, and click it. - You’ll see “Not Connected” in the top left of the Finder window, select the “Connect As…” button in the top-right.
- In the dialog box, enter “pi” as the username, and enter your Raspberry Pi’s password in password, then select the “Connect” button. You should then be connected to your Raspberry Pi in the “pi” directory (shown on your Mac as “pi’s home“.
- Once you are connected, you’ll see a “pi’s home” folder in this Finder window. Double click this folder to open it. This is where we’ll copy the sounds folder to, using the steps, below.
Copy the sounds folder from your Mac to your Pi:
- Open the Finder window containing the mil-mascaras-main folder that you just decompressed to your computer. Within this folder you should see another folder named sounds. If you open this folder you should see several wav files labeled 0.mp3 and up, plus another labeled startup.mp3.
- It’s very important that you have .mp3 files with these names for use in this project. You can use the app to add or remove files by providing other descriptions, but your files will all need to be labeled 0.mp3, 1.mp3 … consecutively through the last file in the project. This project also expects there is a startup.mp3 file in this folder.
- Select and drag the sounds folder from the mil-mascaras-main window and drop it into the Finder window for your Pi, and release. Your Mac will now make a copy of the sounds folder and all of the files inside of it, and place this in the Pi.
- If you open the sounds folder on your Pi, then open one of the .mp3 files, you’ll hear it play through your Mac’s speakers.
Configure Your Pi to Play Sound from the Speakers
Getting audio to consistently play on a Raspberry Pi is a bit of a dark art, especially with different hardware options and configuration file changes in recent operating systems. The approach shown here, using a mini-speaker with standard circular pin-style RCA connector, should work just fine for this project if you follow the steps below.
- From the prompt, enter sudo halt, then wait for the green lights on your Pi to stop flashing and turn off (about 3-4 seconds), then turn off the power to your Pi (or unplug it if you don’t have an on/off switch on your power cable).
Pro-Tip for those that might use USB peripherals with a Pi: Unlike PCs, a Raspberry Pi will automatically reboot if you plug something into the USB port while it’s running, and your terminal session will hang and need to be restarted. - Plug your RCA-jack speaker into the Pi’s audio jack, then turn on your speaker (make sure it’s charged).
Remember, if you’re using a Pi Zero, those boards don’t have an audio jack, so you’ll need an miniHDMI to VGA (not microHDM) to get an audio jack, or you’ll need a USB sound card, and likely also a USB to microUSB adapter. - Turn on your Pi, open the Terminal program, and after the Pi starts up (about 30 seconds or so), log into your Pi using the proper hostname as you’ve done, above (e.g. ssh [email protected]).
USEFUL SIDE NOTE If you did a full Raspberry Pi OS install (not the Lite version I use in this build) you may here the phrase “To install the screen reader press control alt space” over and over again after booting with a speaker plugged in. To remove the file that produces this message, type the command below, then reboot.
sudo rm -f /etc/xdg/autostart/piwiz.desktop
Log into the Raspberry Pi and Install the PyGame Library
We’ve installed a Lite version of the Raspberry Pi software and it doesn’t have an mp3 player included, however the PyGame software will play .mp3 files, and we’ll run a script to play our files after we install PyGame.
The PyGame library adds commands to the python programming language so that we can more easily write code that plays sounds. We’ll be using PyGame commands to play sounds in our bot-controlling Python program. To add these libraries to the python language on our Pi:
- Type the command below and press the return key. When asked to confirm that it’s OK to use some of the SD card disk space, type Y. The installation should take approximately 3-5 minutes with a faster Internet connection.
sudo apt-get install python3-pygame
Now let’s write a very short program to run and test that PyGame is working.
- Enter the following command at the prompt and press return. This will open nano and begin creating a file named sound-demo.py
nano sound-demo.py - Copy the code below and paste it into nano.
import pygame import time # location of our sounds directory/folder fileLocation = "/home/pi/sounds/" # sets up to play sound and loads the "startup.mp3" sound pygame.mixer.init() pygame.mixer.music.load(fileLocation + "startup.mp3") speakerVolume = "0.5" # initially sets speaker at 50%, "1.0" is full volume pygame.mixer.music.set_volume(float(speakerVolume)) pygame.mixer.music.play() while pygame.mixer.music.get_busy() == True: continue - Exit nano by typing control+x, then typing Y when asked to save. The filename to write should be correct, so press return and you will be returned to the prompt.
Now execute the python program.
- Enter the command below and press the return key.
python3 sound-demo.py
You should hear the “startup.mp3” sound play through the speakers attached to your Pi. Congratulations! Your Pi has a voice!
The volume on your Pi is likely set to full. If you’d like to adjust the volume settings, you can use the alsamixer program. Simply type alsamixer at the prompt and press return. You’ll see a vertical bar representing volume. Pressing the down arrow will decrease volume, pressing the up arrow increases volume. Pressing the ESC key will exit the alsamixer program.
- Shut down your Raspberry Pi by typing the command below and pressing the return key:
sudo halt
- Turn off the power and unplug the Pi from its power supply.
Assemble the Robot and Wire Up the Motors and Battery Pack to the Motor Hat, and Hook up the Pi to Power and Speakers
 Place the purple chassis bottom side up.
- Attach the metal caster bearing wheel (the third wheel) to the front, bottom of the chassis. You can tell the front because it has a solid bar going from one side to the other. The back the chassis has a shorter bottom bar that doesn’t stretch from side to side and also has side arms that point up diagonally. Yours may be a different caster than the one I show in this video, but the one I recommend in the parts list above will work fine and should install fairly easily.
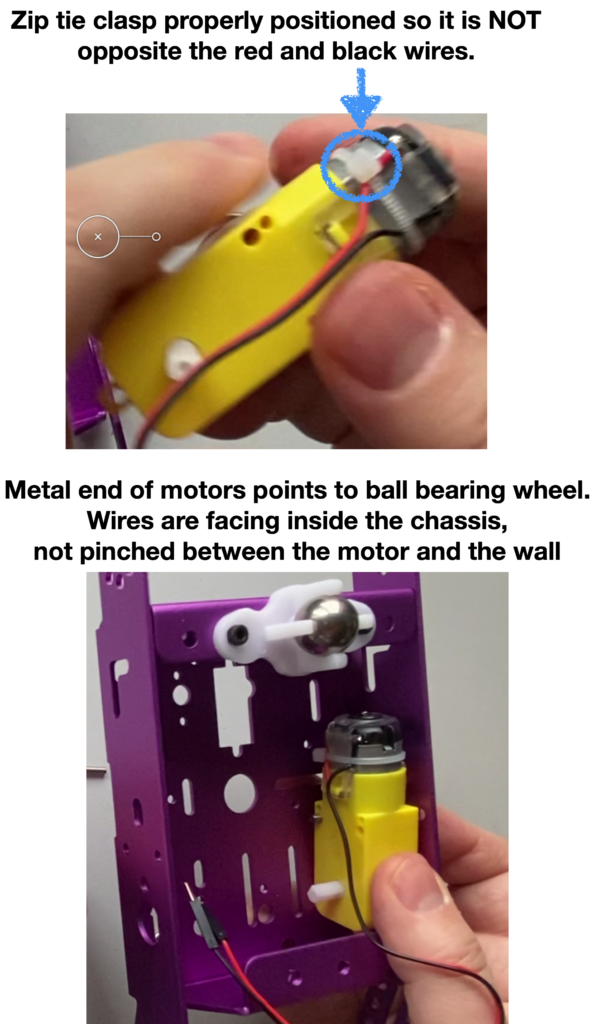
- Each TT motor may have a zip tie holding down the two delicate wires. Keep the zip tie on, but gently twist the closing clasp of the zip tie so that it’s not on the side of the motor directly opposite the wires, otherwise the motors will not be able to be mounted flush with the sides of the chassis (image at right shows correct placement).
- Insert the TT motor on the inside of the chassis. The metal part of the motor with the attached wires should be pointing toward the metal caster bearing wheel. The motor wires should be facing inward in the chassis, not pinched between the motor and the chassis (image at right shows placement).
- Insert the two 25 mm M3 screw bolts from outside chassis holes through the holes in the motor. Screw nuts to the inside end of the motor. Use a screw driver to tighten – they should be tight enough so the motor won’t come loose when running, but be sure not to over-tighten and squeeze or crack the plastic motor.
- Pass the two sets of motor wires through the largest circular hole at the back of the chassis deck (circled at right). It’s OK to peel the wires apart a bit if that makes it easier to pass them through the holes (tweezers can help here). Pro Tip: Label the wires so you can identify the red and black pair associated with each motor right or left (I use red tape for right, black for left, in my build). You can also secure the motor wires to the underside of the chassis deck using packing tape.
- Push the wheels into the outside axel of the TT motors, then turn the chassis over so it’s now balanced on its two back wheels and front caster.
- Place four charged AA batteries in the batter pack in the orientation shown on the inside of the pack. Reattach the battery pack’s lid and secure it with the small screw provided with the battery pack.
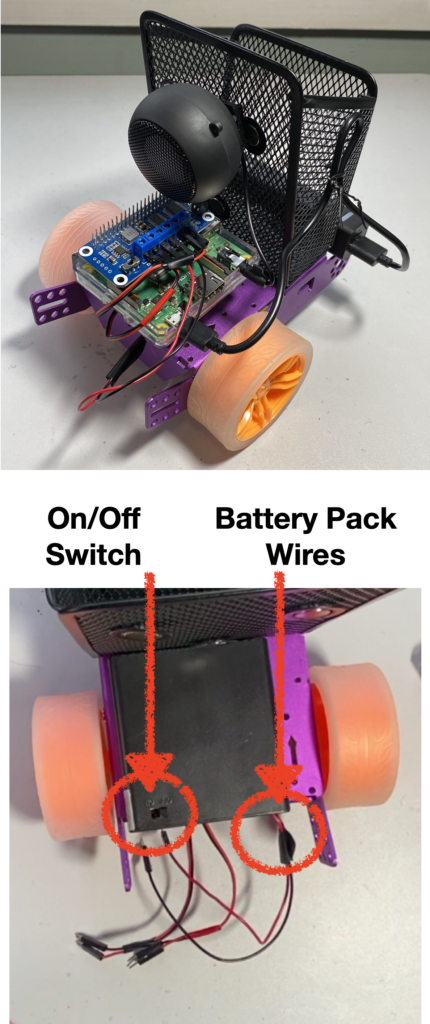
- Turn off the battery pack so you don’t pre-maturely drain the batteries. Pro tip: the on/off switch can be tough to read, so put a label on the battery pack to show where the on position is.
Take a look at the photo of the completed robot on your right, for reference, as you prepare to attach components to the chassis deck and complete wiring.
 Unplug the Pi from its power supply.
- While a case isn’t required, it’s recommended. If you have one, remove the SD card from the Pi and insert the Pi snugly into the case base. Then slide the SD card back in its slot.
- Line up the pins in the motor hat with the pins in on the Raspberry Pi. Make sure you don’t skip any pins, and that both rows are aligned. Push the motor hat into place. It should fit snugly and shouldn’t require forcing.
- Attach the basket to the front of the chassis deck, just above the ball bearing caster wheel. Use double-sided velcro tape to secure the basket to the deck. Two strips of velcro along the base should give an extra-strong fit.
- Attach the 4 AA battery pack to the back of the chassis deck. Make sure the on/off switch is accessible (oriented toward the back wheel in my build). Also make sure the battery pack wires come out toward the back of the robot (see image at right).
- Orient the Pi in the Pi case as shown in the completed build image at right. The full-size USB port is unused in this project, so it can face the basket. The audio jack and microUSB ports should be facing the right wheel. The Pi’s SD card slot is still accessible from the back. Before attaching the Pi with velcro tape, double-check to make sure you are placing it at a location where all wires are long enough to reach their terminals or ports. When satisfied with the positioning, use velcro tape to attach the Pi case with Pi in it to the battery pack.
- Loosen the screws on the motor hat’s blue terminals. Don’t completely unscrew them, you just want to loosen them enough so you can insert the header pins.
- Insert the header pins, one at a time, tightening the screws to snugly secure the pins in place. In this build, an appropriate orientation of wires is, left to right, is:
- left motor wires: red to MB2, black to MB1.
- battery pack wires: red to VIN, black to GND (make SURE these are definitely the wires coming from the battery pack).
- right motor wires: red to MA1, black to MA.
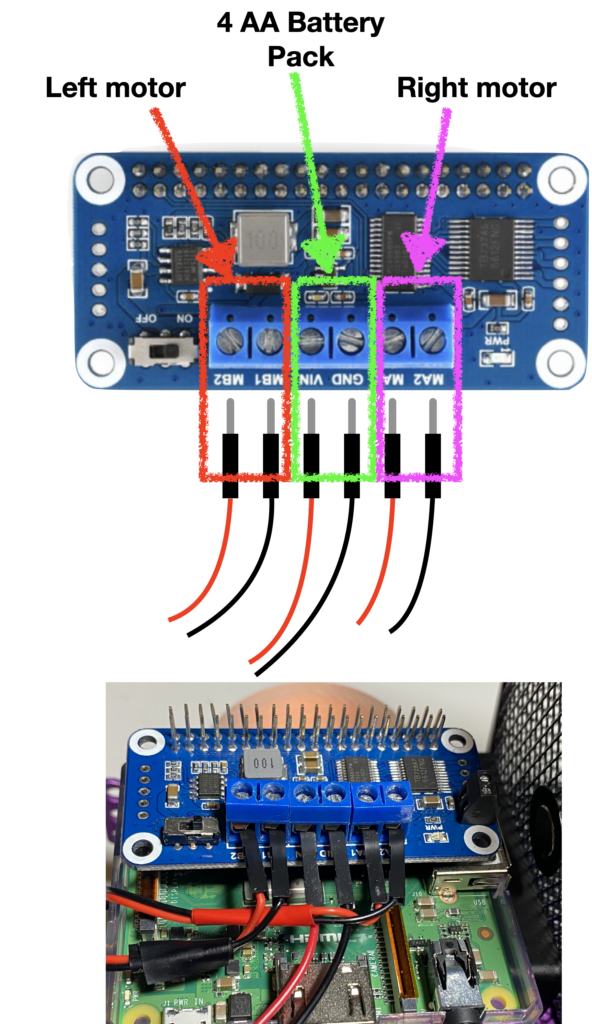 So reading left to right you should see red, black, red, black, red, black. VIN will always hold the red battery pack wire. GND will always hold the ground battery pack wire. If you switch the MA and MB wire pairs, then the right motor will run when the left button is pressed, and vice versa. If 1 and 2 motor wires are backward (black where red is and vice versa), then the wheels will run in the opposite direction. If, for some reason, your robot wheels run in an unexpected direction you can power things off and use the paragraph above as a guide to re-wiring things. There is a chance your motors may run in the opposite direction, so having to re-wire isn’t entirely unheard of, but hopefully this will work as shown.
Also know that the 4 AA battery pack powers the motor hat and motors. If the AA batteries in this pack are dead, or if you forget to turn this battery pack on, your Pi won’t move (don’t turn it on now, though).
- Turn off the speaker and plug it into the Pi’s audio jack. Attach the speaker to the basket using velcro tape. The speaker cable is very short, so make sure you’ve oriented it properly before pressing it on with velcro tape. You want to make sure that while the speaker is plugged in, you can also reach the speaker’s on/off switch, and you can plug the recharge cable into the speaker, too.
- Plug the mobile phone battery charger into the Pi’s microUSB power port. This battery powers the Pi and the speaker. We don’t need to turn the Pi on yet, so unplug the other end that attaches to the charger, or, if your charger has an on/off switch, turn the charger off.
- Secure the mobile phone battery to the robot chassis. Depending on the type of mobile phone battery charger you’re using, you might need to select a different location for the battery. For the battery recommended in the parts list above, it will fit when laid across the two arms that stick out of the side of the chassis, just past the ball bearing wheel. You can cut a strip of velcro tape in half and tape part of the battery to the short lip on the chassis, just above the arms, and the other to strip to the basket.
- Bundle any loose hanging battery wire and attach it to the basket with a wire tie or velcro tape.
Congratulations! Your robot is built and should look like the image above. Now we just need to install some additional software and get the iOS app.
Install Additional Circuit Python Libraries to Drive DC Motors
While the mobile phone battery that powers the Pi can be recharged, it’s a good idea to switch to the plugged in power supply when installing software so that you don’t risk losing power during an install.
- Make sure the AA batter pack that powers the Motor Hat is also turned off.
- Plug your Pi back into the power supply and (if your power supply has an on-off switch) turn it on.
- Launch the Terminal program on your Mac by pressing Command-Space to launch Spotlight, then type Terminal, and press the return key.
- Log into your Pi using the command below replacing hostname with your Pi’s hostname, then press the return key.
ssh pi@hostname.local
- Enter your Pi’s password when prompted, and press the return key.
Install the adafruit-circuitpython motorkit software:
- Enter the line below into the Terminal’s command prompt and press enter. This may take a while before the Terminal shows progress, but you should see the installation progressing and fully install in about a minute or two.
sudo pip3 install adafruit-circuitpython-motorkit
Modify CircuitPython’s adafruit-circuitpython-motorkit library to work with the Waveshare Motor Driver HAT
The Waveshare Motor Driver HAT product is nice and inexpensive, and requires no soldering, but it doesn’t work with CircuitPython. While Waveshare does have some python libraries on its website, I prefer to stick to the well supported CircuitPython libraries (it’ll be easy to find support for other projects). Unfortunately there are slight differences between the Waveshare HAT and the ones supported by Adafruit, but we can change two lines in the software library that you just downloaded so that the fantastic, elegant and easier-to-use CircuitPython code will work with the Waveshare. If you’re new to python, this may look pretty gnarly, but we’re only performing minor surgery to the library file – we’re just changing a portion of two lines – and the steps below will show you exactly what to do:
- Enter nano so that you can edit the adafruit_motorkit.py library by typing the entering the command below at the terminal command prompt, then press the return key. NOTE: there is a chance the python version has been upgraded since this tutorial was written. If you try the command below & see a blank screen, Ctrl-X out of nano, then at the prompt, perform ls /usr/local/lib. This should list the latest version of python used on your machine. Substitute out your latest version # instead of the 3.7 listed below.
sudo nano /usr/local/lib/python3.7/dist-packages/adafruit_motorkit.py
- If you press and hold down the arrow key on your keyboard and advance through about nine screens of code (I don’t give an exact line number because Adafruit may change this code), you’ll come to a python function named motor1 that looks like this:
def motor1(self):
Continue to press the down arrow to pass through about two more screens of code until you get to the return statement that looks like this:
return self._motor(1, (8, 9, 10), 1)
- Replace the middle three numbers, removing the 8, 9, and 10, and replacing them with 0, 1, 2 so the new statement looks like this:
return self._motor(1, (0, 1, 2), 1)
Just change the numbers, don’t remove or add any spaces, don’t add or remove spaces or tabs to the beginning, or remove any of the parentheses or commas. Only the three numbers underlined above should be changed. Python is REALLY picky about things like spaces and tabs, and if things fall out of alignment, the code might not run.
- You’ll notice that two lines after the return line that you just modified, a new python function starts that is named:
def motor2(self):
keep pressing the down arrow until you get to the return statement for this function. It should take about two screens full of code to get there, and it will look like this:
return self._motor(2, (13, 11, 12), 1)
- Replace the middle three numbers, removing the 13, 11, and 12, and replacing them with 5, 3, 4 so the new statement looks like this:
return self._motor(2, (5, 3, 4), 1)
Once again, just change the numbers, don’t remove or add any spaces, don’t add or remove spaces or tabs to the beginning, or remove any of the parentheses or commas. Only the three numbers underlined above should be changed.
- Type Control+x in nano to save these changes. Congratulations! You’ve just modified a CircuitPython library to work with the WaveShare Motor Shield!
Create a Python3 program to test the motors
- From the command prompt, type the following command to create a blank file using nano, named pibottest.py
nano pibottest.py
- Visit the project’s GitHub page at https://github.com/gallaugher/mil-mascaras
- Click the link for the file named pibottest.py. A page containing python code will open.
- Copy the python code on this page, return to the Terminal, and paste this code into nano.
- Type Control-X to quit nano.
- Type “Y” when asked if you’d like to save the file.
- Press the return key after the file name and you’ll be returned to the command prompt.
Now you’re ready to run the program.
- Stop your pi by typing sudo halt at the prompt and press return. Wait for the green light on the Pi to stop flashing and turn off (3-4 seconds), unplug the Pi from the power supply, plug the Pi back into the mobile phone battery, turn on the battery pack (if it has an on-off switch, most don’t), and after about 30 seconds, open the terminal and log back into your Pi.
- Turn on the AA battery case that powers the Motor Hat.
- Place your robot on the floor – give it about a square meter of room to roam.
- Execute the pibottest.py python program by entering the command below, followed by the return key.
python3 pibottest.py
You should notice the motors running as indicated by the code. Congratulations! You’re officially bot-building!
It’s common for the robot to turn slightly to the right or left when running. We’ll cover how to address this later in the tutorial.
IF FOR SOME REASON ONE OR BOTH WHEELS MOVE IN THE WRONG DIRECTION: this means the wires on the motor hat for the errant motor need to be flipped. For example, if the left wheel is running backward when it should be running forward, then power down the Pi and turn off the AA batter pack, then loosen the terminal screws for M1 and M2, flip the wires so the wire in M2 is now in M1 and M1 is now in M2, then tighten the terminal screws back up. If you then turn on the Pi and repeat the steps above, you should find your robot works properly.
IF FOR SOME REASON RIGHT IS LEFT AND LEFT IS RIGHT: You need to switch the MA and MB wheel wiring. If you’re not sure if the wheels are wired wrong, or backward, it’s OK to turn off the batter pack and Pi, then unscrew and remove the red and black pin for just one wheel (the MAs or MBs). By examining the only wheel connected you can tell if right means right or needs to be switched. Then you can deal with any wheels where the red and black wires need to be switched.
Install Mosquitto and Python Libraries to Use MQTT in Python Programs
We’re going to install more software on our Pi, so it’s a good idea to switch from using the mobile phone battery back to using the Pi power supply.
- Stop your pi by typing sudo halt at the prompt and press return. Wait for the green light on the Pi to stop flashing (3-4 seconds). Turn off the AA batter pack. Unplug the Pi from the mobile phone battery, plug the Pi back into the power supply, and after about 30 seconds, open the terminal and log back into your Pi.
Your Pi will use a communication standard known as MQTT to take messages from the iOS app and pass them to our Python program running on the Pi so the robot can move and play sounds. The Pi program that we’ll use to handle MQTT messaging is known as mosquitto (two ts in mosquitto for the two ts in MQTT).
- To install the mosquitto software, enter the command below at the command prompt and press the return key. As always, select “Y” if asked if you’d like to continue, even though the operation will use additional disk space. NOTE: Some of the installations may seem like they are stalling at first, but after a minute or two you should see text showing installation progress. The install should only take a minute or two.
sudo apt-get install mosquitto mosquitto-clients
Install the libraries for python support for MQTT by entering the command below and pressing the return key. The install sometimes takes a few seconds before messages appear, but the install should only take a minute or two.
-
sudo pip3 install paho-mqtt
Verify that the mosquitto broker software is now running by typing the command below and pressing the return key.
-
systemctl is-active mosquittoYou should see a message stating “active” if everything is working properly. If, for some reason, you don’t receive an “active” message, you can try rebooting your Pi, waiting about 30 seconds, login, then re-enter the command above.
Use systemctl to Automatically Run mosquitto Each Time Your Pi Boots
Enter the command below and press the return key to ensure that the mosquitto broker runs automatically every time you boot your Pi (no need to ssh in or type additional commands). This is exactly what we’ll want if this Pi is dedicated to our robotics project – ideally we’d just turn our robot on and the software we need will begin running.
-
sudo systemctl enable mosquitto.service
You can verify everything is working by stopping your Pi with the command:
-
sudo halt
- Wait 3-4 seconds until the green light on your Pi stop flashing and turns off. Then power your Pi off.
- Turn your Pi on again.
- Log back into your Pi using ssh
- Then retype the command below and press the return key.
systemctl is-active mosquittoYou should see “active”, confirming that mosquitto has begun running on its own.
Create a Subscriber Program to Listen for Robot Commands and Control to Our Robot
We’ll create a python program named control-pibot.py. This program will listen for messages from mosquitto. When it receives a message that it can use, it will respond by sending commands to our robot. For example, if the mosquitto broker receives a “forward” message from our iOS app, it will send the “forward” message to control-pibot.py, and this program will move our robot forward. Follow the steps below to create the control-pibot.py program:
- From the Terminal, enter the command below, followed by the return key, to create an empty file in nano named control-pibot.py
nano control-pibot.py
- Open a browser and visit the project’s GitHub page at: https://github.com/gallaugher/mil-mascaras.
- Find the link labeled control-pibot.py and click it. A page will open showing all of the code for this python program.
- Highlight and copy all of the lines in this python program.
- Return to the Terminal and paste the program into nano.
- IMPORTANT NOTE 1: ONLY if your Pi is named something other than “mil-mascaras”, then use the up arrow to move to the top of your code and find the line that reads:
serverAddress = “mil-mascaras”
Change “mil-mascaras” to the name of your Pi
- IMPORTANT NOTE 1: ONLY if your Pi is named something other than “mil-mascaras”, then use the up arrow to move to the top of your code and find the line that reads:
- Exit nano by typing Control-X
- Press the return key to save the file.
And at this point you should have a working MQTT subscriber running on the Pi that works in conjunction with the broker.
- Run the program by typing the line below at the command prompt, then press the return key.
python3 control-pibot.py
If things are working properly you’ll see a PyGame message print, that’s part of the PyGame libraries we’re using, then you’ll see confirmation messages that the program is subscribing and has subscribed.
You will NOT be returned to the command prompt in this terminal window because the program was run from within this window and it is continuing to execute.
Open a New Terminal Window then as a Test, Write a Command to “Publish” a Command to Move our Robot
- From with the Terminal program, select the Shell menu, then New Window > New Window with Profile – Basic (or use the shortcut Command-N). This will open up another terminal window and return you to the command prompt.
- From within this new window, enter the commands log in to your Pi using ssh (the same commands, Pi name, and password you’ve been using throughout this tutorial).
NOTE: The commands below assume your pi’s hostname is mil-mascaras. If your pi has a different hostname, then substitute that name where you see mi-mascaras in the mosquitto_pub commands, below.
- Try out a sound by entering the command below and pressing the return key. You should hear a sound coming from your speaker. If it works, feel free to experiment by changing the sounds (make sure any number corresponds to the name of a sound in your Pi’s “sounds” folder).
mosquitto_pub -h mil-mascaras.local -t "pibot/move" -m "0"
WARNING: You can also try out commands to move the robot. Be sure to turn on the AA battery pack, also, be sure to prop up your bot so the wheels aren’t touching the ground, otherwise be prepared to run after a runaway robot, and for it to possibly run into something.
- Enter the command below and press return to send a “forward” command to the mosquitto broker. Mosquitto will then relay this command to the subscriber program (control-pibot.py), which will tell your bot to start moving forward.
mosquitto_pub -h mil-mascaras.local -t "pibot/move" -m "forward"
IMPORTANT NOTE: if your Pi is NOT named mil-mascaras, then change mil-mascaras.local to your Pi’s hostname.
- Stop your bot by entering the command below, followed by the return key (as above, changing mil-mascaras.local to the name of your Pi if it’s not named pibot).
mosquitto_pub -h mil-mascaras.local -t "pibot/move" -m "stop"
If everything works, congratulations – your Pi is now set up to listen for and act on commands sent to it over the Internet (and that’s what we’ll do in the next video when we write an iOS app to control the robot).
Create a Service to Run control-pibot.py Automatically Whenever the Pi is Started
- Close the Terminal window where you entered the mosquitto_pub commands above (you can click the “Terminate” button when closing this window)
Look at the output in our first window. You should notice that underneath the “subscribing” and “subscribed” messages, there are now messages for each command you entered (e.g. to play a particular sound file, go forward, or stop). We wrote control-pibot.py to print out these messages when it receives them, so this is a nice additional check that confirms that our python program is receiving messages as a subscriber to our mosquitto server.
Finally – let’s make sure control-pibot.py will run each time our Pi is started. To do this, follow the steps in the final section:
- From the Terminal window, type Control-C to stop the execution of control-pibot.py. You can ignore the messages that show up as a result of stopping the program.
- Enter the command below to begin creating a nano file with the name of the service we are going to create, then press the return key.
sudo nano /lib/systemd/system/pibot-mqttclient.service
- Open a browser window and return to the GitHub repo for the project at: https://github.com/gallaugher/mil-mascaras
- Find and click on the link for the file named: pibot-mqttclient-service. This will open a page containing code for the service we’ll write to automatically run control-pibot.py after the Pi starts.
- Highlight all of the lines in the program in this file and copy them to the clipboard.
- Return to the Terminal and paste the program into nano.
- Type Command-X to exit nano, then the return key to save using the name we gave the file.
- Enter the command below and press the return key to run this new pibot-mqttclient-service file whenever we start this Pi.
sudo systemctl enable pibot-mqttclient.service
You should see a verification message that says something like:
Created symlink /etc/systemd/system/multi-user.target.wants/pibot-mqttclient.service → /lib/systemd/system/pibot-mqttclient.service
Verify Everything is Working As Expected
- Enter the command below and press enter to stop your Pi.
sudo halt
- Wait until the green light on the Pi stops flashing and turn off (3-4 min), then turn off power to the Pi and the battery pack attached to the Motor HAT.
- Plug the Pi back into the mobile phone battery, then turn on the AA battery pack and (if you it has an on/off switch) the mobile phone battery.
- After about 30 seconds to a minute you should hear the Pi play the startup message in its speaker. And you haven’t even logged into the terminal! Nice work!
Congratulations! You’ve got an Internet-aware robot set up and ready to receive orders. Up next – create an iOS App to Control Your Robot!
- You can now turn off your mobile phone battery and AA battery pack to preserve batteries while we set up the iOS app.
Install the App on your Device!
- Visit the App Store on your iOS device and download the Mil Mascaras app:
https://apps.apple.com/us/app/mil-mascaras/id1550345112
Be sure your robot is charged & turned on (mobile phone battery, 4AA battery pack, and speaker). Shortly after turning on your robot you should hear “Ready to Roll! Let’s Go!” Make sure your iOS device is on the same Wi-Fi network as your robot. Click the “Connect to Robot” button. Press a cell in the list of sounds to play that sound. Adjust the volume by moving the volume slider. Hold your finger down on an arrow button to begin moving in that direction and raise your finger to stop the robot. Have fun! - If you have and know how to use Xcode, you’re welcome to use the app you downloaded as part of the GitHub project GitHub repo at https://github.com/gallaugher/mil-mascaras. Just be sure to click the file named mil-mascaras.xcworkspace to open the project, NOT the .xcodeproj file. This project uses cocoapod libraries, so it needs to be opened with the .xcworkspace project.
No COVID Bro or Plague Princess in the app: Apparently this is a violation of Apple’s guidelines, BUT if you like these statements, they are still in your sounds file and you can simply click the gear symbol at the top of the app and add the “COVID Bro…” sound as sound 10 and “Plague Princess…” sound as sound 11. Consider them to be easter eggs 🙂
And if you got this far – congratulations! Please like, post a comment in YouTube, send a tweet, and consider subscribing. Interest in the channel & expansion of reach motivates me to continue to create more content like this. I’m honored to have been part of your robotics journey.
– Peace, Prof. G.
❖ ❖ ❖ ❖ ❖
BONUS: Adding Your Own Sounds + Changing Your Pi’s Hostname
Replacing Sounds
You can easily add your own sounds to this project. Replacing sounds involves two steps:
- Replacing sounds on the Raspberry Pi that powers the robot, and
- Using the iOS app to edit the list of sounds.
The project standardizes on sounds named numerically, starting with 0.mp3. To replace sounds or add new sounds.
- Use the Mac Finder to Connect To… the Raspberry Pi that controls your robot (techniques described in an earlier step when you first copied your sounds from the Mac to your Pi).
- Open the “Pi’s Home” directory, then open the “sounds” directory. You should now see the original sounds used in this project, labeled 0.mp3 through 11.mp3, plus startup.mp3 (which is the sound that plays when the robot first starts: “Ready to roll! Let’s go!”
- Replace or delete any of these files with new ones that you’d like to use. Just be sure that the files are numbered consecutively, beginning with 0.mp3. You can replace the startup sound, just make sure your new sound is also named startup.mp3.
Now edit the sound list in your iOS app:
NOTE: This does NOT change things on your Pi – it just changes the list on the app and should be used after you update sounds on your Pi to make your app’s sound list consistent with the sounds in the “sounds” folder on your Pi. Clicking on the first cell will always trigger the play of a sound named 0.mp3, clicking the 2nd will trigger 1.mp3, etc. The descriptions are only there to assist the app user in recognizing sounds, so if you enter the wrong description for a sound file, you’ll still hear whatever sound number was clicked.
To reorder the list of sounds:
- Click the cog wheel in the upper right-hand corner of the app. You’ll receive a warning about changing file names and host names. Click OK.
- To Move and reorder sounds, click the “Move/Delete” button. The list will change, adding red circles with minus signs for deletion on the left-hand side, and three lines on the right of each cell for moving.
- Move a cell by clicking and dragging the three lines on the right of the cell that you want to move. Release it in the space where you want it to be repositioned. You’ll now see the new name for that file in the left-hand side of this cell. E.g. if you drag 6.mp3 to 2.mp3, then the cell that you drag will now show as 2.mp3 and all of the cells below it will be renumbered in sequence.
- Click “Done” when you are done moving cells.
To change the description of a sound:
- Click the cell where you wish to change its description. You’ll see this description shown in a new app screen.
- Enter the new description and press Save. You’ll be returned to the list.
To delete a cell from the sounds list:
- You can do this either from within “Edit” mode by clicking the red minus delete circle on the left side of any cell that you want to delete, or you can swipe left on the cell to delete. Either gesture accomplishes the same thing.
After deleting a cell, the cells below the deleted cell will be renumbered accordingly. Again, make sure that what you see in your app corresponds with what you’ve got in your “sounds” file.
If you want to restore the original sound list and descriptions, simply delete the app from your iOS device and reinstall it. The list is stored in what Apple calls “User Defaults”, and is specific to each device, so if you have this app on multiple devices, you’ll have to update the access list on each device.
❖ ❖ ❖ ❖ ❖
Ready for more? Check out tutorials on Robotics, Wearables, App Development and more at: https://youtube.com/profgallaugher. Please consider subscribing and do share with others who may be interested!
Look for more updates at gallaugher.com as well as on Twitter @gallaugher